
Step 7
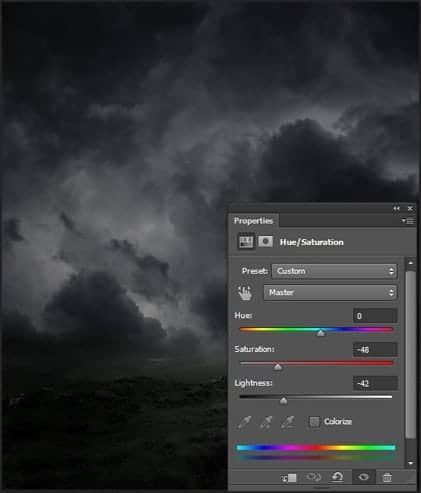
Add Hue/Saturation adjustment layer for sky to dark it and set the set the hue to 0, saturation to -48 and lightness to -42 setting as shown in the image.
Step 8
Now, place the moon image above the sky layer as shown in the image.
Step 9
Add a layer mask to moon image and pick a soft black brush then paint on the layer mask as shown in the image below. You can see the result on layer mask.
Step 10
Add Hue/Saturation adjustment layer to the and clip it to moon layer. Set the set the hue to 0, saturation to -100 and lightness to -18
Step 11
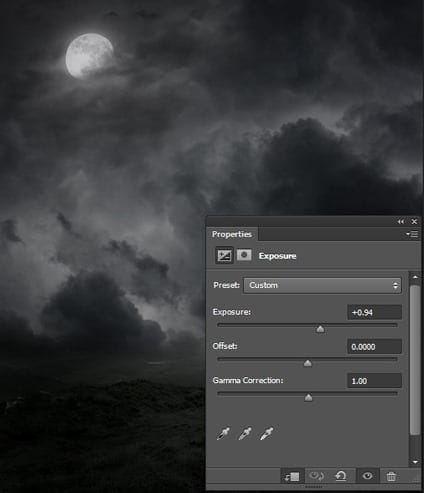
Next, Add a Exposure adjustment layer to moon and clip it to moon layer. Select the all moon layer and group them. Name that group moon .
Step 12
Here is the result and process so far.
Step 13
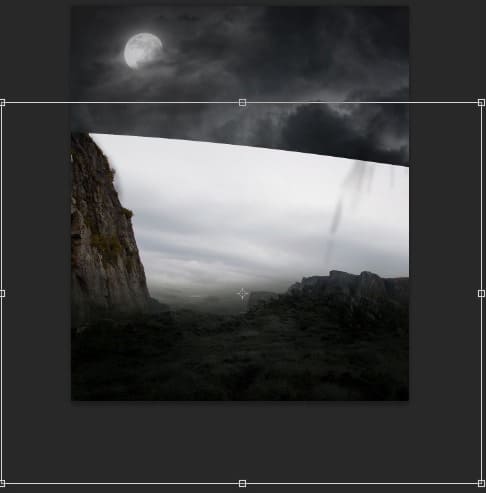
We have a created a dark atmosphere and it time to add the mountain image. So, place the mountain 1 image below the base group and activate the transform tool by pressing CTRL+T. Then right click and choose warp tool. Alter the shape of image as shown in the image .
Step 14
Now transform the image as shown in the image after warping it and move it to left.
Step 15
Add a layer mask to the mountain 1 and pick the soft round black brush. Start painting on layer mask as shown in the image. You can see the result on layer mask .
Step 16
To blend the mountain to the scene, I Added a photo filter adjustment layer, choose color #055ae5 and also added a Hue/Saturation adjustment layer don’t forget to clip these adjustments layers to the mountains.
 <
<Step 17
Now, place the mountain 2 image below the mountain 1. Add a layer mask to it and paint with soft black brush to blend it properly.
Step 18
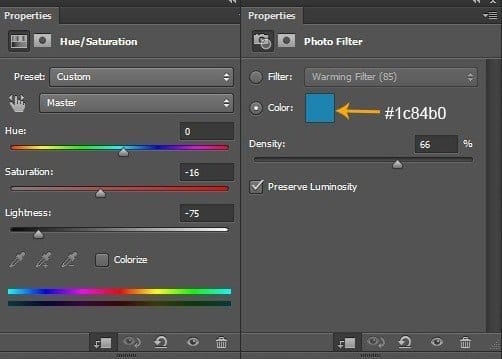
Add a Hue/Saturation and Photo filter adjustment layer. In photo filter adjustment layer choose color #1c84b0. Clip both adjustment layer to this image. As always you can see the setting in the image below.

Step 19
Now, duplicate the mountain 1 image and name it m1 copy. Flip it horizontally by activating the transform tool and right click on it then choose flip horizontal.
Step 20
Place it to left side and activate the transform tool then scale it as shown in the image .13 responses to “Creepy Lady on a Dark Mountain – Learn How to Create This Composite in Photoshop”
-
Nice work. Thanks for sharing.
-
Awesome post I love it
-
as always, superb tutorial. Thanks!
-
as always, superb tutorial. Thanks!
-
as always, superb tutorial. thanks a lot
-
Nice Tutorial. I always get the best photo manipulation tutorials here… Great going
-
入木三分
-
спасибо за урок!
-
That’s really stunning, Bunty. Great work!
-
hoo
-
Super fotomanipulacja
-
molto interessante impegnativo ma chiaro


Leave a Reply