


The opacity of the layer is set to 90%.
Step 17
Add Adjustment Layer “Curves”

Step 18
Add Adjustment Layer “Color Balance”

Step 19
Add Adjustment Layer “Hue/Saturation”

Step 20
Add Adjustment Layer “Curves” and press Ctrl/Cmd + I to invert and use Brush Tool(B) Soft Round with foreground color white and paint the right side. Blend mode change to Screen.


Step 21
Create a new layer and use Soft Round Brush Tool(B) foreground color set to #76543d and paint balloons with a brush flow of 10%. Opacity set to 90%.

Step 22
Go to File > Place and select Pyramids.


Now create a layer mask and use a soft round brush tool(B) with the foreground color black and start removing the background around the pyramids.

Put pyramids to folder (Ctrl/Cmd +G)

Step 23
Add Adjustment Layer “Curves”

Step 24
Add Adjustment Layer “Brightness/Contrast”

Step 25
Add Adjustment Layer “Color Balance”

Step 26
Add Adjustment Layer “Curves” and press Ctrl/Cmd + I to invert. Then use Brush Tool(B) Soft Round with foreground color white and paint on Highlights parts. Opacity set to 20%


Step 27
Add Adjustment Layer “Curves” and press Ctrl/Cmd + I to invert. Then use Brush Tool(B) Soft Round with foreground color white and paint on dark parts.


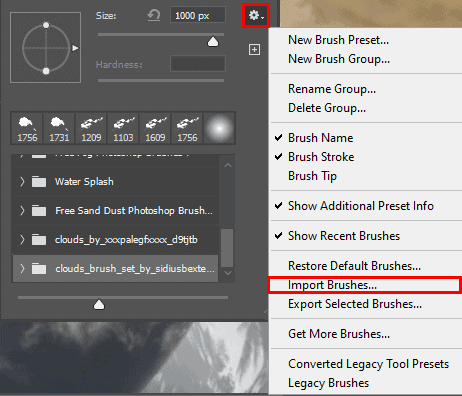
Step 28
Next, we need to import brushes. Select a Brush Tool(B) and right-click on the background. Now click on the gear icon and Import Brushes (Select a downloaded brush).
Step 29
Now create a new layer and select cloud brush. Foreground color for clouds set to #5e453a and paint. Flow set to 10%.

Create another layer and use the Soft Round brush tool(B) foreground color use the same as previous layer and paint, also flow set to 10%. Opacity reduces to 24%.


Step 30
Add Adjustment Layer “Color Balance”

Step 31
Next, place texture photo Go to File > Place and select Texture. Then place it on our work canvas. Then position the image with the transform tool (Ctrl / Cmd + T). Hold Alt + Shift and rasterize like the image below. In Photoshop CC only hold Alt to rasterize all sides together.


Blend mode change to Soft Light with Opacity of 36%. Create a layer mask and use Brush Tool(B) Soft Round with foreground color black and delete upper part of the texture.
One response to “Create a Desert City Photo Manipulation”
-

The original desert photo’s lines on the road make the image look funny. I would have lessened the intensity of the right yellow line and the white middle lines to make a more complete photo. Also the person is tiny compared to the road and there’s no sand/dust in the foreground making the image look more fake. I understand the image has to be as raw as possible for the article but if you put a polished final with the little details people would appreciate that more. Because that’s the artistic touch that kind of needs to be taught. What separates a B+ and an A+.
Leave a Reply