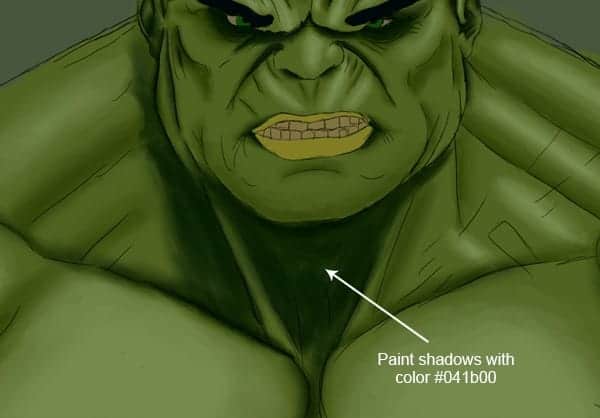

Step 17 Shadows
Based on light your shadows will fall in opposite direction of light source. In our scene shadow will fall on left side of character. Proper shadows gives the character a natural look. If you add shadows to everywhere, then your scene may not look natural.

Step 18
Select a round brush with size 50 pixels and hardness 75%. Press F5 to access brush panel, set “Opacity Jitter” to “Pen Pressure”. Change the brush color to #041b00 and paint shadows below neck area.

Step 19
Paint some more shadows on face too to make it realistic. Reduce your brush size to 30 pixels and add shadows to the left ear, cheek, etc. Change the brush size when necessary to get desired shadows.

Step 20
Change your brush size to 50 pixels color to #030602 and add some dark shadows to the character.

Step 21
We have added sufficient shadows to the character, but you will notice that the brush strokes visible in character. To fix that we will smooth the blending we did in previous steps. Select a soft round brush of size 50 pixels and opacity to 70%. Open brush panel by pressing “F5” and set “Opacity Jitter” & “Flow Jitter” to “Pen Pressure”. Turn “Smoothing” ON and set “Spacing” to 11%. Save this brush with name “Smooth blending brush”.


Step 22
Now select the brush you created in last step and start smooth blending by repeating step 12. With your soft brush you will get perfectly smooth blending.


Step 23
Repeat step 22 and smooth all other parts of the character. Pay more attention while smoothing small details like face, ears, eyes, etc. Avoid over smoothing because if you smooth too much, you may lose some finer details in character.


Step 24
Now it’s time to add some fine details in face including wrinkles, edges, etc. Turn off your sketch layer, set your brush size to 2 pixels and set your “opacity jitter” to “pen pressure”. Save this brush and rename it to “Sketch brush”. Change your brush color to #142406 and start adding details to the nose of character.


Step 25
Similarly add details below eyes and smooth the details where necessary, change your brush size whenever needed to get better features in the face of character. Don’t forget to set Opacity Jitter to pen pressure in your brush setting. This is important and would be used everywhere so keep the brush setting same as in this step and use it in this tutorial instead a default brush.
21 responses to “Create an Amazing CG Illustration of The Incredible Hulk”
-
How do you download blur’s good brush 4.1 pro :(
-
güzel video abone oldum oh
-
bu video mu gerizekalı
-
-
k
-
Stuck in step 12 :(
-
What are you stuck with? If you’re using a mouse, the pen pressure won’t work. So you’ll need to adjust the brush opacity manually.
-
-
Dude you’re insane … i love your work. I followed this with procreate because the concepts are the same.
-
Tengo un problema con Photoshop me. Podrían ayudar es sobre el error 22
-
Please Sir photoshop serial number
-
Who else loves unlocked cell phones ?
-
I do pls aw can i get access to it
-
-
That is one badass hulk drawing!
-
Ye bina Pen Tablet ke kaise draw hongi starting lines, Please jaldi batana mujhe ek Digital Painting jaldi banani hai.
-
These are amazing. Super creative and imaginative and all things that are good.
-
how do you do step #6.. I cant find the color palate.. help
-
There are very incredible themes!.Thank you for your amazing effort.
-
WoW! Thanks so much for the tutorial and specially the PSD file. I learnt a lot more than any other tutorial.
-
How the heck are ya gonna put stitches on the Hulk?
-
A good tutorial but “tablet” should be listed in the tutorial resources.
-
xalk
-
A good post with the technique of illustrator design.


Leave a Reply