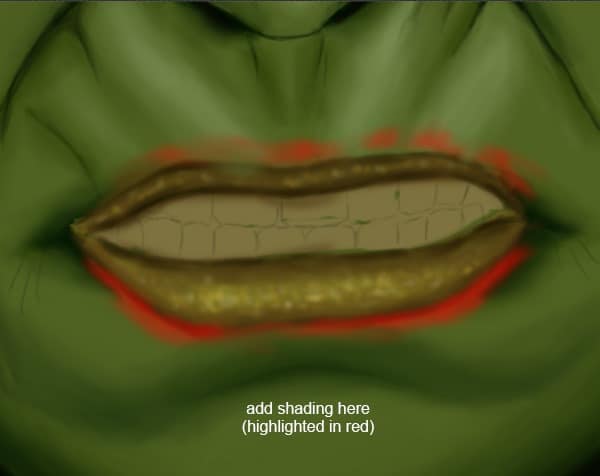
Step 37
We will need to define the outline of lips that is blurry right now. Hence, change your brush color to #302605 and add shadows to define the lips edges.

Step 38
Add more shading to the lips with a soft brush of size 15 pixels and color #56431a. Set “Opacity Jitter” & “Flow Jitter” to pen pressure to get better results. Save this brush and rename it to “smooth brush”.


Step 39
Keep selected the smooth brush and brush around mouth to define its edges with color #22340b and 67722f.


Step 40
Change your brush color to #bcbb86, reduce its hardness to 25%. Brush around upper lip edges to add some lights to give it a natural look.


Step 41 – Painting the teeth
It’s time to paint teeth of the character. Select “sketch” brush which you created in earlier steps, change its size to 8 pixels start painting teeth of the character with color #7a7036. Change brush color to #7f855b and add some highlight of the teeth.


Step 42
Change your brush color to #6d6738 to add shadows to the teeth to give them depth and natural look. Pay special attention while adding shadows between teeth gaps, excessive shadows can darken the teeth and lose the details.

Step 43
Now we will add light to the teeth. Change your brush color to #8d9377 and paint some lights to the teeth to give it natural look. Add lights to the teeth based on the position of light source that we defined in earlier steps.

Step 44
Now we will add dark shadow behind teeth row to give character’s mouth depth. Select a sketch brush with hardness 75% and color #090900 and brush behind the teeth row.

Step 45
Now we will add dark shadows to the lips. Change your brush size to 5 pixels and color to #090900 and add shadows to add the depth. Change the brush size to 35 pixels & hardness to 0%, turn “Opacity Jitter” & “Flow Jitter” to pen pressure and add some more shadows around the edge of lips to give it natural look. Save this brush and rename it to “smoothing”.


Step 46
Now we will add smooth to the skin to remove roughness. Select the “smoothing” brush, change its color to #081603 and brush the cheek, neck, wrinkles, nose to highlight the expression.
21 responses to “Create an Amazing CG Illustration of The Incredible Hulk”
-
How do you download blur’s good brush 4.1 pro :(
-
güzel video abone oldum oh
-
bu video mu gerizekalı
-
-
k
-
Stuck in step 12 :(
-
What are you stuck with? If you’re using a mouse, the pen pressure won’t work. So you’ll need to adjust the brush opacity manually.
-
-
Dude you’re insane … i love your work. I followed this with procreate because the concepts are the same.
-
Tengo un problema con Photoshop me. Podrían ayudar es sobre el error 22
-
Please Sir photoshop serial number
-
Who else loves unlocked cell phones ?
-
I do pls aw can i get access to it
-
-
That is one badass hulk drawing!
-
Ye bina Pen Tablet ke kaise draw hongi starting lines, Please jaldi batana mujhe ek Digital Painting jaldi banani hai.
-
These are amazing. Super creative and imaginative and all things that are good.
-
how do you do step #6.. I cant find the color palate.. help
-
There are very incredible themes!.Thank you for your amazing effort.
-
WoW! Thanks so much for the tutorial and specially the PSD file. I learnt a lot more than any other tutorial.
-
How the heck are ya gonna put stitches on the Hulk?
-
A good tutorial but “tablet” should be listed in the tutorial resources.
-
xalk
-
A good post with the technique of illustrator design.


Leave a Reply