Digital painting is an incredible way of creating awesome arts. In this tutorial you will learn how to create a hulk digital painting by following these simple steps. Here, I will share some fundamental techniques used while creating this painting.
Preview of Final Results

Tutorial Resources
Step 1
Before starting, we will first understand some basics important for digital painting.
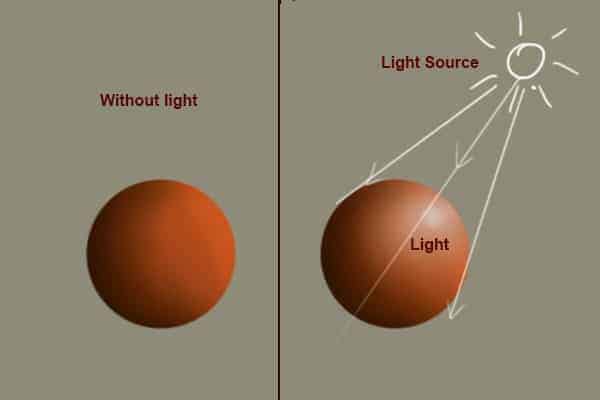
Light
Lights plays a crucial role in digital painting that affects several other factors like shadows, shading, environment, etc. It is important to decide your light source in the scene before going too far with painting to avoid the re-work on lighting and spending several hours fixing them.

Shadow
Proper shadows is a very important factor that gives an object realism. It gives depth to the scene and give it natural look. Poor shadows can make whole scene fake looking and objects hanging in the space without shadows. Always double-check the shadows, focus on details how shadows forms in different light source.

Blending
Smooth blending of colors is very important to get the desired result. Without proper blending your scene may look unfinished and crowded with brush strokes. There are several methods of blending the colors. You can blend your colors with blending tools or you can use a soft brush & color picker to blend your colors.

Step 2
Now we are aware about the painting basics that are crucial for a good digital painting. Let’s start by creating a new document of size 3000 X 4000 pixels dimension. It’s better to start with a large document because you won’t like to recreate the whole art again when you want to print it in bigger size.

Step 3
In this tutorial we are going to use brush tool extensively and a tablet to use the brush tool at its full potential. Select a hard round brush by pressing “B”, now press F5 to access brush panel. Set the ‘Flow Jitter’ to pen pressure and check ‘smoothing’ on.

Step 4
Set your brush size to 4 pixels and start sketching rough outline of the character. This is a rough sketch hence you need not to spend too much time to make your stroke perfect. Just rough stroke would work.
21 responses to “Create an Amazing CG Illustration of The Incredible Hulk”
-
How do you download blur’s good brush 4.1 pro :(
-
güzel video abone oldum oh
-
bu video mu gerizekalı
-
-
k
-
Stuck in step 12 :(
-
What are you stuck with? If you’re using a mouse, the pen pressure won’t work. So you’ll need to adjust the brush opacity manually.
-
-
Dude you’re insane … i love your work. I followed this with procreate because the concepts are the same.
-
Tengo un problema con Photoshop me. Podrían ayudar es sobre el error 22
-
Please Sir photoshop serial number
-
Who else loves unlocked cell phones ?
-
I do pls aw can i get access to it
-
-
That is one badass hulk drawing!
-
Ye bina Pen Tablet ke kaise draw hongi starting lines, Please jaldi batana mujhe ek Digital Painting jaldi banani hai.
-
These are amazing. Super creative and imaginative and all things that are good.
-
how do you do step #6.. I cant find the color palate.. help
-
There are very incredible themes!.Thank you for your amazing effort.
-
WoW! Thanks so much for the tutorial and specially the PSD file. I learnt a lot more than any other tutorial.
-
How the heck are ya gonna put stitches on the Hulk?
-
A good tutorial but “tablet” should be listed in the tutorial resources.
-
xalk
-
A good post with the technique of illustrator design.


Leave a Reply to CzarCancel reply