Turn any photo into a dot grid artwork with these Photoshop actions. You'll get great results with dots that change size. They get larger in brighter areas and smaller in darker areas. Free download available.
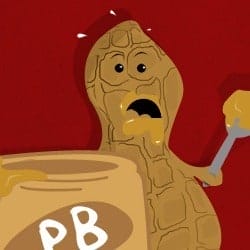
In this tutorial you will learn how to create comic style characters in Photoshop. This tutorial will require extensive use of the pen tool.
Preview of Final Results

Download the PSD
Comic Illustration.zip | 15.36 MB
Download from Website
Comic Illustration Photoshop Tutorial
Tutorial Resources
· Texture - Tofurious
Step 1
First, I started off drawing my illustration on paper and scanned it into my computer. Open up Photoshop and create a new document. File>New. The size of my document is 3900px x 3000px with a resolution of 300. Just in case I want to use it later in another project.

Step 2
Fill the background (paint bucket tool) with any color you like, for this tutorial I will be using a brownish/red color #9d1313.

Step 3
Apply the texture from your Resources. Open the texture up in Photoshop and Drag and Drop into your image. Then change the layer style to Linear Burn with an Opacity of 47%.

Step 4
Now we will create some background lines to help us with the placement of the peanuts. Create a new layer below your texture layer. Before grabbing your pen tool change your paint brush tool to these settings.

Step 5
Take your pen tool and create the path. Make sure your Foreground and Background colors are set to black and white. Right click the path and select Stroke Path. Make sure the 'Tool' is set to brush.


Step 6
Repeat the last steps to create the other path.

Step 7
Change the Opacity of this line layer to 13%.

Step 8
Now we will start with the peanut jar. Note: it is always a good idea to place your layers into their own folders. Ex. background, jar, peanut etc. Create a new layer and name it jar (place this in a folder). Use your pen tool and create the shape of a jar.

Step 9
Right click the path and select 'Make Selection'. Fill the selection with any color, we will be changing it in the next step.

Step 10
Apply these layer styles to this layer. Starting with Color Overlay. To bring up the Layer Styles Dialog box just double click the jar layer. The color I'm using is #D6A559 but choose whatever color suits your image

Stroke: #A87540

Step 11
Now we will create the label. Create a new layer and grab your pen tool and start making your label.

Step 12
Right click the path and select 'Make Selection'. And fill the selection with #A87540

Step 13
Use the pen tool or your favorite font to create the name. For this tutorial I will be using the letters "PB" for peanut butter. I created my letters by using the pen tool and the color #FFFFFF.

Step 14
Create a new layer and use the Elliptical Marquee tool to create the top of the inside of the jar and fill it with #A87540.

Step 15
Create a new layer and with your pen tool create the shadow. Make a selection of it and fill it with #432305

Step 16
Change the Opacity to 18%.

Step 17
Before using your pen tool change the settings of your Paint brush tool to a 17px Hard round brush. Use your pen tool to create the path at the top of the jar. Change the foreground color to #A87540. Create your path and right click the path and select 'Stroke Path'. Make another line.

Step 18
Time to create the peanut butter. Create a new layer and make some peanut butter on the outside edge of the jar. Fill the selection with #C6912A

Step 19
Add this Layer Style.

Step 20
Now we will add some highlights to the peanut butter. Create a new layer and with a 25 px soft round brush make two dots along the peanut butter outline.

Step 21
Use your smudge tool to smooth out the dots. I set my smudge tool to 33% with a strength of 81%. Change the opacity of this layer to 30%

Use your pen tool and create another highlight at the tip using the color #FFFFFF

Step 22
Find your 'jar' layer and duplicate it (right click layer then duplicate). Change the Color Overlay and make the stroke invisible by clicking the eye icon next to the stroke layer. Change the opacity of this layer to 14%. Move it a few pixels to the left.

Step 23
Now we're finished with the jar, time to start on one of the peanuts. Remember to create a new folder for the 1st peanut and place it beneath the jar folder. Create a new layer and with your pen tool create the shape of the peanut. Right click the path and make a selection from it and fill it with #b2833b

Step 24
Create a new layer above the shape of the peanut. Use the pen tool to create the shape of the shadow and make a selection of it and fill it with #432305.

Step 25
Change the Opacity of this layer 18%.

Step 26
Now we will add detail to the outer shell of the peanut. Using your pen tool create a irregular shape and fill it with #432305.

Step 27
Create some more in the same layer so that they look like the image below.

Step 28
Change the opacity of this layer to 7%.

Step 29
Now its time to create outlines on the peanut. Before doing this with your pen tool take your paint brush tool and change the settings to 4px hard round brush and the foreground to #432305. Use the pen tool and create a outline.

Right click the path and select Stroke Path, click ok

Step 30
Create the rest of the outlines and change the opacity of this layer to 75%.

Step 31
Create a layer mask by selecting the icon that looks like a square with a circle on top. Make sure that your foreground and background is black and white. And with a soft round brush erase away some of the outlines.

Step 32
Now for the next couple of steps create a new layer for each one and use your pen tool to create the spoon, peanut butter and the hand covering up the spoon. Colors I used:
Spoon: #8d8b8b
Peanut Butter: #c6912a
Hand: #b2833b

Step 33
Add this layer style to the peanut butter.

Step 34
Under the hand layer, create a new layer and with a 50px soft round brush (#000000) add some shadow with the paint brush tool.

Step 35
Create a new layer and with the pen tool create the mouth and the peanut around the mouth.


Step 36
Add some highlights.

Step 37
With a 50px hard round brush use it to make the eyes and a smaller brush for the pupils.

Step 38
Use the pen tool to create the eyebrows but remember to set the paint brush to a small pixel amount while using a soft round brush.

Step 39
Also use the pen tool to create the sweat beads flying off its head.

Step 40
Create the shadows of the peanut by filling them with black and changing the opacity to 14%.

Step 41
Repeat the same steps that you used to make the first peanut to create the other two. Note: the color that I used for the child peanut is #76420d and the mother's lips is #9d1313. Also don't forget the shadows and placing certain layers into groups. Here is the process:


Final Results

Download the PSD
Comic Illustration.zip | 15.36 MB
Download from Website
13 comments on “How to Create a Comic Illustration in Photoshop”
yeah i like it,you are creative
I love your all icon sets….and start to bookmark this!!!
hi I paul
MMMM yall should be very ashamed showin little kids to eat thier own family.....This is for all the little kids dont eat your own people like this picture is encourging to do!!Also this is very sad poor little kid forced to eat his people.
i like it !!!!!
Romans dad
this is great! thanks for sharing the knowledge.
The picture is so cute! I love it. It is very easy!
Great tutorial and some cool tips. Thanks for posting.
I like it
Cute picture...lots of great techniques for a beginner like me. Thanks!
Very good tutorial. Thank you.
Cute pic! Lol