Luminar AI lets you turn your ideas into reality with powerful, intelligent AI. Download the photo editor and see how you can completely transform your photos in a few clicks.
Learn how to paint this car part using Photoshop. This advanced tutorial will show you how to shade and create reflections to create a realistic metal intercooler. A PSD of the outline is included to get you started.
Preview of Final Results

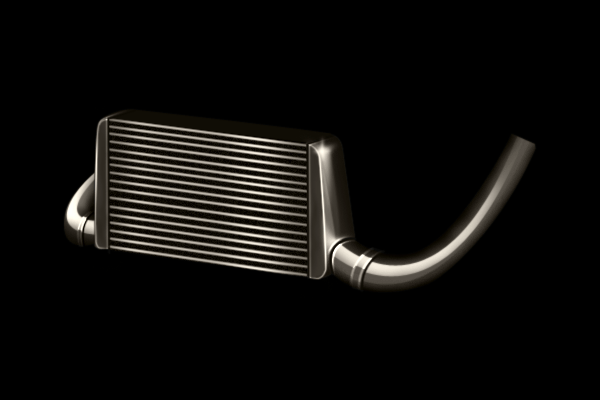
Paint a Realistic Intercooler Photoshop Tutorial
Step 1
Open a new file in Photoshop, with Transparent background. The size I choose is 600x300 pixels. Then rename the Layer 1, in Background. Fill it with black colour. Make a new layer and name it, Contour or Shape, or, what you want, to know that is the contour. Take the Pentool (P), and draw the intercooler contour.( I've choose this shape, because it's a very popular intercooler shape, that many choppers use, and because this shape is " full". You can see 90% of intercooler's interface. ) When you finished the shape, with Brush Tool (B) set at 2px and a green colour, with Pen Tool, right click on the file and choose Stroke Path. After that, press once the Delete button, on your keyboard, to delete the path. If you want to skip this step, you can download the PSD file below.

Step 2
Decrease the Contour layer's opacity, to 5-10%. Make a new Group under Contour layer, and name it Exterior Parts. Then make selections to side parts, with 0.3 feather. Create a new layer, and fill the selections with # 353535 colour. Then make a new selection to top part, with 0.3 feather, create a new layer and fill it with #0F0F0F colour.

Step 3
Now click once on side parts layer, in Exterior Parts group, and make 2 selections like these with 0.8 feather. Then take the Burn Tool (O), and use it. I've choose these selections to show the darken parts of intercooler.

Step 4
Make a selection like this with feather 0.8, take the Dodge Tool and use it, like I did.

Step 5
Make a new layer. After that, take Pen Tool, and following the shape, make a path to one of the side parts, like I did, and then, having the Brush Tool (B) at 2px size, stroke it, with #9B9B9B color. Take the Erase Tool (E) with a size of about 20px, and erase a bit the path at the start and at the end. Then do the same process to the other side, but using the same layer.

Step 6
Create again a new layer, and repeat the process, but with pure white colour #FFFFFF. This time, erase much more the paths.

Step 7
Make a new layer, choose Brush Tool (B) and with a brush of 9px and white colour #FFFFFF, make a point like that, on the top of part. Then, using Smudge Tool (R), smudge it like I did. After that, do exactly the same process, but this time, with a 5px brush and lower on the part, next to the pipe.

Step 8
Make a new layer, and using Brush Tool and black colour #000000, make 2 points, in front side of the exterior parts, and smudge them, with Smudge Tool. Then set the layer's opacity to 56%.

Step 9
Create a new Group, and a new layer. Make a selection, to the main part of intercooler, and fill it with #0B0B0B colour. Then go to Filter > Noise > Add noise.

Step 10
Create a new layer, and having the Brush Tool at 3px size, take Pen Tool, and following the initial shape, make a line path. Then stroke it with #808080 colour. Duplicate the layer how many times is need, to fill the intercooler, with these lines. But, always follow the initial shape.

Step 11
Duplicate the layer with the lines, and go to Image > Adjustments> Hue/ Saturation and set the Lightness +100. Then take the Erase Tool, set it opacity at 50% and erase in the center, and in the borders of lines.

Step 12
Make a new layer, make a path, following the shape, to separate the exterior parts of the main intercooler. First on the right side or on the left. So, take Pen Tool, make a path, and then, having the Brush Tool at 2px size and black colour, stroke it. Immediately, make a new layer and using the same path, stroke it with white colour. Then, move the last layer, with white colour next to the black, but external. Set the layer's mode to Overlay. Take Erase Tool, and a big brush, 65px size, and erase a bit the top of this layer, there where are the shadows. After that, do the same procedure to the other side.

Step 13
Make a path like that with pen tool, and then right click on the image, and choos Make Selection. Make the selection with 1.5 feather. Make a new layer and fill the selection with a big brush about 65px, and white colour. It should look like this.

Step 14
Now, let's make the pipes. Start by making a new Group and name it Pipes. Following the initial shape, make a selection with 0.3 feather. Then make a new layer in the new group and fill the selection with #1A1A1A colour.

Step 15
Make a selection to the bottom of the pipe, choose the Burn Tool, and use it. The make again a selection to the top of the pipe and again use the Burn Tool. Then go to Image> Adjustments> Brightness/Contrast and set the Brightness +150 and the Contrast -50. After that, the pipe should look like this.

Step 16
Make a selection with 0.3 feather, in the center of the pipe. Make a new layer, and fill it with white colour. Then, take the Erase tool and set the size about 65~80px and the opacity 62%. Start to erase smoothly on the top, and next, at the bottom.

Step 17
Make a new layer, and having the Brush Tool set at 3px size, take the Pen Tool and make a path like that, and stroke it with black colour. Immediately make a new layer and with the same path but with white colour, and stroke it. Then move it next to the black line, and set the white layer mode to Overlay. Then erase a bit and smoothly with Erase Tool on the top and at the bottom of layer. After that, duplicate this layer, and move it to the other side of black line. Then the pipe should look like this.

Step 18
Merge all Pipes group's layers. except the last 3, that are the layers with the 2 white and a black line. Then make a selection like that with 0.3 feather, and go to Layer > New > Layer via Copy. Then, go to Edit > Transform and play there until you get something like this. Then Make a path with Pen Tool, like this one, make a new layer and stroke it with a brush of 3px size, like I did in previous steps, and with black colour. Immediately, make an another layer, and stroke it with white colour. Delete the path, move the white line next to the black line, and set the layer mode to Overlay. Then duplicate the layer, and move the duplicated layer at the other side of this part. it should look like this.

Step 19
Now, let's make the other pipe. Create a new group and name it Pipes 2. Then follow the instructions that I gave you in Step 14, Step 15, Step 16 and in Step 18. The result should look like this.

Step 20
This is the final step. Now, merge all your layers EXCEPT Background layer, and Contour or Shape layer. Finally, go to Image > Adjustments > Color Balance, and set these values. Thanks for reading my first tutorial. Good Luck !

Final Results
