Download Lightroom presets and LUTs, absolutely free. Use the presets to add creativity and style to your photos.
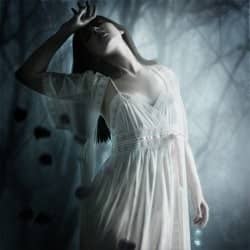
Create this emotional blue-tone photo manipualtion of a woman in a forest with flying petals. This tutorial uses few resources and will show you how to use techniques such as dodging and burning to create a dramatic look.
Preview of Final Results
![final-results[4] final-results[4]](https://cdn.photoshoptutorials.ws/images/stories/a6cd10bee1aa_11AFB/final-results4.png?strip=all&lossy=1&quality=70&webp=70&avif=70&w=1920&ssl=1)
Tutorial Resources
- Lady - Mijranum-stock
- Background - Lunebleu-stock
- Petals - Lucifers-star (Alternative)
- Diamonds - Antiseptisch
Step 1 - The Background
Open the Background and cut the part you're interested in.
![step-001[3] step-001[3]](https://cdn.photoshoptutorials.ws/images/stories/a6cd10bee1aa_11AFB/step-0013.png?strip=all&lossy=1&quality=70&webp=70&avif=70&w=1920&ssl=1)
We want to give more visibility to the subject, so let's apply some blur here. Duplicate the background layer and add Gaussian Blur.
(Filter > Blur > Gaussian Blur)
The amount depends on the picture, it's not always the same. (I generally use a range between 5px and 10px)
![step-002[3] step-002[3]](https://cdn.photoshoptutorials.ws/images/stories/a6cd10bee1aa_11AFB/step-0023.png?strip=all&lossy=1&quality=70&webp=70&avif=70&w=1920&ssl=1)
This step is optional. It depends on your taste!
Duplicate the blurred background and set the blend mode to Multiply. Play with Opacity and Fill because sometimes Multiply blend gives the picture too much darkness. (In this case I left both at 100%).
![step-003[3] step-003[3]](https://cdn.photoshoptutorials.ws/images/stories/a6cd10bee1aa_11AFB/step-0033.png?strip=all&lossy=1&quality=70&webp=70&avif=70&w=1920&ssl=1)
Step 2 - The Lady
Open the stock with the lady and extract her.
![step-004[3] step-004[3]](https://cdn.photoshoptutorials.ws/images/stories/a6cd10bee1aa_11AFB/step-0043.png?strip=all&lossy=1&quality=70&webp=70&avif=70&w=1920&ssl=1)
Create a new layer above the background layers and put there the lady. I previously worked on hair and skin but we're not here for that! You can easily find tutorials about hair and skin.
![step-005[3] step-005[3]](https://cdn.photoshoptutorials.ws/images/stories/a6cd10bee1aa_11AFB/step-0053.png?strip=all&lossy=1&quality=70&webp=70&avif=70&w=1920&ssl=1)
Create a layer between the lady and the background and paint some hair (I suggest you a little hard brush). In alternative you can download some strands stock and place them in the layer you created. When you're done just smudge the part that is under the dress of the lady.
![step-006[3] step-006[3]](https://cdn.photoshoptutorials.ws/images/stories/a6cd10bee1aa_11AFB/step-0063.png?strip=all&lossy=1&quality=70&webp=70&avif=70&w=1920&ssl=1)
Below you can see the result.
![step-007[3] step-007[3]](https://cdn.photoshoptutorials.ws/images/stories/a6cd10bee1aa_11AFB/step-0073.png?strip=all&lossy=1&quality=70&webp=70&avif=70&w=1920&ssl=1)
Step 3 - Petals
Create a new layer above everything. Download the PSD containing the petals and paste them into this layer. Put them in the position you like.
Add a Hue/Saturation adjustment level just for the petals layer (with ALT button) and set the Lightness at -30 because they have too brightness.
Now we want they seem to fall. We can achieve that result with blur. (Filter > Blur > Motion Blur). Amount can vary. It depends on how big is the resolution and on your taste.
![step-008[2] step-008[2]](https://cdn.photoshoptutorials.ws/images/stories/a6cd10bee1aa_11AFB/step-0082.png?strip=all&lossy=1&quality=70&webp=70&avif=70&w=1920&ssl=1)
Step 4 - Diamondsw
Create a new layer above the petals layer and with the diamonds brush paint some of them with white color. They have a lot of opacity so duplicate this layer 3 times and merge all 4 layers in one.


4 comments on “How to Create an Emotional Soft-Tone Photo Manipulation”
Cool
nice tutorial,thanks for sharing
Do you know what steps I take to do this. I have a picture but this will not let me post the pictures
This is one awesome collection. One of my favorites I have seen in a long time. Thanks for sharing.