
Step 10
Continue changing the ground color with a Color Balance adjustment layer:


Step 11
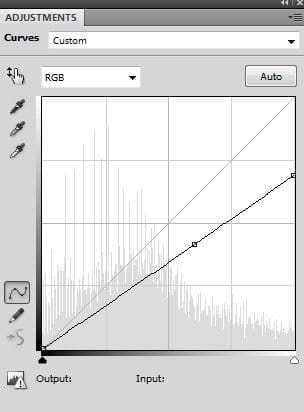
I used a Curves adjustment layer to add some light to the ground:

On this Curves layer mask use a soft black brush to erase the left and make the right brighter:

Step 12
Continue using another Curves adjustment layer to darken the left:

Erase the right on this Curves layer mask to keep it brighter:

Step 13
The ground needs some vibrant color so I used a Selective Color adjustment layer to do it:


Step 14
To add a dreamy effect to this ground, go to Layer > New Fill Layer > Solid Color:

Lower the opacity of this layer to 30%, also use a soft black brush to remove this effect on the higher part and reduce it on the ground:

![dance14a[1] dance14a[1]](https://cdn.photoshoptutorials.ws/wp-content/uploads/2014/06/dance14a1.jpg?strip=all&lossy=1&webp=82&avif=82&w=1920&ssl=1)
Step 15
To add some mist to the whole scene, I made a new layer, used a soft brush with white color to paint on the right of the pic. Change the mode of this layer to Soft Light 50%:


Step 16
On a new layer, use this brush with the opacity and flow about 30% to paint over the pic. Alter the mode to Soft Light 100%:


Step 17
Create a Curves adjustment layer on the top of all layers:


Step 18
Use Color Balance to add another colors to the scene:


Step 19
I used Selective Color with the same purpose:

On this layer mask use a soft black brush to reduce the effect on some of the trees below:

Step 20
We’re still in the process of adding color to the scene. On a new layer, I used a soft brush with the color #6e9299 to paint on the right side of the picture. Set the mode of this layer to Hard Light 100%:


Step 21
Make a new layer and use the same brush to paint on the right of the ground. Alter this layer mode to Hard Light 30%:

Step 22
To add more dreamy effect to the ground I used a soft brush with another color (#d2f0bb) to paint on the right of it. Change the mode to Soft Light 40%:

Step 23
Open the model stock photo and extract her from the background:

Step 24
Make a new layer and use the Clone Tool to remove the tattoo on one of her legs:

Step 25
In this step we’ll be adding more hair to the model. Make a new layer and use a basic, hard brush with the color #e9e1cc. Press F5 to change the settings of this brush:
24 responses to “Create a Photo Manipulation of an Emotional Dancer in a Forest”
-
ok
-
The color choices are spectacular!! Great JOB!
-
NICE AND GREATE TUTORIAL
-
NICE GREAT EXPLAINE THE TUTORIAL
-
I’m only new to composites and just came across this by a fluke. Just what I was looking for to learn and practice.
Thanks so much… -
hi!could you tell me how to extract a model from its original photo?
-
I like this because it shows skills and it shows emotion
-
very good!
-
It’s my creation http://j-p-g.net/if/2015/08/13/0540766001439480057.jpg
Thanks for this divine lesson.It’s a miracle -
The most amazing lesson!!!!! better seen.Thank you for this fab ripping tutorial
-
Amazing Tip i like your steps
-
Thank!!!
-
Thanks. Your tutorial is great as well as the other is. Keep going. But you didn’t say how you removed the model from it’s original background!!!!
-
Amazing. . Very nice,
-
A very smart approach to explain the things, Ilike your step by step tutorial.
-
Thank you for this great achievement and tutorial that I had fun to be completed in 2 different versions:
http://cartes-mireilled.eklablog.com/photomontage-scene-de-foret-en-automne-a109215440 -
Emotional model and emotional background scenery very pretty with tutorial.
-
Wow , very inspiring Shows that I still have a long way to go Thanks though for sharing your brilliant work
-
very good
-
I will use this one for my girl photo.
-
Beautiful work. Thanks so much for sharing.
-
I am highly inspired by your tutorials.As a learner,I found it very helpful.Thank you very much.
-
Looks like something I should try now. Thank you for the step by step Tutorial. I’ve book marked your post. :) Keep Going!!!
-
thanks for your tutorial, I really learned a lot


Leave a Reply