Make skin look perfect in one-click with these AI-powered Photoshop actions.
Learn how to utilize the Repousse feature in Photoshop Extended to create a poster that has a mix of retro and modern effects. This tutorial will teach you many subjects such as how to work with shapes, apply patterns, brushes, create 3D objects, and apply photo effects. To follow this tutorial, you'll need Photoshop CS5 Extended or newer.
Preview of Final Results

Tutorial Resources
Step 1
First, start Photoshop and create a new document. This tutorial is also going to be a wallpaper, so the size i'm using is 1920 x 1200. You can follow all the individual settings as shown in the diagram below.

Background
Create a new layer and fill the contents with black. The base colour of the background is going to be black. Get the nebula stock image from the resources and drag it into your document on a new layer. To make it look good, we are going to reduce the opacity of the nebula layer to about 86%. You can also rasterize the background nebula by right clicking on the layer and selecting rasterize.
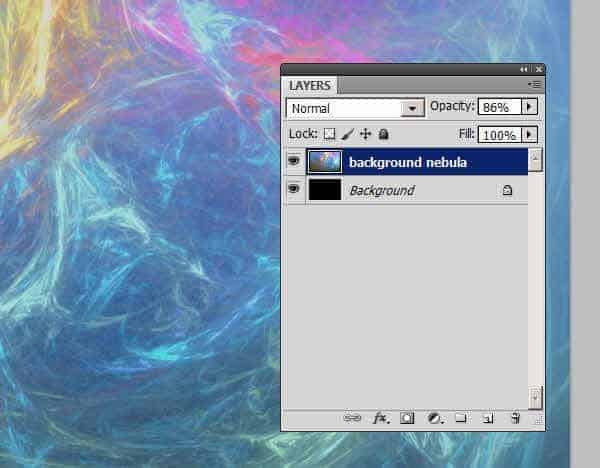
The background is a little grungy, so we are going to remove a little bit of the grunge by going to Filter>Blur>Surface Blur.........and use the settings as shown below.Radius 18 & Threshold 23

Step 2. Insert your Model
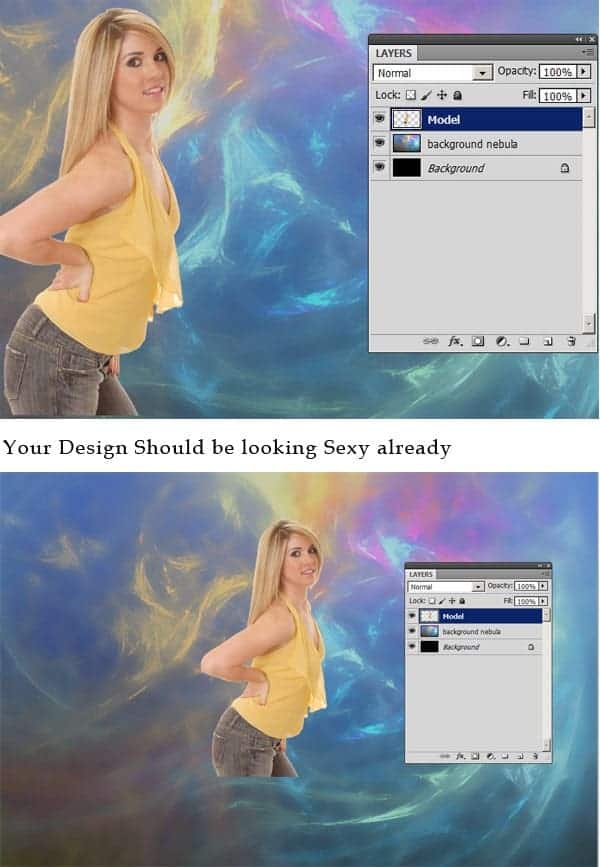
Drag and drop the photo of your model into the document. It was pretty easy to remove the model from its original white background by using the magic wand tool and the layer masks feature.
Step 3. Focal Circle
This step is what i call the focal circle. The focal circle's main job is to create a "focal point" in the image. (irony huh?). To create the circle, create a new layer by pressing CTRL + N on your keyboard. Now using the Elliptical Marquee tool ("M") hold shift and drag & draw a perfectly round circle and fill it with black.

To cut out the middle of the circle use the same procedure by holding shift and drawing a perfectly round circle. When the selection has been made, drag it into the middle of the totally black circle and press delete. This should now leave us with a circular ring.
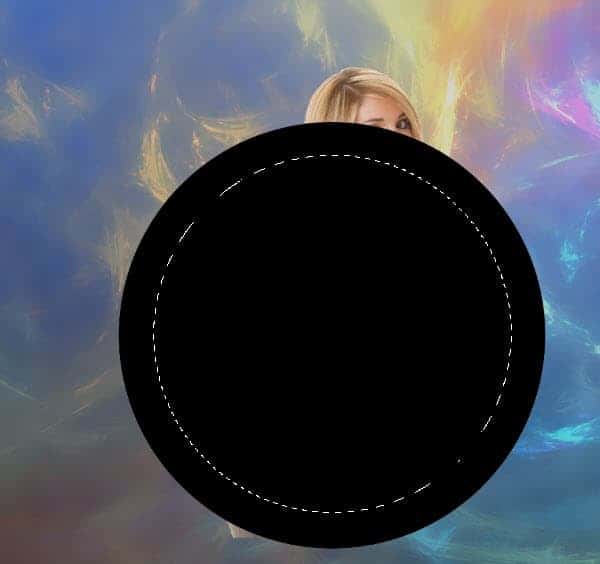
Voila!! Now we are going to move the circular ring layer below the model's layer. To give the impression that the model is slightly coming out of the ring i'm going to use the eraser tool and erase "a little bit of her backside" as shown in the demonstration.

I used a reasonably sized large soft brush to erase the portion of her legs.
Step 4. Styling the Circle
To give the ring a neat retro effect i'm going to use layer styles and the default photoshop patterns. I'm using Photoshop cs5 to write this tutorial so lets hope our features look and behave the same way............Anyways!!!
Double click on the circular ring layer to open up the layer styles dialog box or right click and select blending options.

Click on pattern overlay and follow the settings as shown below. Scale is set to 85% and i clicked the small arrow in the dialog box to choose the desired pattern.

The second layer style we are going to add to the circle is gradient overlay. Leave it at its default black to white gradient but change the blend mode to overlay and the scale to 37%. This gives us a nice gradient effect utilising the pattern.

Step 5: Custom Brush Effects
In this step. I'm going to use the pen tool and we are going to create a custom brush effect to make a nice circular bokeh element. Select the pen tool as in the diagram below and follow the steps below:

Create 3 points using the pen tool as demonstrated in the image below. The circular effect is going to follow the pattern of the pen tool. Read on............

Now Select the brush tool by clicking and holding on the icon shown and then selecting "brush tool"......................^_^. The fun starts here!

After selecting the brush tool select an average size brush using the brush panel. The brush size i'm using in this example is 38 px. Typically, the brush panel is not always shown by default, Therefore, go to Window>>brush or follow the pictoral example below. The panel should now pop up automatically once activated.

Follow the settings below to create the custom brush.

The most used options in the shape dynamics tool is normally size jitter and the minimum diameter. Size jitter and Minimum diameter work hand in hand. Based on our use of the tool, the minimum diameter affects how small the circle would be and size jitter would control the varying sizes from small to big. To properly understand this tool, you would have to tweak the settings on your own or my explanation would be useless!
Adjust the scatter percentage anf you'll see what happens. Use the settings in the diagram below for complete accuracy whilst following the tutorial.

Transfer is basically used to adjust the opaque values of the brush. TRANSPARENT>>LEAST TRANSPARENT>>SOLID ( Or the diagram below would give a better explanation)

Step 6: Stroke the pen path
Yes! Stroke the pen path and stroke it good! Anyways......Select the pen tool again and using the path that you have created in the steps above, Right click on the path and click STROKE...........Make sure Simulate pressure is selected.
![pen-tool-dialog[1] pen-tool-dialog[1]](https://cdn.photoshoptutorials.ws/wp-content/uploads/2013/04/pentooldialog1.jpg?strip=all&lossy=1&quality=70&webp=70&avif=70&w=1920&ssl=1)
Your result should now look like this.

Change the blending mode of the circular layer to overlay- This would make the circles invisible in the black areas.

We are going to give the circle a nice glowing effect by double clicking the layer. In the layer style dialog box, select outer glow and change the blend mode of the outer glow to color dodge. The color dodge blending mode would give the dots a beautiful glow.
Use the color picker to sample her skin color and use it for the outerglow. This would ensure that the image is blended a little better.


Step 6:Retro Spheres
We are now going to add some spheres from the gfxcave sphere collection. This would also give the image a nice retro-ish feel. For the spheres you can either use the brushes provided or the images. I decided to use the images on separate layers using the striped texture sphere. I named the layer striped texture and duplicated and rotated the layers based on the rotation i wanted. View the image below

We are now going to create a new layer and using the brush pack or the stand-alone images, lets create a random set of spheres beneath the model. Name the layer sphere particles 1. Using the brushes, Select random spheres and add them to the image until you achieve a similiar effect.

Now select the sphere particles 1 layer and go to filter<Blur<Motion blur. Set the angle to 28 and the distance to 31. This would give a motion blur effect to all the spheres on this particular layer. (sphere particles 1) I'm using Photoshop cs5, therefore, if you have an older version, various settings might be different.

Step 7:Clouds
We are going to use cloud number 485 in the cloud brushes provided. Create a new layer and name it cloud 1. The size i'm using is 960. Reset the default coloursand click about 3 times in the same spot to get a beautiful cloud as the one depicted below. The reason why we clicked three times is because the cloud is very transparent, so the multiple clicks, would make it fuller and deeper.

Now use cloud number 886 and click once directly underneath the previous cloud. You can leave the clouds on the same layer. This added cloud enhances the previous cloud by making it look unique and adding the perception of movement.

Step 8: Enhancing the Scenery
Lets start to beautify the image. Drag and drop the landscape photograph into your photoshop document and place it just below the nebula background. Resize the photo accordingly. Change the blending mode of the background nebula to screen. (this would brighten the background and also allow the nebula to gracefully show through. View the results below.


Step 9: Repousse 3d
For those of you new to repousse, it is basically responsible for creating easy 3d graphics in photoshop CS5. Lets dive in. We are now going to create a 3d arrow using repousse and strategically place it in the design. Arrows are well noted for creating that "retro-ish" feel in designs.
Start by selecting the custom shape tool and drawing an arrow as demonstrated below. (just drag and draw)


Current Progress.........................After repousse

Now, lets start to incorporate the arrow into the design. firstly, press ctrl + t to transform the 3d arrow and resize it. Resize as shown in the image below and rotate accordingly. The image was also placed directly below the model's image and the blending mode was changed to hardlight. View results below:


Step 10:Abstract and Retro
The design is starting to look Abstract,Beautiful,Surreal and a "lil" retro. Now, we are going to duplicate the 3d arrow layer a couple times and resize as needed. Follow the pictoral steps below.

Light Effects
Create a new layer and select the Rectangular Marquee Tool. Now, on the freshly created layer make a selection as shown:

Then, Select a large soft brush around 300 pixels. Double click on the foreground color and then select the color on her jersey as the foreground color. Now just paint with the soft brush on the outskirts of the selction as shown below: (Also, change the blending mode of the layer to color dodge)

Press CTRL + T to free transform and use the "love handles" to rotate the the light stripe as shown.

Step 11: Be Creative
We are now going to freestly on this design. Press Ctrl + J on the keyboard to duplicate the light stripe a couple times as shown. DRAG the light stripe layers UP/DOWN/SIDE ways..................Make as many and as few as you would like! Check out my current progress:
Step 12: Final Details
To finish this design, add a couple more spheres. The largest sphere i used is in the lower right hand corner of the design. To simulate movement i added a motion blur by going to filter>blur>Motion blur. You can use my settings as shown below..............Or...........be dramatic and experiment!

Add two more spheres and rotate accordingly. Don't be afraid to add depth of field or motion simulation by blurring the spheres.
Photofilter
We are going to add a photofilter above the entire image to basically standardise the color tones and make the image look a little more regulated. Go to LAYER>NEW ADJUSTMENT LAYER>PHOTO FILTER

Select warming filter (81) and use the settings below. This is going to generalise the color tones in the image and make it a little more standardised.

The end! I just added a vignette to the upper image and blurred the background a little bit - don't be afraid to experiment! I also added a lensflare from the free lensflare pack along one of the light stripes.
![final[1] final[1]](https://cdn.photoshoptutorials.ws/wp-content/uploads/2013/04/final1.jpg?strip=all&lossy=1&quality=70&webp=70&avif=70&w=1920&ssl=1)
VARIATIONs for your Inspiration!

Tutorial by Gilron Charles
Thank you for following my tutorial! I wrote this tutorial because most people simply refuse to use repousse for some of their 3d objects and because EVERYBODY loves lights!. My personal blog is www.gfxcave.com and i also offer simple photoshop tutorials and designer resources. Thanks again for reading this tutorial and i hop it inspires you
- Gilron Charles...Owner of www.gfxcave.com
Preview of Final Results

Tutorial Resources
Step 1
First, start Photoshop and create a new document. This tutorial is also going to be a wallpaper, so the size i'm using is 1920 x 1200. You can follow all the individual settings as shown in the diagram below.

Background
Create a new layer and fill the contents with black. The base colour of the background is going to be black. Get the nebula stock image from the resources and drag it into your document on a new layer. To make it look good, we are going to reduce the opacity of the nebula layer to about 86%. You can also rasterize the background nebula by right clicking on the layer and selecting rasterize.

The background is a little grungy, so we are going to remove a little bit of the grunge by going to Filter>Blur>Surface Blur.........and use the settings as shown below.Radius 18 & Threshold 23

Step 2. Insert your Model
Drag and drop the photo of your model into the document. It was pretty easy to remove the model from its original white background by using the magic wand tool and the layer masks feature.

Step 3. Focal Circle
This step is what i call the focal circle. The focal circle's main job is to create a "focal point" in the image. (irony huh?). To create the circle, create a new layer by pressing CTRL + N on your keyboard. Now using the Elliptical Marquee tool ("M") hold shift and drag & draw a perfectly round circle and fill it with black.

To cut out the middle of the circle use the same procedure by holding shift and drawing a perfectly round circle. When the selection has been made, drag it into the middle of the totally black circle and press delete. This should now leave us with a circular ring.

Voila!! Now we are going to move the circular ring layer below the model's layer. To give the impression that the model is slightly coming out of the ring i'm going to use the eraser tool and erase "a little bit of her backside" as shown in the demonstration.

I used a reasonably sized large soft brush to erase the portion of her legs.
Step 4. Styling the Circle
To give the ring a neat retro effect i'm going to use layer styles and the default photoshop patterns. I'm using Photoshop cs5 to write this tutorial so lets hope our features look and behave the same way............Anyways!!!
Double click on the circular ring layer to open up the layer styles dialog box or right click and select blending options.

Click on pattern overlay and follow the settings as shown below. Scale is set to 85% and i clicked the small arrow in the dialog box to choose the desired pattern.

The second layer style we are going to add to the circle is gradient overlay. Leave it at its default black to white gradient but change the blend mode to overlay and the scale to 37%. This gives us a nice gradient effect utilising the pattern.

Step 5: Custom Brush Effects
In this step. I'm going to use the pen tool and we are going to create a custom brush effect to make a nice circular bokeh element. Select the pen tool as in the diagram below and follow the steps below:

Create 3 points using the pen tool as demonstrated in the image below. The circular effect is going to follow the pattern of the pen tool. Read on............

Now Select the brush tool by clicking and holding on the icon shown and then selecting "brush tool"......................^_^. The fun starts here!

After selecting the brush tool select an average size brush using the brush panel. The brush size i'm using in this example is 38 px. Typically, the brush panel is not always shown by default, Therefore, go to Window>>brush or follow the pictoral example below. The panel should now pop up automatically once activated.

Follow the settings below to create the custom brush.

The most used options in the shape dynamics tool is normally size jitter and the minimum diameter. Size jitter and Minimum diameter work hand in hand. Based on our use of the tool, the minimum diameter affects how small the circle would be and size jitter would control the varying sizes from small to big. To properly understand this tool, you would have to tweak the settings on your own or my explanation would be useless!
Adjust the scatter percentage anf you'll see what happens. Use the settings in the diagram below for complete accuracy whilst following the tutorial.

Transfer is basically used to adjust the opaque values of the brush. TRANSPARENT>>LEAST TRANSPARENT>>SOLID ( Or the diagram below would give a better explanation)

Step 6: Stroke the pen path
Yes! Stroke the pen path and stroke it good! Anyways......Select the pen tool again and using the path that you have created in the steps above, Right click on the path and click STROKE...........Make sure Simulate pressure is selected.
![pen-tool-dialog[1] pen-tool-dialog[1]](https://cdn.photoshoptutorials.ws/wp-content/uploads/2013/04/pentooldialog1.jpg?strip=all&lossy=1&quality=70&webp=70&avif=70&w=1920&ssl=1)
Your result should now look like this.

Change the blending mode of the circular layer to overlay- This would make the circles invisible in the black areas.

We are going to give the circle a nice glowing effect by double clicking the layer. In the layer style dialog box, select outer glow and change the blend mode of the outer glow to color dodge. The color dodge blending mode would give the dots a beautiful glow.
Use the color picker to sample her skin color and use it for the outerglow. This would ensure that the image is blended a little better.


Step 6:Retro Spheres
We are now going to add some spheres from the gfxcave sphere collection. This would also give the image a nice retro-ish feel. For the spheres you can either use the brushes provided or the images. I decided to use the images on separate layers using the striped texture sphere. I named the layer striped texture and duplicated and rotated the layers based on the rotation i wanted. View the image below

We are now going to create a new layer and using the brush pack or the stand-alone images, lets create a random set of spheres beneath the model. Name the layer sphere particles 1. Using the brushes, Select random spheres and add them to the image until you achieve a similiar effect.

Now select the sphere particles 1 layer and go to filter<Blur<Motion blur. Set the angle to 28 and the distance to 31. This would give a motion blur effect to all the spheres on this particular layer. (sphere particles 1) I'm using Photoshop cs5, therefore, if you have an older version, various settings might be different.

Step 7:Clouds
We are going to use cloud number 485 in the cloud brushes provided. Create a new layer and name it cloud 1. The size i'm using is 960. Reset the default coloursand click about 3 times in the same spot to get a beautiful cloud as the one depicted below. The reason why we clicked three times is because the cloud is very transparent, so the multiple clicks, would make it fuller and deeper.

Now use cloud number 886 and click once directly underneath the previous cloud. You can leave the clouds on the same layer. This added cloud enhances the previous cloud by making it look unique and adding the perception of movement.

Step 8: Enhancing the Scenery
Lets start to beautify the image. Drag and drop the landscape photograph into your photoshop document and place it just below the nebula background. Resize the photo accordingly. Change the blending mode of the background nebula to screen. (this would brighten the background and also allow the nebula to gracefully show through. View the results below.


Step 9: Repousse 3d
For those of you new to repousse, it is basically responsible for creating easy 3d graphics in photoshop CS5. Lets dive in. We are now going to create a 3d arrow using repousse and strategically place it in the design. Arrows are well noted for creating that "retro-ish" feel in designs.
Start by selecting the custom shape tool and drawing an arrow as demonstrated below. (just drag and draw)


Current Progress.........................After repousse

Now, lets start to incorporate the arrow into the design. firstly, press ctrl + t to transform the 3d arrow and resize it. Resize as shown in the image below and rotate accordingly. The image was also placed directly below the model's image and the blending mode was changed to hardlight. View results below:


Step 10:Abstract and Retro
The design is starting to look Abstract,Beautiful,Surreal and a "lil" retro. Now, we are going to duplicate the 3d arrow layer a couple times and resize as needed. Follow the pictoral steps below.

Light Effects
Create a new layer and select the Rectangular Marquee Tool. Now, on the freshly created layer make a selection as shown:

Then, Select a large soft brush around 300 pixels. Double click on the foreground color and then select the color on her jersey as the foreground color. Now just paint with the soft brush on the outskirts of the selction as shown below: (Also, change the blending mode of the layer to color dodge)

Press CTRL + T to free transform and use the "love handles" to rotate the the light stripe as shown.

Step 11: Be Creative
We are now going to freestly on this design. Press Ctrl + J on the keyboard to duplicate the light stripe a couple times as shown. DRAG the light stripe layers UP/DOWN/SIDE ways..................Make as many and as few as you would like! Check out my current progress:
Step 12: Final Details
To finish this design, add a couple more spheres. The largest sphere i used is in the lower right hand corner of the design. To simulate movement i added a motion blur by going to filter>blur>Motion blur. You can use my settings as shown below..............Or...........be dramatic and experiment!

Add two more spheres and rotate accordingly. Don't be afraid to add depth of field or motion simulation by blurring the spheres.
Photofilter
We are going to add a photofilter above the entire image to basically standardise the color tones and make the image look a little more regulated. Go to LAYER>NEW ADJUSTMENT LAYER>PHOTO FILTER

Select warming filter (81) and use the settings below. This is going to generalise the color tones in the image and make it a little more standardised.

The end! I just added a vignette to the upper image and blurred the background a little bit - don't be afraid to experiment! I also added a lensflare from the free lensflare pack along one of the light stripes.
![final[1] final[1]](https://cdn.photoshoptutorials.ws/wp-content/uploads/2013/04/final1.jpg?strip=all&lossy=1&quality=70&webp=70&avif=70&w=1920&ssl=1)
VARIATIONs for your Inspiration!

Tutorial by Gilron Charles
Thank you for following my tutorial! I wrote this tutorial because most people simply refuse to use repousse for some of their 3d objects and because EVERYBODY loves lights!. My personal blog is www.gfxcave.com and i also offer simple photoshop tutorials and designer resources. Thanks again for reading this tutorial and i hop it inspires you
- Gilron Charles
8 comments on “Create a Retro and Futuristic Design in Photoshop”
Aw, this was a really nice post. Spending some time and actual effort to generate a really good article… but what can I say… I put things off a lot and never manage to get nearly anything done.
Good blog you have got here.. It's difficult to find excellent writing like yours nowadays. I honestly appreciate individuals like you! Take care!!
Quality articles is the crucial to invite the users to visit the web page, that's what this website is providing.
some very cool designs. Thanks a lot for compiling an st.d sharing this li
I like your website but this artwoek looks like a random mess
very nice post ure post is very useful for me i appreciate ure collection very good work
link are dead
I hate free links they always fail