
Step 12
Open the “Raven” file and make a selection of the raven. Ctrl+C to copy and Ctrl+V to paste it into our document. Don’t worry if your selection is not perfect because we will going to make very small. Press Ctrl+T to free transform the raven like shown below than add clipped Curves adjustment layer to color correct it.

Step 13
Make a new layer and using a round soft white brush at 5% opacity draw some smoke (or fumes) at the base of the house and at the base of the crosses. Don’t overdo.

Step 14
Open the file “Van” and make a selection of the van. Ctrl+C to copy and Ctrl+V to paste it into our document. Press Ctrl+T to free transform the van like shown below than add a clipped Curves adjustment layer and a clipped Hue/Saturation adjustment layer to color correct the van. Notice that we don’t take all the color from the van, because we still want some color somewhere in the scene. Make a new layer below the “Van” layer and paint some shadow than change the layer blend mode to Multiply.

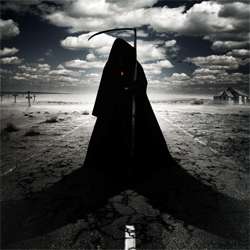
Step 15
Let’s make some creepy dark veins emerging from our dark figure. To do this make a new layer and fill it with white. Than press D to set default colors and choose Filters > Render > Clouds. Now choose Filters > Render > Difference Clouds. Choose Image > Adjustments > Curves and use the settings shown below to get rid of the mid tones and keep only the black lightning. Press Ctrl+T to free transform this layer like shown below and change the blending mode to Multiply. Changing the blending mode will get rid of the white areas. Add a layer mask and mask the obvious lines. You can make a duplicate layer and using free transform (Ctrl+T) flip it horizontally to add even more black veins/lightning .

Step 16
Time for the final adjustments.
Press Ctrl+Shift+Alt+E to make a new layer from all visible then choose Filters > Stylize > Glowing Edges. Change the blend mode to Overlay and lower the opacity to 23%. This step will further increase the contrast and darken the mood. Now add Hue/Saturation adjustment layer to decrease the Saturation of the scene. Note that sometimes less is more and in our case less saturation will make the image darker and moodier. It will also keep the focal interest in the center preventing our eyes from wandering al l over the places.
4 responses to “How to Create a Grim Reaper Scene Artwork in Photoshop”
-

some very cool designs. Thanks a lot for compiling an st.d sharing this li
-
Do I HAVE to pay for “Clouds” picture to have it..?
-
This is an awesome tut but the “desert” picture is no longer available on DeviantArt…..Could you suggest another pic?
-
@PhasmaParanorma I just looked at different pictures on Google of a “cracked desert” and found the most suitable one! :)
-
Leave a Reply