Learn how to create an assassin wielding a deadly flaming arrow! This Photoshop tutorial will show you how to create an out-of-focus background, create a realistic flaming arrow using brushes and color combinations, and finish it off with a vignette and texture overlay.
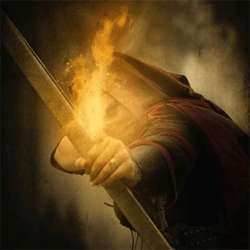
Preview of Final Results

Assassin with a Flaming Arrow Photoshop Tutorial
Tutorial Resources
- Fantasy Forest Stock by Moonchilde-Stock
- Southron Archer 4 by lindowyn stock
- Fire Brushes by Skippy3E
- Star Brushes Volume 1 by JonasKr
- Grunge Texture 4 by darkrose 42 stock
Step 1: Create a New Image
We will start by creating a new image file, go to the Menu bar and click File > New, and then input the following values on their respective fields:
- Preset: International Paper
- Size: A4
- Width: 2480 pixels
- Height: 3508 pixels
- Resolution: 300 pixels/inch
- Color Mode: RGB Color; 8 bit
- Background Contents: Transparent

Step 2: Create the Background
In this step, we will be creating the background of our image, which would be a dark and mystical forest where the assassin will be attacking her target. To start, let’s open “Fantasy Forest Stock” by Moonchilde-Stock. Once it is open, just activate the Move tool by pressing V on your keyboard and once this tool is active, left-click on our open stock image and drag it to our canvas.
Position the “Fantasy forest stock” as shown below:

Next, we would need to resize this image so activate the Transform tool by pressing Ctrl/Cmd + T and resize it as shown on the images below:


When you’re done, the image should now appear like this:

Next, we will have to blur this image to make it look like it is far from our subject. To start, make sure that the background image is selected and then go to Filter > Blur > Lens Blur. Once it opens, input the following:

After hitting OK, the result should be similar to this:

Now, we will be enhancing the light on this forest background. To start, click on the background layer and then create a new layer by pressing Ctrl/Cmd + Shift + N and once the box opens, input “Light 1” on the name box.

Activate the Brush tool (B) but before we start, make sure that the active Brushes are the default brushes. The default Photoshop brushes are shown on the image below, if that’s not what you see, then follow the instructions below:

Right click the canvas while a layer is selected and while the Brush tool (B) is activated and then click on the button highlighted below:

Then click on “Reset Brushes” from the contextual menu.

Now, that that is done input the following settings for our Brush tool (B):
3 responses to “How to Create a Photo Manipulation of an Assassin with a Flaming Arrow in Photoshop”
-

My fiance would love this! She is fascinated by bows, arrows and assassins.
-
I just used other fire brushes and it turned out just as nice
-
Fire brushes do not exist any longer =(
Leave a Reply