- Brush size: 1600px
- Hardness: 0%
- Opacity: 15%
- Flow: 100%
- #: fffdc7

The color of the brush that we need to use is “#: fffdc7” To change the current brush color, follow the steps below:

When the Color Picker box opens, input the following on the # space:

Now, that your brush has the right color for the intended light, we can now paint, but make sure that the “Light 1” layer is selected:

The result:

Next, create another new layer and put “Light 2” on the name box.
Once created, activate the Brush tool (B) and input the following:
- Brush size: 2500px
- Hardness: 0%
- Opacity: 15%
- Flow: 100%
- #: ceb68d

Now, let’s paint:

The result of that should be similar to this:

When you’re done, select all the layers that you’ve created and press Ctrl/Cmd + G to group the layers. Once grouped, rename the layer to “Background”.
Note: To rename a group, simply double-click on the words “Group 1” to prompt a text box to appear and then you may be able to rename it. See image below:

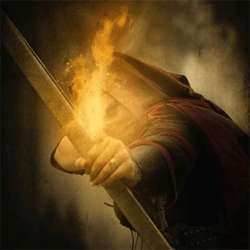
Step 3: Create the Assassin
Now, we will be adding the Assassin which will be the subject of our artwork. To start, open “Southron Archer 4” by lindowyn stock. Once open, activate the Magnetic lasso Tool (L) and use it to create a selection area around the assassin. See images below:


Once you’ve created the selection area around the assassin, activate the Move tool (V) and drag the selected assassin to our canvas.
Position it above the Background group by dragging it on top of it.

Name this layer to “assassin”. Naming a layer is simple and similar to naming a group. Just double click on the words: “Layer 1” etc. and then a text box would appear and then you can name it.
Now, if you’ve noticed that we have to clean up the mess left on the assassin stock image. See image below:

To remove that, we would need to activate the Polygonal Lasso Tool (L).

Once activated, create a selection area around that remaining grass image from the “Southron Archer 4” image.

The result of that should be similar to this:

Next, we would have to blur the edges since we need to create a realistic depth of field which was lost during the process of creating a selection area around the assassin and moving it to the canvas.
3 responses to “How to Create a Photo Manipulation of an Assassin with a Flaming Arrow in Photoshop”
-

My fiance would love this! She is fascinated by bows, arrows and assassins.
-
I just used other fire brushes and it turned out just as nice
-
Fire brushes do not exist any longer =(
Leave a Reply