![rain17[9] rain17[9]](https://cdn.photoshoptutorials.ws/images/stories/dd77ff9a833f_95C/rain179.jpg?strip=all&lossy=1&webp=82&avif=82&w=1920&ssl=1)
As you see in original picture, light on model comes from in front and from right to left. So it made a shadow of hand on the shawl . To fix it, make two new layers and set the mode to Soft light 100%. I use soft brush with color #fbb7b4 painting on this shadow.
![rain17a[9] rain17a[9]](https://cdn.photoshoptutorials.ws/images/stories/dd77ff9a833f_95C/rain17a9.jpg?strip=all&lossy=1&webp=82&avif=82&w=1920&ssl=1)
![rain17b[9] rain17b[9]](https://cdn.photoshoptutorials.ws/images/stories/dd77ff9a833f_95C/rain17b9.jpg?strip=all&lossy=1&webp=82&avif=82&w=1920&ssl=1)
Step 18
We will continue to retouch the shawl and dress. The left part of them need to be brighter to make the light balanced.
![rain18[9] rain18[9]](https://cdn.photoshoptutorials.ws/images/stories/dd77ff9a833f_95C/rain189.jpg?strip=all&lossy=1&webp=82&avif=82&w=1920&ssl=1)
Make a new layer and use brush with color #fbb7b4 painting on left side of the shawl. Change the mode to Soft light 100%.
![rain18a[9] rain18a[9]](https://cdn.photoshoptutorials.ws/images/stories/dd77ff9a833f_95C/rain18a9.jpg?strip=all&lossy=1&webp=82&avif=82&w=1920&ssl=1)
A new layer and I use soft white brush painting on left side of dress. Put it as Soft light 100%:
![rain18b[9] rain18b[9]](https://cdn.photoshoptutorials.ws/images/stories/dd77ff9a833f_95C/rain18b9.jpg?strip=all&lossy=1&webp=82&avif=82&w=1920&ssl=1)
Step 19
Make a new layer and I set the mode to multipy 50%. I use brush and color #c08373 to paint on model hair to reduce highlight of it.
![rain19[9] rain19[9]](https://cdn.photoshoptutorials.ws/images/stories/dd77ff9a833f_95C/rain199.jpg?strip=all&lossy=1&webp=82&avif=82&w=1920&ssl=1)
Step 20
Now we will darken an outer part of umbrella. On a new layer, use brush with color #4aaff1 painting on this part. Change the mode to Multipy 60%.
![rain20[9] rain20[9]](https://cdn.photoshoptutorials.ws/images/stories/dd77ff9a833f_95C/rain209.jpg?strip=all&lossy=1&webp=82&avif=82&w=1920&ssl=1)
Make two new layers which are set to Soft light 50% and 100%. Use brush with same color #4aaff1 painting on left outer part of umbrella to brighten it.
![rain20a[9] rain20a[9]](https://cdn.photoshoptutorials.ws/images/stories/dd77ff9a833f_95C/rain20a9.jpg?strip=all&lossy=1&webp=82&avif=82&w=1920&ssl=1)
Step 21
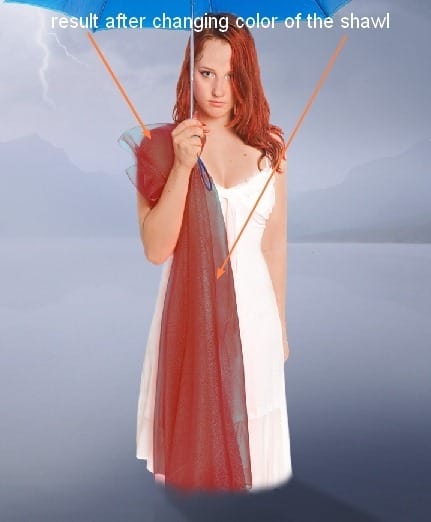
Now it’s time to change color of the shawl . On model layer, use any tools you like to make selection for the shawl. Go to Layer-New Adjustment layer-Channel Mixer and choose Clipping Mask option for this layer. Move this layer on the top of layers.
![rain21[9] rain21[9]](https://cdn.photoshoptutorials.ws/images/stories/dd77ff9a833f_95C/rain219.jpg?strip=all&lossy=1&webp=82&avif=82&w=1920&ssl=1)
![rain21a[9] rain21a[9]](https://cdn.photoshoptutorials.ws/images/stories/dd77ff9a833f_95C/rain21a9.jpg?strip=all&lossy=1&webp=82&avif=82&w=1920&ssl=1)
We have:
![rain21b[9] rain21b[9]](https://cdn.photoshoptutorials.ws/images/stories/dd77ff9a833f_95C/rain21b9.jpg?strip=all&lossy=1&webp=82&avif=82&w=1920&ssl=1)
Click on layer mask of this Channel Mixer layer to active it’s selection. Choose Layer-New Adjustment layer-Selective Color ( Clipping Mask):
![rain21c[9] rain21c[9]](https://cdn.photoshoptutorials.ws/images/stories/dd77ff9a833f_95C/rain21c9.jpg?strip=all&lossy=1&webp=82&avif=82&w=1920&ssl=1)

Step 22
With same method, I use some adjustment layers to change color of dress.
Channel Mixer
![rain22[9] rain22[9]](https://cdn.photoshoptutorials.ws/images/stories/dd77ff9a833f_95C/rain229.jpg?strip=all&lossy=1&webp=82&avif=82&w=1920&ssl=1)
Selective Color:
![rain22a[9] rain22a[9]](https://cdn.photoshoptutorials.ws/images/stories/dd77ff9a833f_95C/rain22a9.jpg?strip=all&lossy=1&webp=82&avif=82&w=1920&ssl=1)
Color Balance:
![rain22b[9] rain22b[9]](https://cdn.photoshoptutorials.ws/images/stories/dd77ff9a833f_95C/rain22b9.jpg?strip=all&lossy=1&webp=82&avif=82&w=1920&ssl=1)
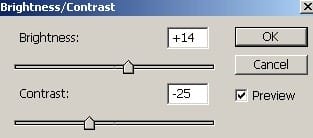
Brightness/Contrast:

This is what we have:

Step 23
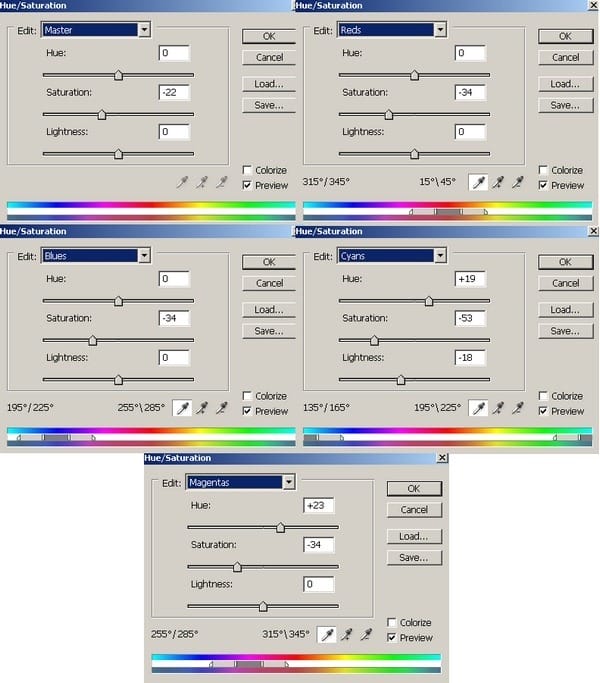
I use somement adjustment layers to change color of whole picture ( Clipping Mask)
Hue/Saturation:
![rain23[9] rain23[9]](https://cdn.photoshoptutorials.ws/images/stories/dd77ff9a833f_95C/rain239.jpg?strip=all&lossy=1&webp=82&avif=82&w=1920&ssl=1)
Selective Color:
![rain23a[9] rain23a[9]](https://cdn.photoshoptutorials.ws/images/stories/dd77ff9a833f_95C/rain23a9.jpg?strip=all&lossy=1&webp=82&avif=82&w=1920&ssl=1)
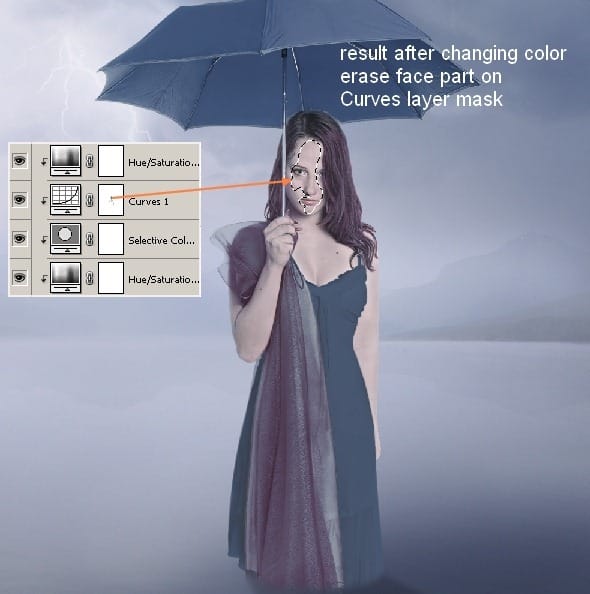
Curves:

Hue/Saturation:

Use soft black brush on layer mask of Curves layer to erase face part:

Step 24
Add a new layer with Clipping Mask. I use Blur Tool with 50% strength to soften inside the face avoiding the face stroke:
![rain24[9] rain24[9]](https://cdn.photoshoptutorials.ws/images/stories/dd77ff9a833f_95C/rain249.jpg?strip=all&lossy=1&webp=82&avif=82&w=1920&ssl=1)
Step 25
I use soft white brush again to brighten parts of model which catch the light from background. Create a new layer with Soft light mode 50%. Paint on shoulder, arm, dress :
One response to “Let Me Sink – Emotional Rainy Scene Photo Manipulation”
-
This work is so nice,I specially like ………………….


Leave a Reply