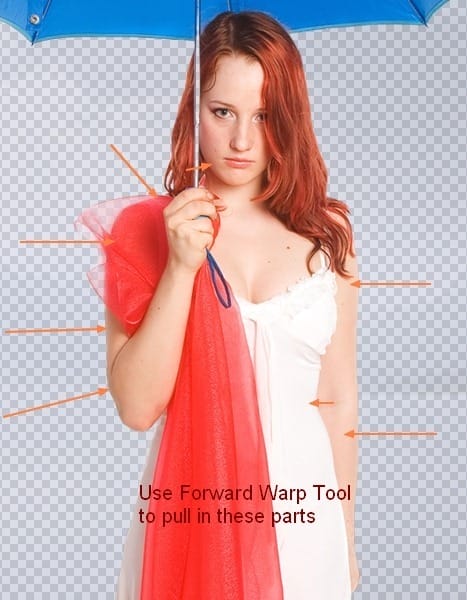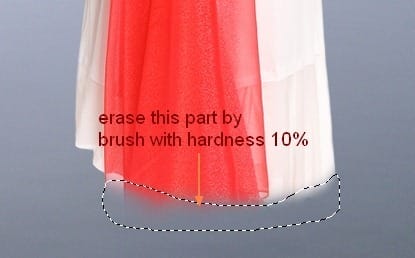
This is result I get:

Add layer mask for model layer , use black brush with hardness about 10% to blur dress bottom. Try to make the masked part round to get rid of flat effect:

Step 11
I aim to set the main light souce to come from upper left and fall onto model back so she should have a shadow in front and to the right of her on the lake. To do it, I make a new layer under model layer, use soft black brush to paint on the lake as the image below shows. Lower opacity of this layer to 20%:
![rain11[9] rain11[9]](https://cdn.photoshoptutorials.ws/images/stories/dd77ff9a833f_95C/rain119.jpg?strip=all&lossy=1&webp=82&avif=82&w=1920&ssl=1)
![rain11a[9] rain11a[9]](https://cdn.photoshoptutorials.ws/images/stories/dd77ff9a833f_95C/rain11a9.jpg?strip=all&lossy=1&webp=82&avif=82&w=1920&ssl=1)
Name this layer as “model shadow”.
Step 12
Now we will create the reflection for model through the lake surface. Do the same technique in step 8 and use layer mask to blur some parts of it. Rename it “model reflection”. Place this layer under “model shadow” layer.
![rain12[9] rain12[9]](https://cdn.photoshoptutorials.ws/images/stories/dd77ff9a833f_95C/rain129.jpg?strip=all&lossy=1&webp=82&avif=82&w=1920&ssl=1)
Step 13
In this step we will darken the part around model . Make two new layers which are set under model layers and with Multipy mode 100%. Use soft brush with color #b6bcd0 painting like the screenshot below shows:
![rain13[9] rain13[9]](https://cdn.photoshoptutorials.ws/images/stories/dd77ff9a833f_95C/rain139.jpg?strip=all&lossy=1&webp=82&avif=82&w=1920&ssl=1)
Step 14
Since this steps I’ll use many layers with Clipping Mask to retouch model. If you use your own model, you may not go over as many steps as I do. But I hope that through my process of retouching, you will learn how to take care of details.
Make a new layer above model layer with Clipping Mask. If you forget how to add a layer with Clipping Mask option, look at step 4. I use Clone Stamp Tool to remove one part on umbrella. You can follow many good tutorials over the web about Clone Tool if you don’t know how to use it properly.
![rain14[9] rain14[9]](https://cdn.photoshoptutorials.ws/images/stories/dd77ff9a833f_95C/rain149.jpg?strip=all&lossy=1&webp=82&avif=82&w=1920&ssl=1)
Step 15
I don’t get sastified with the result after cloning so I take a new layer and use brush with color #52a2d0 painting on the part inside umbrella to brighten it a bit. Change the mode of it to Soft light 50%
![rain15[9] rain15[9]](https://cdn.photoshoptutorials.ws/images/stories/dd77ff9a833f_95C/rain159.jpg?strip=all&lossy=1&webp=82&avif=82&w=1920&ssl=1)
New layer again and with same color for brush. I use it to paint an edge of umbrella to darken it a bit. Set the mode to Multipy 40%:
![rain15a[9] rain15a[9]](https://cdn.photoshoptutorials.ws/images/stories/dd77ff9a833f_95C/rain15a9.jpg?strip=all&lossy=1&webp=82&avif=82&w=1920&ssl=1)
Step 16
In this step I use Clone Tool again to fix a part on model arm.
![rain16[9] rain16[9]](https://cdn.photoshoptutorials.ws/images/stories/dd77ff9a833f_95C/rain169.jpg?strip=all&lossy=1&webp=82&avif=82&w=1920&ssl=1)
Step 17
I use two new layers to darken the skin and remove highlight on it. Take soft brush with color #edd9ce painting over bright parts of skin: face, neck, breast, arm, fingers. Put two these layers as Multipy 50%.
One response to “Let Me Sink – Emotional Rainy Scene Photo Manipulation”
-
This work is so nice,I specially like ………………….


Leave a Reply