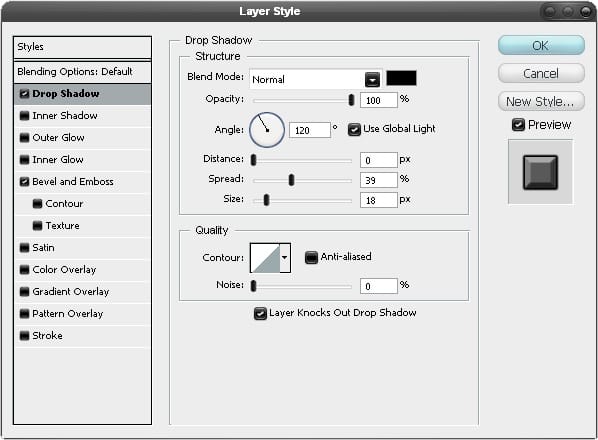
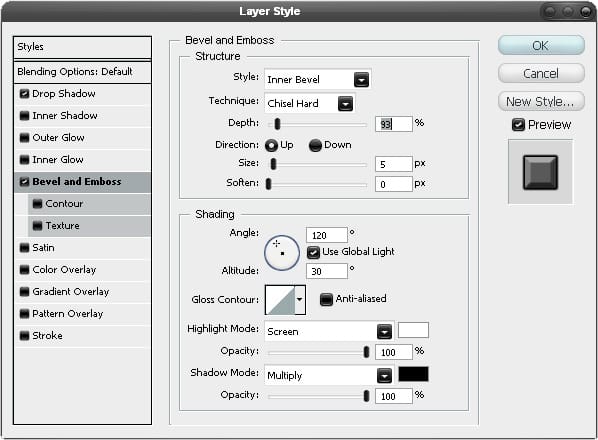
Step 13
We want to add some soft vignetting now, which means darkening the edges of the image. You could do this with a gradient but here we’re going to brush it on because we don’t want it symmetrical and you have more control if you do it this way. So first create a new layer then grab a soft round brush with a size of about 150px and an opacity of about 10% then set the foreground color to black. Now just brush round the top corners (the bottom ones are dark enough) make sure you don’t brush over the plane and keep doing this until your image resembles the one shown below.
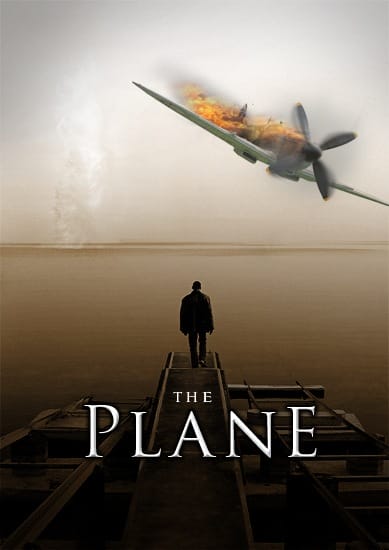
Step 14
Most movie posters contain some credits and most of them use extremely compressed type. Basically here what you want to do is to type in your text and center justify it, it doesn’t really matter what font you are using but set the color to something like #39362d. Now to compress it go Window>Character to bring up the character editor again then highlight the text and adjust the character width as shown in the image below.

Step 15
Now add some more text, I added the names of some actors at the top and a website at the bottom and just kept it pretty simple.
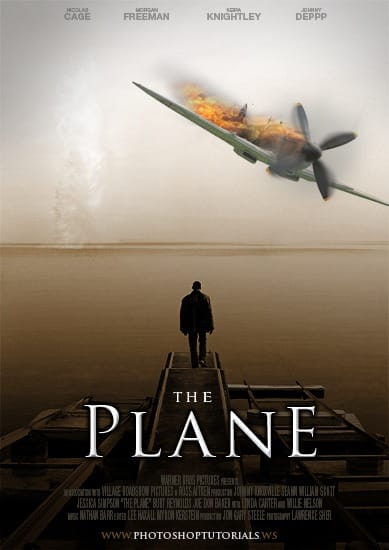
Step 16
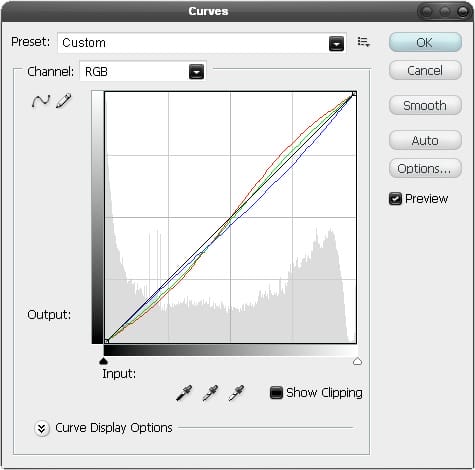
I felt the image was a bit cold at this point so to fix this I added a curves adjustment layer by clicking the button at the bottom of the layers panel. Next just go through each channel and alter the curves slightly, the main thing I did was to lower the amount of blue in the image. Try to get your curves looking like the image shown below.
Step 17
I also felt the flames were not bright enough so I fixed this in two steps. First add a levels adjustment layer and drag the black slider in to about 35 and the white slider in to about 225; this will brighten our image a bit as well as raise the saturation.
![17[1] 17[1]](https://cdn.photoshoptutorials.ws/images/stories/17%5B1%5D_f3030d54-6bfe-444d-94bb-956a50f803c8.jpg?strip=all&lossy=1&webp=82&avif=82&w=1920&ssl=1)
Step 18
You’ll notice that the flames look awesome now but the rest of the image is a bit off so we’re now going to mask off the adjustment layer. This time hold Alt and click on the layer mask button in the layers panel and this will create a layer mask and fill it black so this adjustment layer is fully hidden now. Select the brush tool and choose a 30px soft round brush with an opacity of about 20% then set the foreground color to white. Now select the layer mask and just paint over the flames a few times and you will notice that when you paint over them they will become brighter as what we are doing is unhiding the adjustment layer in these parts.
78 responses to “Manipulating a WW2 Fighter Aircraft”
-
TOP Mestre
-
I’m stuck in step 8
-
Very nice, thank you sir
-
good
-
It´s great!! Thank you fot that!! :)
-
i just manipulated it into paint and created it there.
-
this app needs to get things right cant copy image this page lies to the public people using this page
-
Cant get the geyser
-
Your propellers are spinning the wrong way.
-
PLEASE: take the “word” BEGINNER out of the title. This is not for beginners! I am fairly good with Photo Shop and I could not follow your directions at all. I need to understand how to develop layers. I know what to do with them when they are there, but how to get them started is my problem. You do not explain things for beginners.
Thank You
MJ -
helppp
-
how do you make it so you can see the prop blur and still completely see the plane? my blur covers the plane unless i change the opacity but then the whole picture is really faint.
-
it ‘ s awsome
-
hi
-
youre not a nice person I don’t get it
-
much plane
-
How to add noise in image
-
Hey I was trying to do this and I dropped my donut and I accidently lost my mouse in the process, I was trying to figure like step 5 so can anyone help me as soon as I find my mouse?
-
hiiiiiiiiiiiiiiiiiiiiiiiiiiiiiiiiiiiiiiiiiiiiiiiiiiiiiiiiiiiiiiiiiii
-
how to do this thing ????????????? need help sos somthing
-
cool
-
Thanks for a great tutorial, this really helped me to get started with PS! :)
-
this is a waste of time
-
I did this, and my jet looks like it landed in the BBQ LOL. I didnt use opacity enough:P
-
awesome
-
how do you do step 3?
-
easy
-
-
how do you
-
that good… but not complete.please brief with screen short.
-
I’m new to photoshop, and I don’t think this describes accurately how to make a clipping mask. To do so, you select the above image (in this case the noise layer), then go into Layer and tap Create Clipping Mask (Alt+Ctrl+G)
-
I don’t get it! Please help me. I added a layer mask on duplicated picture of the plain and then with black brush I painted the propeller. Now i have a hole in my work. How i get the propeller shown like abow?
-
I am stuck on step 5. I duplicate the layer but then I the option of “add layer mask” once I right click it is unclickable. Please help! Thank you!
-
gary
-
dumb ads and too damn hard
-
I don’t know how to do it, i’ve been on step:2 for the pass 2 week already
-
Fill the layer with white before trying to add noise. Hope this helped.
-
-
hiiiiiiiiiiiiiiiiiiiiiiiii
-
im gonna try it out seems cool
-
dis good tutorial. me did good on its. it look like good plane
-
Awsome.I learned it right now
-
Okay, I am using CS6 Photoshop964-Bit) the problem with the “selected area is empty”. When you make a new project, it gives you a locked white background, duplicated this layer, then use that layer to add the noise. Quick way of doing it. Remember to put it on top of the layer of the plane. Then it works fine, also yes it’s a dead link just use your common sense and copy the image from the tutorial.
-
That was very helpful! Thank you!
-
thanks i had to use a different image because the plane one was no longer available. great tutorial:
http://i49.tinypic.com/2lukwy.jpg -
I can’t understand the second step. When I created the new layer (for the noise) the noise can’t applied.
-
the first layer you had you must use it instead of creating a new layer since this new one will eventually be empty.
-
-
Ya explained the work in the best manner. Understud very well, it was really helpfull. Please keep uploading more work with this type of explanation.. Thank you whu ever it is…
-
hey i am not able to go step 4 , at step 5 i am struck badly as i couldnt understand wat to do? if i right click the layer mask then it is applied directly on the duplicate layer otherwise if i right click the layer mask on the duplicate plane layer then i get an option to delete the layer masking or disable layer masking
-
@jumman I got an option saying me to resterize the layer if i use smudge on the layer masked layer i.e., the duplicate plane layer
-
-
Actually it was very helpful for me. Thanks
-
I can’t see the harden brush for smudge tool. I set the size and the strength but I can’t see the harden tool or button or menu.
-
idk how to do this!!!! Helppppp!!!!
-
-
Can’t add the noise to the new lyer “can’t add the filter because the area is emty”!
what to do please?-
hiiiiiiiiiiiiii
-
that’s happenin to me too…
-
-
Very good tutorial. Thanks.
-
This is a damn good guide sir, but You have no idea how planes works, do you? :P
-
Do you?
-
You’re a God!!!
Waiting 6 Years for a reply…
# Thug Life
-
-
i don’t know about blend mode?i m completely new for it
-
It won’t let me make noise on an empty layer. An error comes up saying:
“Could not complete the Add Noise command because the selected area is empty”-
True, that won’t work. I think that what is not mentioned is that this new layer should be filled with white before the noise is applied, this will give the desired effect and I assume that is what is done in this tutorial, just not mentioned. The noise will only be generated on that part of the layer that already contains something, eg. is NOT transparent.
The easiest way to fill with white (or black) is to hit D on the keyboard. This will set default foreground and background color which is black and white respectively. To fill with the foreground color use ALT + BACKSPACE. To fill with the background color, use CTRL + BACKSPACE. On a Mac you would use Command instead of CTRL. -
create a new layer and fill the layer with white colour
ctrl+backspace -
okay
-
-
How do i extract the propeller? i am completely new to this.
-
You might want to look for some tutorials covering Layer Masks, they form the basis of a lot of things you can do in Photoshop. This tutorial clearly assumes some knowledge about Layer Masks as it does not describe the exact procedure of using layer masks in much detail.
So check up on Layer Masks and give this tutorial a go afterwards. -
Thanks Simon for all your help here. I had to do this as an assignment and found it easier with your tips.
-
-
Dont bother going to the dead link. Just right click the picture and press save as. Then open the file via photoshop.
-
there is no image in that link:(
-
You can simply use the first image that is displayed in the tutorial, the picture of just the airplane with nothing added. Right click it and save it somewhere on your computer – then open it up in Photoshop.
-
-
Very Useful Tutorial Thanks a LOT :p
-
can no longer copy the image :(
-
must suck to be you
-
Ryrtf
-
Just copy the image that is on this page. That’s what I did. :_
-
it says I cant add noise to a layer with nothing on it?
-
just right click on his picture and save – worked for me when I found out the link was gone
-
plane does look more realistic
-


Leave a Reply