Luminar AI lets you turn your ideas into reality with powerful, intelligent AI. Download the photo editor and see how you can completely transform your photos in a few clicks.
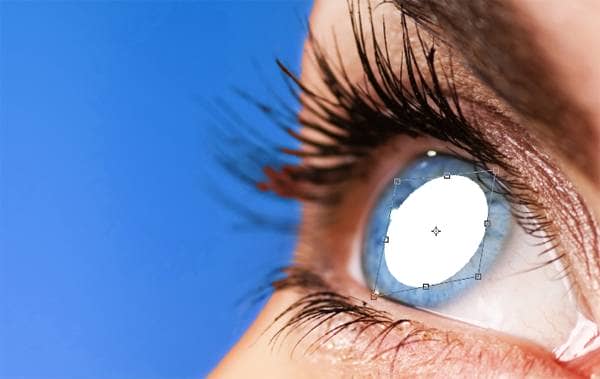
Step 7 – Apply layer styles to create the cutout effect
First, change the blending mode to multiply. Whenever you want to create transparent-looking cutouts or objects (ex. water drops, contacts, etc.), you’ll want to use the multiply blend mode.

Right click on the layer then choose blending options. Apply a Bevel and Emboss style with the settings shown in the image below. This will give the LASIK flap cutout effect on the eye.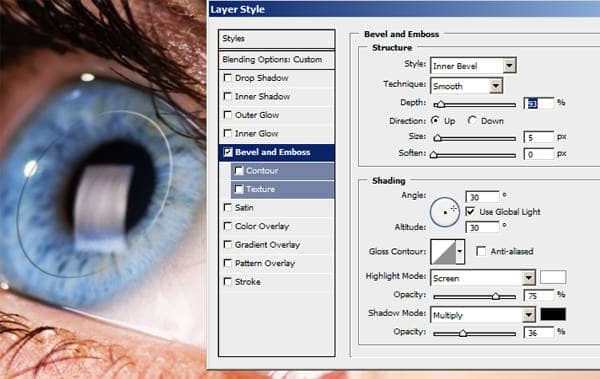
Apply an Inner Glow style with the settings below. This will darken the inside of the cornea.
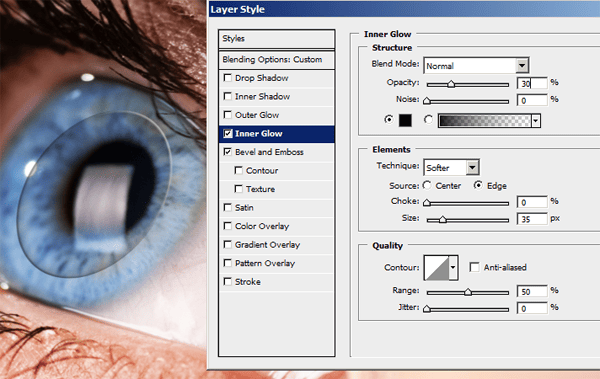
Click OK to exit out of the layer style window. The effect should look too strong. Lower the opacity until you get more realistic looking results.

And finally, here’s what the LASIK flap cutout looks like. Next, we’ll add the LASIK flap.

Step 8 – Rename the Layers
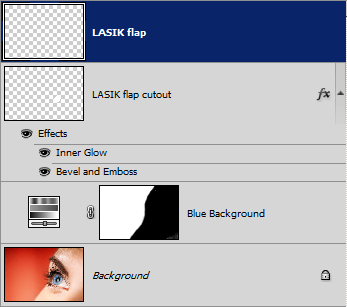
Usually if your document has few layers you don’t have to rename the layers. When you start to add more layers, you should rename your layers so that you can easily find the layer you want to work on. We’re starting to get more layers so we’ll rename the layers. Rename the adjustment layer to “Blue Background” and the top layer to “LASIK flap cutout”.
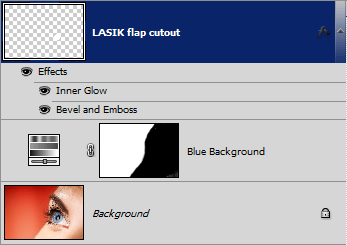
Step 9 – Create a new layer for the LASIK flap
Create a new layer as the top layer and rename this layer to “LASIK flap”.
Step 10 – Create the shape of the LASIK flap
Hold the Ctrl key and click on the thumbnail from the “LASIK flap cutout” layer. This will create a selection based on the transparency of the “LASIK flap cutout” layer. You should still have the “LASIK flap” layer selected. Fill the selection with white then press Ctrl+D to deselect.

Select the move tool and move the circle down like shown in the image below.

Press Ctrl+T to bring up the Free Transform tool. Hold the Ctrl key and drag the bottom left corner towards the center so that the circle becomes more round.
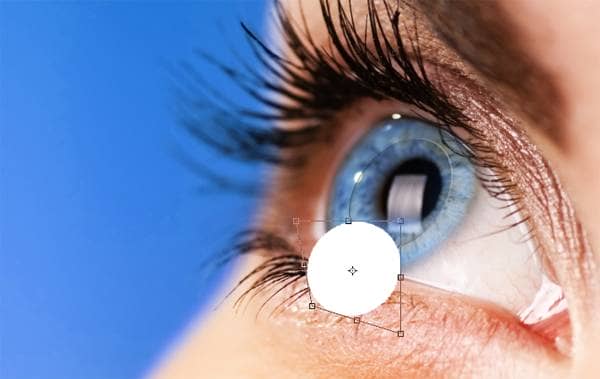
Choose Edit > Transform > Warp and on the option bar at the top, set the warp to Rise and click on the ![]() button to change the orientation of the warp.
button to change the orientation of the warp.

Drag the top left corner to create a shape like below.

Step 11 – Apply the layer styles for the LASIK flap
Right click on the “LASIK flap” layer and choose Blending Options.
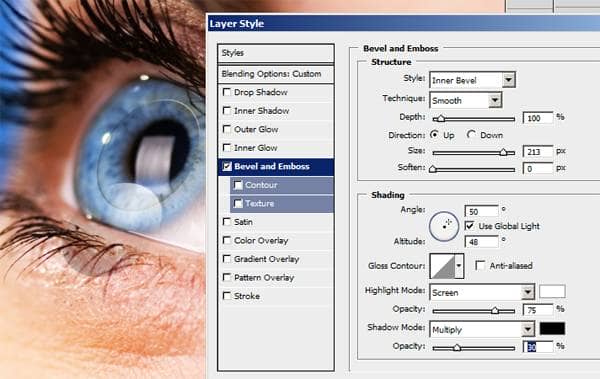
- Enable the Bevel and Emboss style.
- Increase the Structure> Size setting so that the bevel creates a rounded tip in the center. The center tip should not be flat.
- Lighten the shadow by reducing the Shading > Shadow Opacity setting.
- Finally, adjust the Shading > Angle setting. Click on the crosshair and position it so that you get a gradient effect on the LASIK flap like the image below.
- Enable the Stroke setting.
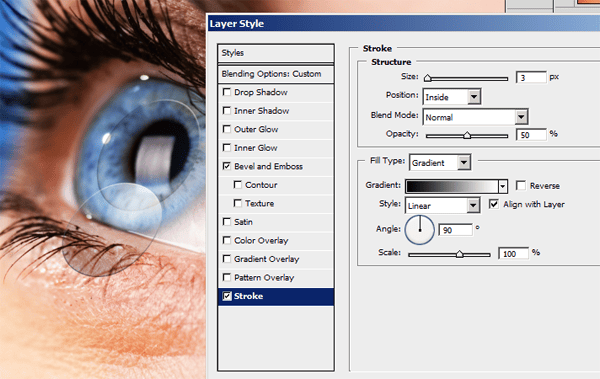
- Set the Fill Type to gradient. Adjust the Structure > Size setting so that you get a thin outline.
- Set the Structure > Position setting to inside.
- Reduce the Structure > Opacity setting to 50%.
- Click OK to apply the layer styles.
Step 12 – Connect the LASIK flap to the LASIK flap cutout
Use the polygon lasso tool to create a selection like shown in the image below. The selection edge should meet at the two corners where the LASIK flap and the LASIK flap cutout meets.


2 comments on “Perform Laser Eye Surgery on a Photo with Photoshop”
lol someone stole your pic and it got on Digg
http://i.imgur.com/9rwYKjs.png
can u pls send me through mail all of your tutorials.
These tutorials are more than useful for me.