Download Lightroom presets and LUTs, absolutely free. Use the presets to add creativity and style to your photos.
![step-018g[3] step-018g[3]](https://cdn.photoshoptutorials.ws/wp-content/uploads/migrated-images/ad2143290bbc_133F2/step-018g3.png?strip=all&lossy=1&quality=70&webp=70&avif=70&w=1920&ssl=1)
Add some colons were they are needed to sustain the tower.
![step-018j[3] step-018j[3]](https://cdn.photoshoptutorials.ws/wp-content/uploads/migrated-images/ad2143290bbc_133F2/step-018j3.png?strip=all&lossy=1&quality=70&webp=70&avif=70&w=1920&ssl=1)
![step-018k[3] step-018k[3]](https://cdn.photoshoptutorials.ws/wp-content/uploads/migrated-images/ad2143290bbc_133F2/step-018k3.png?strip=all&lossy=1&quality=70&webp=70&avif=70&w=1920&ssl=1)
Step 19
Add some small people on each level of the tower.
![step-019[3] step-019[3]](https://cdn.photoshoptutorials.ws/wp-content/uploads/migrated-images/ad2143290bbc_133F2/step-0193.png?strip=all&lossy=1&quality=70&webp=70&avif=70&w=1920&ssl=1)
![step-019a[3] step-019a[3]](https://cdn.photoshoptutorials.ws/wp-content/uploads/migrated-images/ad2143290bbc_133F2/step-019a3.png?strip=all&lossy=1&quality=70&webp=70&avif=70&w=1920&ssl=1)
Step 20
Select the brush tool (1-2 px) and draw some lines so it will look like dry grass.
![step-020[3] step-020[3]](https://cdn.photoshoptutorials.ws/wp-content/uploads/migrated-images/ad2143290bbc_133F2/step-0203.png?strip=all&lossy=1&quality=70&webp=70&avif=70&w=1920&ssl=1)
Step 21
Adjustment Layer – Color Balance. Use this on the right part of the tower to create the sensation of light.
![step-021[3] step-021[3]](https://cdn.photoshoptutorials.ws/wp-content/uploads/migrated-images/ad2143290bbc_133F2/step-0213.png?strip=all&lossy=1&quality=70&webp=70&avif=70&w=1920&ssl=1)
Step 22
Using a basic brush draw the bottom part of the tower on top of the sand.
![step-022[3] step-022[3]](https://cdn.photoshoptutorials.ws/wp-content/uploads/migrated-images/ad2143290bbc_133F2/step-0223.png?strip=all&lossy=1&quality=70&webp=70&avif=70&w=1920&ssl=1)
Step 23
Select a grass brush and place it on the cliff just like I did in the image below. Add some light on the grass.
![step-023[3] step-023[3]](https://cdn.photoshoptutorials.ws/wp-content/uploads/migrated-images/ad2143290bbc_133F2/step-0233.png?strip=all&lossy=1&quality=70&webp=70&avif=70&w=1920&ssl=1)
![step-023a[3] step-023a[3]](https://cdn.photoshoptutorials.ws/wp-content/uploads/migrated-images/ad2143290bbc_133F2/step-023a3.png?strip=all&lossy=1&quality=70&webp=70&avif=70&w=1920&ssl=1)
Step 24
Merge all the layers into one and go to Filter-Other-High Pass (1 px). Set the layers blending mode to overlay.
![step-024[3] step-024[3]](https://cdn.photoshoptutorials.ws/wp-content/uploads/migrated-images/ad2143290bbc_133F2/step-0243.png?strip=all&lossy=1&quality=70&webp=70&avif=70&w=1920&ssl=1)
Step 25
Adjustment Layers – Hue\Saturation
![step-025[3] step-025[3]](https://cdn.photoshoptutorials.ws/wp-content/uploads/migrated-images/ad2143290bbc_133F2/step-0253.png?strip=all&lossy=1&quality=70&webp=70&avif=70&w=1920&ssl=1)
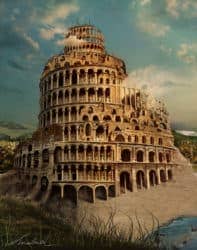
Final Results
![final-results[7]](https://cdn.photoshoptutorials.ws/wp-content/uploads/2010/11/The-Babel-Tower.jpg?strip=all&lossy=1&quality=70&webp=70&avif=70&ssl=1)
Download the PSD
The Babel Tower.zip | 7 MB

![profile[3] profile[3]](https://cdn.photoshoptutorials.ws/wp-content/uploads/migrated-images/ad2143290bbc_133F2/profile3.jpg?strip=all&lossy=1&quality=70&webp=70&avif=70&resize=125%2C125&ssl=1) I am a Romanian freelance artist with a passion for art. I love both traditional art and digital art as well.
I am a Romanian freelance artist with a passion for art. I love both traditional art and digital art as well.

2 comments on “The Babel Tower Photo Manipulation”
This is an incredible piece I am so stoked to try it out. Thanks!
how to cut and paste a head of a person