
In this tutorial, I will show you how you can make a stylized 3D textured text effect using various textures to give it a unique look with Illustrator & Photoshop. I will be giving you the step by step instructions along with the links to the resources & stuffs used.
Preview of Final Results

3D Textured Text Photoshop Tutorial
Step 1
Open up Illustrator, and with the Type Tool type a letter or text, I typed the letter “C” I used the font Adobe Caslon Pro,you can use any font that you like, just make sure that it is a bit thick font to yield better results. I set the font size to 400 pt & scaled it horizontally & vertically to 150% through the Character Palette, though don’t worry about the font size too much because we’ll be pasting it as Smart Objects in Photoshop so we can adjust the size at any given time. The color I used for the letter is #8CC63F.

Step 2
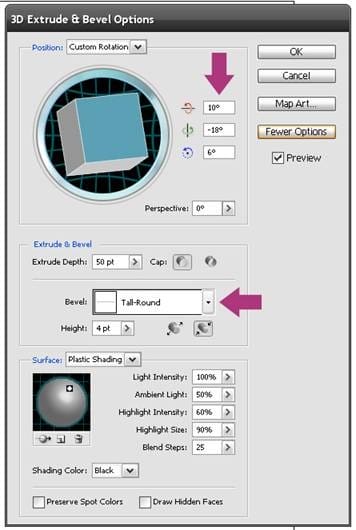
Now go to Effect>3D>Extrude & Bevel, make sure that Previewis on. Use the settings shown below, apart from specifying rotations for x, y & z axis, I chose Tall-Round from the Bevel drop down list. The settings will more or less depend on the font, so if you have used a different font play a bit, though I will advise to stay away from the fancier Bevel settings, mostly None setting works best. You can also make it more thick by increasing the Extrude Depth.
Step 3
After you’re happy with your 3D effect, it will be time to move on over to Photoshop. Open a new document in Photoshop. Now, copy your 3D text/letter from Illustrator & paste it as Smart Object in Photoshop, press Enter key or checkmark to commit. You can now resize your text to whatever size you want, in fact, bigger the better, but for the purposes of this tutorial, I will stick to a small canvas.

Power Tip: If for any reason, you want to edit the pasted 3D Smart Object, just double click on the Vector Smart Object thumbnail in the Layer Palette, press OK on the resulting window, the Smart Object will automatically open up in Illustrator, do the changes or editing you want, then go to File>Save & close the file & tadaa the changes will reflect in your Photoshop file.
17 responses to “3D Textured Text Effect”
-

I really like this product because its aimed
-
hi
-
hi i am vishal rana i am graffics designer in surat.i have used photoshop, illustrater,coral & flaceCS3 so your have requerment in your company.i have complite my education T.Y B.COM complite.
-
I wanted to thank you for posting this tutorial, I had a lot of fun learning.
This is what my image turned out like http://s747.photobucket.com/user/Sensaki610/media/Anyone/merci002f_zps93221ff8.png.html
One note the link on Page 2 “another texture pack” no longer exists, however I was able to use a similar image here http://joorteloog.deviantart.com/art/numbing-blow-160234146
I am retired and Photoshop and other Adobe apps are a hooby.
Thanks again John.
-
thanks for tutorial. i’m still a bit confused about how much PS distinctive in comparison with AI on the fly objects customization
-
i like
now its simple before -
Thank you so much.
-
Np
-
-
hi
-
Naren
ojha -
Thank you so much it was very helpful everyone!
-
thanks very much for this tut – it was really helpful and clear!
-
I thought this was for photoshop. I don’t have illustrator
:( -
Ayyo
-
Here is very good.
-
Can anybody help me out pls…
How can i place or Overlape any image on this 3D Art…??
As in this they do some flowers & leaves on the 3D image of “C”…-
You can fill option.. :)
-
Leave a Reply