
– Drop Shadow: Change the Distance to 2 and the Size to 8.

– Bevel and Emboss: Change the Size to 7, the Highlight Mode color to #bfbfbf, and the Shadow Mode color to #797979.

– Contour: Choose the Cove – Deep contour.

– Pattern Overlay: Choose the “Rack Pattern”.

This should give the Rack a nice beveled and textured look.

Step 13
Double click the “Rack – H” layer to apply the following Styles:
– Drop Shadow: Change the color to #848484, the Distance to 0 and the Size to 4.

– Bevel and Emboss: Change the Size to 4, the Highlight Mode color to #bfbfbf, and the Shadow Mode color to #797979.

– Contour: Choose the Cove – Deep contour.

– Pattern Overlay: Choose the “Rack Pattern”.

This is what you should get.

Apply the same Layer Styles to the “Rack – V” layer. (Right click on the “Rack – H” layer, choose Copy Layer Style, then right click on the “Rack – V” layer, and choose Paste Layer Style).

Step 14
Select the “Shadow” layer, change its Blend Mode to Multiply and it Opacity to 50%. With the Move Toolactive, use the Arrow keys to move the shadow around (to the left and downwards). The extra parts we left will ensure that no empty areas appear when the shadow is moved.

Go to Filter -> Blur -> Gaussian Blur and set the Radius to 1.5.

Once you’re done moving the shadow, use the Ractagular Marquee Tool to select and delete the extra parts from the “Rack – V”, “Rack – H”, and “Shadow” layers.

Step 15
The last thing we are going to do is toning down the colors, so this is optional. Click the Create new fill or adjustment layer icon and choose Vibrance.

Set the Vibrance value to -15.
Note: If the colors you get still look so red and vibrant, this might be caused by the color settings you have in Photoshop. To fix this, click the “Create new fill or adjustment layer” icon again, and choose Color Balance. With the Midtones option checked, change the Color Levels to -17, +4, -4.

And that’s it! Hope you enjoyed this tutorial and found it useful. Will be glad to know your thoughts and read your comments.
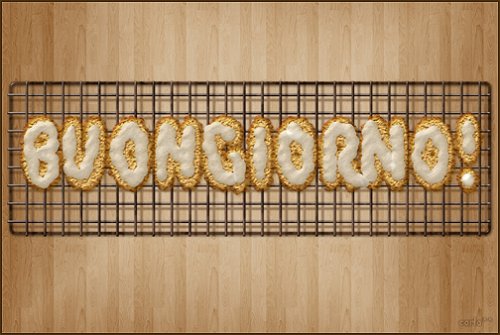
Final Result
![final-results[1]](https://cdn.photoshoptutorials.ws/images/stories/b4ba78947634_FA1/final-results1.png?strip=all&webp=82&avif=82&w=1920 "final-results[1]")
Download the PSD
Frosted Cookies Text Effect.zip | 5.4 MB
Download from FileSonic
10 responses to “Create Delicious Cookie Text Using Photoshop”
-

Nice Tutorial =)
-
Awesome!!!!
Thanks for sharing these steps and performance!! -
Absolutely wonderful,
-
Absolutely wonderful, easy to follow and thorough tutorial! Thank you very MUCH for this!!!
-
Very very nice tutorial!
My version here:
http://car51.altervista.org/_altervista_ht/nuova/biscotti_bgiorno.jpg -
Very very nice!
My version here
http://car51.altervista.org/_altervista_ht/nuova/biscotti_bgiorno.jpg
-
Excelente tutorial. Gracias!!
-
where the heck is the cell pattern
-
Thank you Rose for a great tutorial. It was easy to follow and I enjoyed following along.
-
This is a very super tutorial. Easy to follow, detailed. Thank you so much!
Leave a Reply