

– Texture: Choose the Cells pattern, and change the Depth to 50.

– Satin: Change the Blend Mode to Saturation and the color to #838383.

– Color Overlay: Set the color to #ebe1c6.

Step 9
After the Layer Styles are applied, we are going to modify the frosting brush. Open the Brush panel again (Window -> Brush), choose a hard round brush, and under Brush Tip Shape set the Size to 45, the Hardness to 100%, and the Spacing to 25%.

Under Shape Dynamics, set the Size Jitter to 75%, and make sure other values are set to 0.

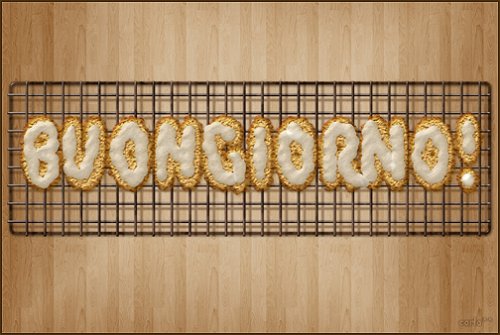
With the “Frosting” layer selected (active), start adding the frosting. Try moving slow and fast to see how the brush works in both cases. Because the Layer Styles are already applied, you’ll notice that the brush flows smoothly, kinda’ like a real frosting does!
Keep in mind that you can change the size of the brush, undo and redo, add or remove parts from different areas. Take your time with this step, we want the cookies to look as delicious as possible!

Once you’re done adding the frosting, duplicate the “Frosting” layer, then right click on the copy and chooseClear Layer Style.

Make sure that the Foreground and Background colors are still set to #eae2cb and #c3a46c.

Go to Filter -> Noise -> Add Noise, and set the Amount to 10, the Distribution to Uniform, and check the Monochromatic box.

Change the “Frosting copy” layer’s Blend Mode to Soft Light and its Opacity to 50%. This will enhance the frosting color and give it a nice shine.

We’re done with the text effect. Next, we are going to create the rack.
Step 10
Create a new 42 x 1 px document with a Transparent Background.

Press Ctrl/Cmd + R to show the Ruler. Click and drag a guide from the vertical ruler, and place it in the center of the document. (Check the Snap option under the View menu so that the guide will snap to the center of the document when you drag it).

This is optional, but it can be a bit helpful. Go to Edit -> Preferences -> Cursors, and check the Show Crosshair in Brush Tip box.

Back to the document, (you can zoom in to make things clearer), choose a round hard brush, set its size to 15, and set the Foreground color to #5a391d. Place the center of the brush on the guide outside the document from the top, press and hold the Shift key, then drag the brush to the bottom.
10 responses to “Create Delicious Cookie Text Using Photoshop”
-

Nice Tutorial =)
-
Awesome!!!!
Thanks for sharing these steps and performance!! -
Absolutely wonderful,
-
Absolutely wonderful, easy to follow and thorough tutorial! Thank you very MUCH for this!!!
-
Very very nice tutorial!
My version here:
http://car51.altervista.org/_altervista_ht/nuova/biscotti_bgiorno.jpg -
Very very nice!
My version here
http://car51.altervista.org/_altervista_ht/nuova/biscotti_bgiorno.jpg
-
Excelente tutorial. Gracias!!
-
where the heck is the cell pattern
-
Thank you Rose for a great tutorial. It was easy to follow and I enjoyed following along.
-
This is a very super tutorial. Easy to follow, detailed. Thank you so much!
Leave a Reply