

The reason why a brush is used instead of a fill is that it gives a smoother result.

Go to Edit -> Define Pattern, and type in Vertical.

Go to Image ->Image Rotation -> 90° CW, then, once again Edit -> Define Pattern, and type in Horizontal this time.

Step 11
Back to the original document, create a new layer right on top of the original text layer, and call it “Rack”. Pick theRounded Rectangle Tool, click the Paths icon in the Options Bar, and type in 10 for the Raduis value. Draw a round rectangle path around the text.

With the Foreground color still set to #5a391d, stroke the path just like you did back in Step 2 (Right click -> Stroke Path, choose Brush and un-check the Simulate Pressure box).

Create a new layer on top of the “Rack” layer and call it “Rack – V”. Pick the Paint Bucket Tool, and choose theVertical pattern to fill the document.

Using the Rectangular Marquee Tool, draw a rectangular selection around the area you want to keep. Make sure that all the lines are inside the rack’s base, nothing outside it or intersecting with it from the left and right sides, but leave some extra (10 – 15 px) parts at the top and the bottom. We will need those later on to create the shadow.

Go to Select -> Inverse, and hit Delete to get rid of the unwanted lines..

Create a new layer below the “Rack – V” layer and call it “Rack – H”. Fill it with the Horizontal pattern. You can move the pattern around if you want to change its position.

Once again, use the Rectangular Marquee Tool to select the parts you want to keep. This time, leave the extra parts on the right and left sides of the rack.

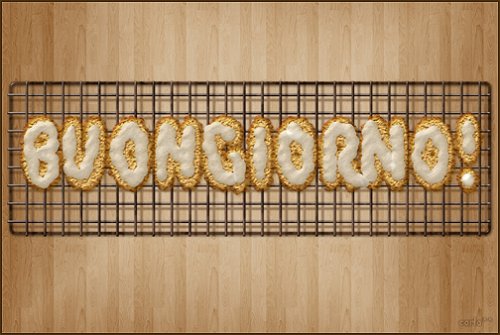
This is what you should get.

Step 12
Press the Ctrl/Cmd key, and click on the “Rack – V” and “Rack – H” layers to select them, then duplicate them and drag them so that they are below the original layers. Press Ctrl/Cmd + E to merge the copy layers, and rename the merged layer to “Shadow”.

Open the Rusty Texture image, then go to Edit -> Define Pattern and type in “Rack Texture” for the Name.

Double click on the “Rack” layer to apply the following Styles:
10 responses to “Create Delicious Cookie Text Using Photoshop”
-

Nice Tutorial =)
-
Awesome!!!!
Thanks for sharing these steps and performance!! -
Absolutely wonderful,
-
Absolutely wonderful, easy to follow and thorough tutorial! Thank you very MUCH for this!!!
-
Very very nice tutorial!
My version here:
http://car51.altervista.org/_altervista_ht/nuova/biscotti_bgiorno.jpg -
Very very nice!
My version here
http://car51.altervista.org/_altervista_ht/nuova/biscotti_bgiorno.jpg
-
Excelente tutorial. Gracias!!
-
where the heck is the cell pattern
-
Thank you Rose for a great tutorial. It was easy to follow and I enjoyed following along.
-
This is a very super tutorial. Easy to follow, detailed. Thank you so much!
Leave a Reply