
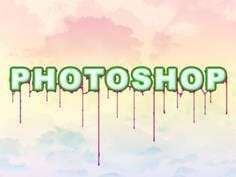
Step 10
If you try Ctrl+clicking on the text layer you will notice that the selection will not include the border around the text, this will become a problem in the next few steps as you will see. The easiest way to overcome this is to first duplicate the text layer then drag it below the original text, now create a new layer directly below the new text layer then select the new text layer and merge it down (Ctrl+E) then name it ‘selection’. Now if you Ctrl+click this layer you will notice the selection covers the border of the text and we also still have our original text which can be edited easily.

Step 11

Create a new layer group named lines, this time above the text layer although still in the foreground group. Create a new layer then select the pen tool and draw path, making sure to hold and drag after each point to ensure the path is smooth. Next right click on the path and select stroke path and don’t check simulate pressure. The result should be similar to below. On these brushes, using simulate pressure will blend out both ends of the line which is not what we want here.
Step 12
Now select the eraser (E) and use a 100px diameter, 0% hardness and 30% opacity to fade out the end of the line. Also use the blur tool (R) with a similar brush to blur some parts of the line.
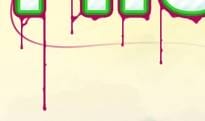

Step 13
Now we will use that layer we created back in step 10 to remove parts of this line accurately. The concept behind this method is to use our selection layer to select all our text then create a new selection manually and intersect these selections, let’s see how it works. ![]()
First Ctrl+click on the selection layer then select the polygonal lasso tool (L) and in the main toolbar change it to intersect mode. Choose a part of the line that you want behind the text then draw round that part of the text then select the layer with the line in it and hit Delete. So in the image here, I want the line to go behind the left part of the ‘H’, note that I didn’t draw accurately around the ‘H’ this is because only the parts included in both selections will become our final selection. Continue using this method for other parts of the line to give the impression it weaving in and out of the text.
11 responses to “Decorating Text”
-

Very nice art work. My path was not so smooth, need more practice. I could hide some imperfections in color mode:-). My pattern creation was not cool, either. TU so much for sharing.
-
Still The First Step to Create Pattern was confusing. What you mean by use polygon tool and make the first image. We didn’t get. Anyone one can help? What it really means?
-
i don’t understand the first step, could someone please elaborate? :)
thanks-
I got a little confused there too. What you do is create a new layer, hide the background by clicking the eye looking button on the left of it, click your color square at the bottomish left and put in the hex code number #808080 if you dont know what that is, it is the bottom middle option when you click the color square. Then just set layer 1 to that color. Next you use the polygonal lasso tool to recreate the first image that was shown. So just use the lasso tool to select parts to delete to RECREATE the FIRST image shown. Hope I helped!
-
-
CULO
-
awesome !!
-
great shareing i love it
-
how do you add the things coming off of the letters?
-
I love it ;P no i hate it f off
-
Bet you can do a lot better
-
-
Awesome! Great Tutorial. I did it with my name :)
Leave a Reply