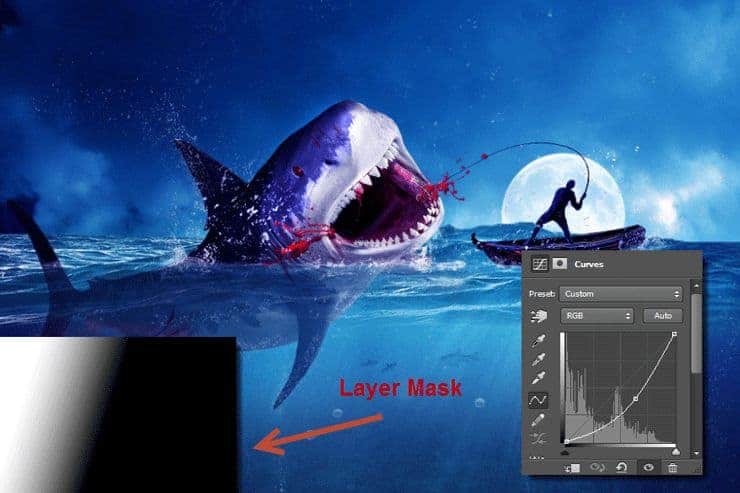
Step 58
Time to add some splashes. Open the file “Splash1”. Choose Select > Color Range. Click once on a white spot on the image to make a selection of the drops and click ok.

Step 59
Now that we have a selection of the splash press Ctrl + J to make a new layer from the selection. Ctrl + A to select all, Ctrl + C to copy and while back in our working document Ctrl + V to paste the water drops.

Step 60
Add a layer mask and mask all the unwanted parts until you have something like the image below.

Step 61
Repeat the steps 59-60 two more times to add splashes in the indicated regions but this time using “Splash2” image.

Step 62
Import the splash brush. Create as many layers as you see fit and create splashes on them using the brush. You can mask portions of the splash you don�t like. Place some splashes around the shark and some around the boat. Group all the splashes together and further add a layer mask to the group to refine where the splashes are.

Step 63
Create a Color Balance adjustment layer. Use the settings shown below in order to achieve a darker, more interesting mood.

Step 64
Create a new layer and set the blending mode to Overlay. With a soft brush paint with white over the areas indicated below in order to emphasize them.

Step 65
Create a Curves adjustment layer. Drag the curve down to darken. Select the gradient tool and in the layer mask drag from the up left corner towards the right bottom corner with black and white as default colors in order to reveal the darkening effect only in the upper left portion of the scene.

Download the PSD
Tutorial by Johan Sandu
8 responses to “Amazing Surreal Shark Photoshop Tutorial You Have to Try”
-
wow amazing, thx for tutorial.. :D
-
great
-
Excuse my language, but, this looks bloody terrifying! Thank you for sharing!
-
excuse my language, but this is insane
-
-
thank you for uploading and creating this tutorial man–much appreciated!
-
nice
-
Wow Great work
-
Nice work


Leave a Reply