If you’re an artist who wants to get into the world of non-fungible tokens (NFTs), you know the difficulties of protecting your work from piracy. Because anyone can mint an NFT, it’s easy for someone to simply copy your work and sell it as their own. With Content Credentials, you can easily add attributions to your work that will help prove that you’re the original creator. Follow this tutorial to learn how to export your artworks as NFTs in Photoshop.
Content Credentials
Content Credentials is a feature in Photoshop that allows artists to add authentication to their work. This helps buyers know that the NFT they’re purchasing is made by the artist.

Content credentials are linked to your Adobe account. Your Adobe account is linked to your social media accounts (Behance, Instagram, and Twitter) and Web3 wallets (MetaMask and Phantom). Assuming you are the only one with the passwords to your accounts, this proves that the NFT was made by you, as you are the only one who can add that connection between your Adobe account and your social media accounts and Web3 wallets.

If a buyer sees that your NFT has content credentials, they can feel assured that it’s made by you and not someone who copied your work.
Content Credentials are not a bulletproof solution to piracy, but they are a strong deterrent. Anyone can download your image and post it back up as an NFT. They can also create a fake Adobe account that is connected to fake social media and Web3 wallets. Content Credentials are deterrents and they won’t prevent every act of piracy, but they’re the best solution we have right now to help artists protect their work.
How to export your artworks with Content
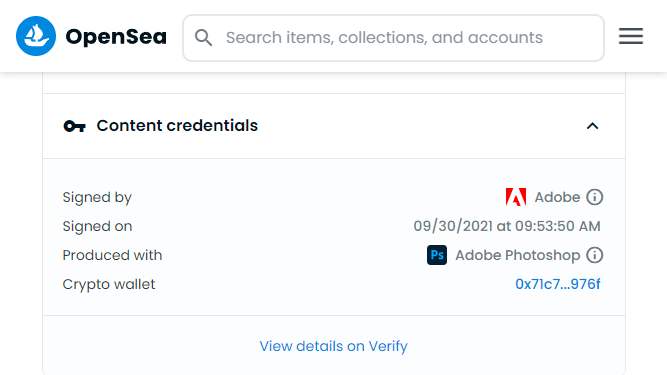
With Photoshop, you can add content credentials to your artwork which will appear alongside your NFT. This helps add authenticity to your NFT and lets buyers know that it’s made by you.
Step 1
First, we’ll need to enable Content Credentials. Go to Edit > Preferences > History & Content Credentials. Under “Content Credentials”, checkmark Enable then click OK.

Step 2
Open the image that you want to export as an NFT in Photoshop.

Step 3
Open the Content Credentials panel by going to Window > Content Credentials.

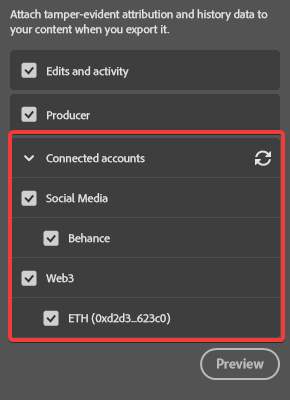
Here, you can choose what information to add to the content credentials.
- Edits and activity: Store a history of your editing process
- Producer: Add your name to the content
- Connected accounts: Add your social media accounts and Web3 wallet addresses to the content

Step 4
Before you can add your social media accounts and Web3 wallets to the Content Credentials, you’ll need to connect them to your Adobe account first. Click on the “Connect accounts” button, or visit the Adobe Connected Accounts website to add them.

On the Adobe Account website, click on the Add button and follow the instructions to link to your accounts.
Important: If you have multiple Adobe accounts, such as a work and personal account, make sure that you are logged in to the correct account.

Step 5
After connecting your accounts, go back to the Content Credentials panel and click on the refresh icon. You should see your accounts listed.

Click on the Preview button to verify that all of the information is correct.

Step 6
To export your artwork, go to File > Export > Export As. In the Content Credentials section, checkmark the “Attach to image” option. Click on the Export button to save your image.

Step 7
You can now create an NFT using the image you just exported.
Here are a few NFT marketplaces that support Content Credentials:
Important: For Content Credentials to work, the Web3 address used to mint the NFT must match the address linked to your Adobe account.


Step 8
To check if your NFT has Content Credentials, import the image into Verify.
If it worked, Verify will show the Content Credentials, including your social media accounts and Web3 wallets.


Leave a Reply