Create an Abstract Sci-Fi Scene with Photoshop

Create an Abstract Sci-Fi Scene with Photoshop

In this tutorial, I'll show you how to create an abstract sci-fi scene. You'll learn how to combine different stock photos, create abstract elements, work with groups and adjust lighting effect.

We'll start this tutorial by setting up a night scene from a sky, two deserts images and starry textures. Then we'll add the planets, the model, apply some nebula textures as well as create some abstract elements and blend them all together using an adjustment layer, masking and brush. Finally, we'll add more lighting effect and adjust color of the whole scene. You'll need Photoshop CS3 or newer to follow this tutorial.

Tutorial Resources

Step 1

Create a new document in Photoshop with the given settings:

scifi1

Step 2

Press Cmd/Ctrl+Shift+N to make a new layer. Hit G to active the Gradient Tool and choose Radial Gradient with the colors #384962 and #09131d. Drag a line from the top center to the bottom of our white canvas:

scifi2

Step 3

Open the star background pack. I chose the image "starry 1" to drag onto our main document and change the mode to Color Dodge 100%:

scifi3
scifi3a

Duplicate this layer three times and arrange them around the dark background to make the starry effect stronger and more visible:

scifi3b

Step 4

Place the sky image over the main document and change the mode to Soft Light 100%:

scifi4
scifi4a

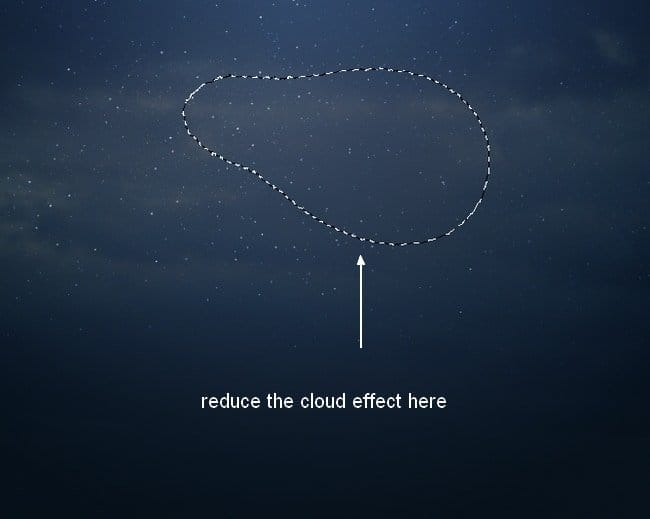
Click the second button at the bottom of the Layers Panel to add a mask to this layer. Use a basic, soft brush with black color, the opacity about 30-40% to reduce the cloud effect on the background:
scifi4b

Step 5

Drag the background image into our working document:

scifi5

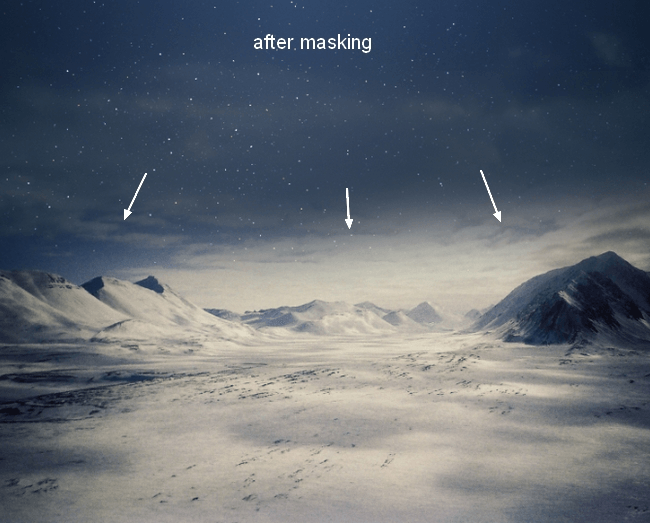
Add a mask to this layer and use a soft black brush to remove the sky edges and blend it with the starry sky:
scifi5a

Step 6

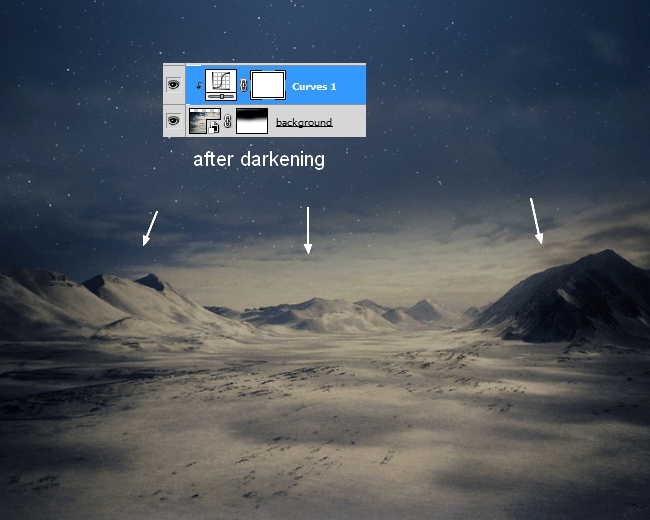
I used an adjustment layer with Clipping Mask to darken the desert. Go to Layer > New Adjustment Layer > Curves:

scifi6
scifi6a

Step 7

I used a Color Balance adjustment layer (Clipping Mask) to match the desert color with the background:

scifi7
scifi7a

Step 8

Open the foreground image and place it in the foreground of our main document, transform it as shown below:

scifi8

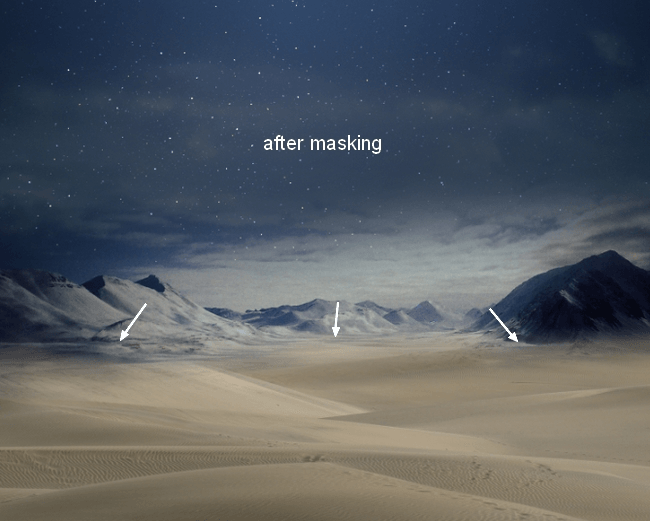
Add a mask to this layer and blend the foreground with the background:
scifi8a

Go to Filter > Blur > Gaussian Blur and set the radius to 8px:

scifi8b

On the Filter Mask use a soft black brush to remove the blur effect on the midground and background and create a depth for the scene:

scifi8c

Step 9

I used Curved to darken the foreground. On this layer mask use a soft black brush with the opacity about 40-45% to reduce the dark effect on the part near the background:

scifi9

Step 10

I used Color Balance the change the foreground color:

scifi10

Step 11

To add some misty effect to the scene, I made a new layer, used a soft brush with the color #cadbe7, the opacity and flow about 50% to paint over the image, especially the mountains:

scifi11

Step 12

Open the planet 1 file. Hide the dark background and press Cmd/Ctrl+Option/Alt+Shift+E to merge all visible layers. Move the merged planet into our main document, place it at the top right of the sky. Position this layer under the foreground and background ones.

scifi12

Change the mode to Screen 100% and use a layer mask to blend the dark side of the planet with the sky:

scifi12a

Duplicate this layer and resize it to be smaller. Place it beside the first:

scifi12b

Step 13

Place the planet 2 at the left side of the image, behind the mountains, change the mode to Screen 100%. Use a layer mask to blend it with the sky:

scifi13
scifi13a

Step 14

Open the star background pack. I chose the image "starry 5" and placed it onto the planets at the top right. Use Cmd/Ctrl+T (Warp mode) to tweak it and set this layer under the planet group:

scifi14

Change the mode to Screen 100%:

scifi14a

Step 15

I used Hue/Saturation for this layer:

scifi15

I used Levels to change the contrast of this effect:

scifi15a

Step 16

Place the nebula 2 image at the left side of the sky and change the mode to Screen 100%:

scifi16

Use a layer mask to erase a part on the image as shown below:

scifi16a

Step 17

I used Hue/Saturation for this effect:

scifi17

I used Levels to remove its visible edges:

scifi17a

Step 18

Open the nebula 3 image. Press Cmd/Ctrl+J to duplicate this layer. Go to Filter > Liquify and choose the Forward Warp Tool (W):

scifi18

Use this tool to tweak the nebula effect as I did below:

scifi18a

Drag this layer into our working document and place it above the nebula 2 layer (still under the planets, foreground and background ones). Use Cmd/Ctrl+T to transform it as shown below:

scifi18b

Change the mode to Screen 100% and use a layer mask to reduce the effect at the top edges of the scene and on the planets:

scifi18c

Step 19

I used Levels to darken the effect:

scifi19

Step 20

Place the nebula 1 image in the center of the sky and change the mode to Screen 100%:

scifi20

Use a layer mask to remove the light on the middle and at the edge to get a subtle effect:

scifi20a

Duplicate this layer and use the Warp Tool (Edit > Transform >Warp) to bend this nebula image as shown below:

scifi20b

Use a layer mask to remove the hard edges and leave the effect visible only on the planet 2:

scifi20c

Step 21

Make two these layers selected and press Cmd/Ctrl+G to group them. Change this group mode from Pass Through (default group mode) to Screen 100%. Make a Hue/Saturation adjustment layer to change the color of the nebula 1:

scifi21

On this layer mask I used a soft black brush to erase the middle as I didn't want it to be affected by this adjustment layer:

scifi21a

Step 22

I used Color Balance for this effect:

scifi22
scifi22a

Step 23

I used Curves to make the effect more subtle and on this layer mask used a soft black brush to erase the sides as shown below:

scifi23
scifi23a

Step 24

Place the model stock photo in the middle section of the ground and remove the background using a layer mask. Set this layer on the top.

scifi24

To make her shadow, make a new layer under the model one. Hold down Cmd/Ctrl while clicking the model layer mask thumbnail to load its selection:

scifi24a

Fill this selection with black (Shift+F5) and convert it to a Smart Object. Flip it vertically (Edit > Transform > Flip Vertical) and lower the opacity to 50%. Move it under the model feet and transform it using Cmd/Ctrl+T:

scifi24b

Apply Gaussian Blur with 3px and use a layer mask to blur the top of the shadow a little:

scifi24c
scifi24d

Step 25

I used Hue/Saturation to reduce the model saturation:

scifi25

Step 26

Make a Color Balance adjustment layer for the model:

scifi26

Step 27

I used Curves to brighten the dark side of the model and on this layer mask erase the brighter side a little:

scifi27

Step 28

Make a new layer on the top and use the Elliptical Marquee Tool (L) to make a selection of a circle above the mode (hold down the Shift key while drawing it):

scifi28

Go to Edit > Stroke and pick white color:

scifi28a
scifi28b

Add a layer mask and use a black brush to break the circle and blur its opacity as shown below:

scifi28c

Duplicate this circle twice, resize them and arrange them inside the first circle. I lowered the middle circle opacity to 50%. Mask them off with the same rule:

scifi28d

 Step 29

Active the Line Tool (U) with the settings below:

scifi29

Draw many lines around the planets and above the mountains top, arrange them as you like to get an abstract feel (remember to make them on the separate layers). Here is mine:

scifi29a

Add a mask to several layers and reduce the opacity of the lines, especially at their two sides to avoid a rigid look

scifi29b

Step 30

Draw six lines above the model arms and arrange them to get a look of her holding these lines. I lowered the opacity of some lines to 30, 50 and 70%:

scifi30

Step 31

Create a new layer on the top. Use the Elliptical Marquee Tool to draw a circle:

scifi31

Active the Gradient Tool with Radial Gradient, the colors #834115 and #f8b2f2. Drag a line from the bottom left to the top right:

scifi31a

Convert this layer to a Smart Object and scale it down:

scifi31b

Duplicate this layer several times and arrange the spheres on the top of the lines on the mountains, in the sky, beside the planets and above the desert. I applied Gaussian Blur with 8 px to the sphere nearest the foreground and to another 4px to add some depth to the scene:

scifi31c

Step 32

For the one beside the two planets, I used Channel Mixer to change its color:

scifi32

Step 33

Make a group for all the spheres and change the group mode to Normal 100%. Use Hue/Saturation to desature some of them:

scifi33

On this layer mask use a soft black brush to reduce this adjustment layer effect, especially the ones above the lines and in the sky:

scifi33a

 Step 34

I used Color Balance for these spheres to add some blue to them:

scifi34

On this layer mask use a soft black brush to clear the effect on the ones on the desert:

scifi34a

Step 35

I used Curves to brighten some spheres:

scifi35

On this layer mask use a soft black brush to erase the ones on the desert and in the sky as they're in the dark side of the scene:

scifi35a

Step 36

Make a new layer on the top. Use a soft brush with the color #d65f35 and #fbbd59 to spot on the picture as shown below:

scifi36

Convert this layer to a Smart Object and use Cmd/Ctrl+T to transform it into a line, place it above one of the model arms, between the white lines:

scifi36a

Change this layer mode to Linear Dodge 100% and duplicate it, place it above the another arm:

scifi36b

Step 37

Duplicate this layer twice and use the Warp Tool to bend it. I placed them at the top left and right:

scifi37

I applied Gaussian Blur with 3 px to them to soften the edges:

scifi37a

Step 38

Make a group for this light effect and change the group mode to Linear Dodge 100%. I used Color Balance for this effect:

scifi38

On this layer mask erase the light lines on the model arms:

scifi38a

Step 39

Drag the nebula 4 image onto the white circles, change the mode to Screen 100%. Use the Warp Tool to tweak the effect a little:

scifi39

Use a layer mask to erase the effect as shown below:

scifi39a

Duplicate this layer and place it onto the model body:

scifi39b

Step 40

Open the wireframe pack. I choose a triangle one and put it inside the white circles:

scifi40

To invert its color, go to Layer > New Adjustment Layer > Invert:

scifi40a

Step 41

Duplicate the planet 1 and place it inside the wire triangle. Place this layer above the planets group and change the mode to Normal 100%:

scifi41

I used Curves to reduce the planet contrast:

scifi41a

Step 42

I used Color Balance to change its color:

scifi42

Step 43

Open the light effect pack. I chose the number 40 and duplicated the background layer. Go to Filter > Liquify and tweak it as done with the nebula 3 in the step 18:

scifi43

Place it onto the model body and change the mode to Screen 100%. Use the Warp Tool to bend it a little to fit the model body:

scifi43a

Duplicate it five times and arrange them around the model body to make the light effect more visible, use a layer mask if needed to remove the unnecessary parts:

scifi43b

Step 44

Duplicate the first layer twice and make them bigger using Cmd/Ctrl+T. Place them inside the white circles:
scifi44

Use a layer mask to erase some unwanted details and make the effect more subtle:

scifi44a

Step 45

Make a group for the light layers in the two previous steps and change the group mode to Screen 100%. Use Color Balance to add more warm tone to them:

scifi45

Step 46

It's time for coloring the scene. Create a Gradient Map adjustment layer on the top:

scifi46

Change this layer mode to Soft Light 100%:

scifi46a

Step 47

I used Color Balance to add some cyan/blue to the image:

scifi47
scifi47a

Step 48

I used Selective Color to adjust the cyan settings:

scifi48
scifi48a

Step 49

I used Curves to increase the contrast of the scene:

scifi49

On this layer mask use a soft black brush to erase the area around the model and circles to keep its lightness:

scifi49a

Step 50

I used Vibrance to enhance the final effect:

scifi50

On this layer mask use a soft black brush with the opacity about 40% to reduce the effect on the light around the circles:

scifi50a

Final Results

scifi50-final

Download the PSD

Download

Tutorial by Jenny Le

I hope that you enjoyed my tutorial and found it useful. To see more of my works and tutorials, you can follow me on Facebook or watch me on Deviantart .- Jenny

Loading Preview...
Powered by Creative Market
Loading Preview...
Powered by Creative Market
Loading Preview...
Powered by Creative Market
90% Off Cyberpunk Preset Bundle
Sponsored

Make your artwork look like they're from an alternate universe. These Cyberpunk presets work with Photoshop (via the Camera Raw filter) and Lightroom. Download all 788 presets for 90% off.

14 comments on “Create an Abstract Sci-Fi Scene with Photoshop”

  1. Wow, the topic was explained in a lovely way. Because it explains so beautifully step by step, that angle people can quickly grasp it. Thanks for sharing it with us.

    I am also a graphic designer. I was also invited to visit my website once.
    My weblink:

  2. hiiiiiiiiiiiiiiiiiiiiiiiiiiiiiiiiiiiiiiiiiiiiiiiiiiiiiiiiiiiiiiiiiiiiiiiiiiiiiiiiiiiiiiiiiiiiiiiiiiiiiiiiiiiiiiiiiiiiiiiiiiiiiiiiiiiiiiiiiiiiiiiiiiiiiiiiiiiiiiiiiiiiiiiiiiiiiiiiiiiiiiiiiiiiiiiiiiiiiiiiiiiiiiiiiiiiiiiiiiiiiiiiiiiiiiiiiiiiiiiiiiiiiiiiiiiiiiiiiiiiiiiiiiiiiiiiiiiiiiiiiiiiiiii lmao

  3. [▪☆⚠ #єиɖ_ਆ_ਗLьτ⚠☆▪]
    [•●#_______ατΤ_GΔlβ∆∆τ●• ]

  4. Thank you very much for this tutorial! It was really good. I kinda nailed it, even tho' I am a beginner. xD

    1. Hi there, go to the drop down menu that is above with the rest of the filters, and search there. If you are on mac you can always go to the help tool, and type in what you are looking for, and the system will pop up what you have typed in, showing you in the menu. Hope this helps!

Leave a Reply to Lovepreet Singh Sidhu Cancel reply

Your email address will not be published. Required fields are marked *

cross