Learn how to this emotional photo manipulation of a girl in a dreamy background. In this tutorial, you will learn how to create a dramatic light effect, create motion in leaves, and create a focal point through lighting and elements. Besides that, you will learn non-destructive techniques that will help make your workflow easier and more efficient.
This image was created to represent the concept of the seven deadly sins, the girl represents Eve, she looks ashamed of what she’s done. To create this image you will start with a forest background, then you will add the model and some details of bushes and trees to create depth, also leaves will give a motion feeling to the image. To finish the art you will learn how to apply texture and color adjustments to create dramatic lighting. You can use photoshop CS6 or CC to follow this tutorial. Also will help you if you have a digital tablet.
Preview of Final Results

Tutorial Resources
- Model– Dazzle-Stock
- Forest– Dragoroth-stock
- Clouds– Missstark(Alternative)
- Texture– Marcela Bolivar
- Apple Tree– Cindysart-stock
- Bush– moonglowlilly
- Leaves– frozenstocks
- Flying Leaves– maureenolde
Step 1
The base image for this manipulation is going to be some woods, the resolution this work is done is Width: 3000 and Height: 3503 pixels.

Step 2
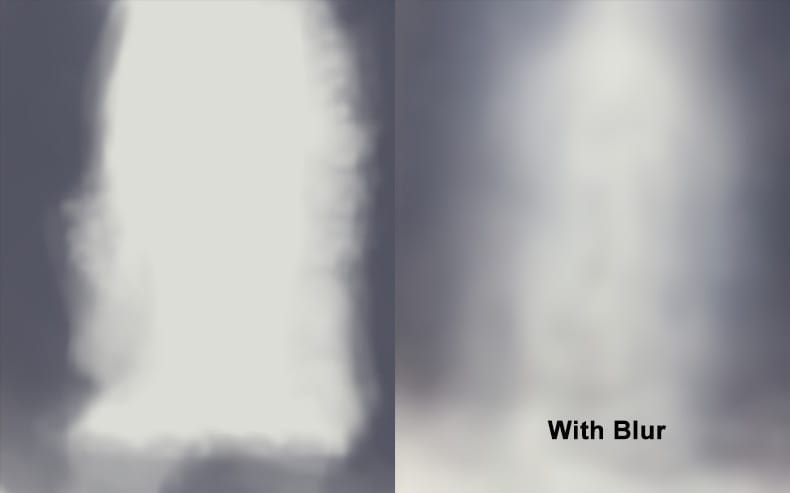
To make a dramatic lighting to the background in a new layer (Shift- Control+N) paint the center with a light gray (#deded8) and in the borders with a darker gray (#545563) should look like the image in the left. Blur: add some blur to make it look softer (Menu Filter – Blur – Gaussian Blur) add 180 px of blur.
Step 3
Change layer mode from normal to soft light. As you can see in the picture below now the light looks lighter in the middle and darker on the sides.

Step 4
Place the model in the background

Step 5
Use the pen toolto crop the model out of the background. Select the pen tool and make sure that the menu that is in the top show the option “Path” and not “Shape”. Click in the image and star to select all the borders of the image you like to keep. Be patient to achieve an accurate selection.

After you complete the path press right click then a menu will appear, choose the option Make Selection. Then click ok and you will have your selection.

Step 6
Add a layer mask by clicking on the Add Layer Mask button in the layers panel or by going to Layer > Layer Mask > Reveal Selection.
22 responses to “Create a Dreamlike Photo Manipulation of an Emotional Girl with a Dramatic Lighting in Photoshop”
-

wow its very nice tutorial Thank You
-
Looks a decent instructional exercise, tragically two stages (stepson and 12) have pictures missing so we can’t perceive what you did to get any impacts. Additionally, a portion of the stock is never again accessible, yet we can work around that.
-
Hi !
Thank you so much for sharing your tutorial.
It helped me a lot. I Came up with this…
http://fav.me/dd0x9t4-
Wow that’s impressive! Thanks for trying out the tutorial!
-
-
Thank you!
-
Awesome! Thank you Andrea!!
-
thank you very much for this tutorial
-
Wow!…verry cool tutorial,…thanks
-
Great tutorial, thank you!
-
good work , help me to create a good idea
-
Thank you, Andrea, for this lovely tut. Didn’t follow it completely, but your work sure inspired me :-) !
My result. -
pretty neat tutorial. I use PSE 9 so I couldn’t follow along exactly, but I still learned a lot and it was fun! Mine didn’t turn out exactly like yours but pretty close. http://jdyjdyjdy.deviantart.com/art/Tutorial-dreamlike-561989308?ga_submit_new=10%253A1442991390
-
A very good tutorial
Well done -
Sencillamente Excelente!!!
-
Looks a nice tutorial, sadly two steps (steps11 & 12) have pictures missing so we can’t see what you did to get any effects. Also, some of the stock is no longer available, but we can work around that.
-
Thanks so much learned alot from this
-
I’m glad
-
-
Awesome, I really love it. Thanks you. <3
-
I’m glad you like it!
-
-
Thank you so much. This is fantastic and so helpful.
-
Amazing!!
-
I’m glad you like it
-
Leave a Reply