Create a Night Fairy Tale of a Mysterious Girl in Photoshop

Create a Night Fairy Tale of a Mysterious Girl in Photoshop

Create an amazing picture of a night of fairy tales and learn how to create beautiful toning for your work. In this tutorial, I will show you a variety of tools to work with, talk about the creation of the composition and use of color, learn how to create realistic lighting. We also explore filter "Camera Raw" and more.

Working with color

In this tutorial, I'll create a magical picture and tell you how to create a popular and beautiful coloring to your pictures. I'll start the tutorial by creating a background, color correction, and adding details. Then I add the model and supplement the composition of the first elements of the plan and dragonflies. The next step is to create the golden bird and work on the color effects. In the final part, I will tell you how to create beautiful coloring and sharpening. Download all attachment links, a little logic, a good mood, and be sure to have Photoshop beginning with CS version.

Tutorial Resources

Step 1

Create a new document via Cmd/Ctrl + N or File > New at 3000 pixels wide and 1875 pixels height, resolution 200 Pixels/Inch.
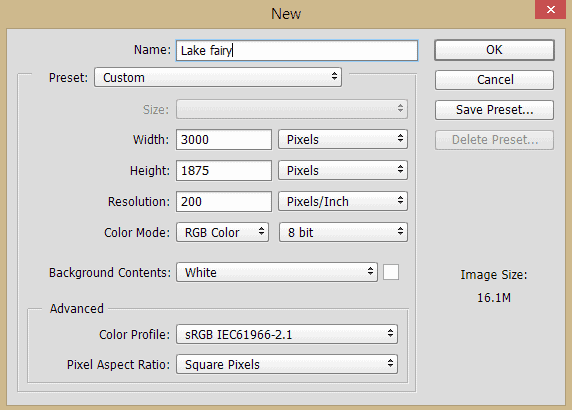
001

Step 2

The first step is to create a background. I found some suitable images, but in each something is not enough, so we take the most interesting parts and will mix them together. Go to File > Place.../Place Embedded and open "pond-438546" image. Resize it with holding Shift key for proportional transformation to the size of the working field, rotate it on -0.55 degrees, and flip it horizontally (right-click in transform mode > Flip Horizontal).

002

Next place another one image - "warsaw-100294". It is not necessary to increase the size of the image, just try to compare the perspectives of these images and rotate it on -0.55 degrees, flip it horizontally.

003

Step 3

Add a layer mask to image "pond-438546" by clicking on the "Add Layer Mask" button in the layers panel (Layer > Layer Mask > Reveal All). Select the Brush tool (B) then set the brush size to 300 pixels and hardness to 0%. Paint over the center of the image like shown in the image below.

004

Double-click on layer mask thumbnail and choice "Mask Edge...". In the window that appears set

  • View: On White
  • Checkmark "Smart Radius"
  • Radius to around 2.3px
  • Shift Edge to -20

Use the brush in this window and brushed all edges of trimmed trees. It takes away the haze from using a soft brush and you get a good contour without any noticeable transition between textures.

005

Step 4

Move "warsaw-100294" layer below the pond layer. Use Cmd/Ctrl + Opt/Alt + Shift + E to create a merged copy of whole image and convert this to Smart Object (right-click on layer > Convert to Smart Object or Layer > Smart Objects > Convert to Smart Object). To correct the image I used the filter "Camera Raw" because this filter has excellent opportunities for correction of material without the use of a whole bunch of adjustment layers. Go to Filter > Camera Raw or use shortcut Cmd/Ctrl + Shift + A. First you need to change the white balance. Set Temperature to +7, Tint to +5. Next reduce Exposure to -0.55, add a bit to Contrast: +8, Highlights: -100, Shadows: +100, Whites: +23, Blacks: +43, Clarity: +23.

006

Go to tab "Sharpness" (black & white triangles) and set the following values - Luminance: 21, Luminance Detail: 50, Amount: 20, Radius: 1.0, Detail: 25 and hit OK to apply changes.

007

Step 5

Draw your own light/shadow map on how we need it. To do this, you can use Screen/Multiply layers and work with Brush Tool (B), but I do not need much change in the contrast of the image, so I just use one "Overlay-neutral" layer. Hold Opt/Alt and click on the "Create a new layer" icon. In the window that appears, set Mode: Overlay and checkmark "Fill with Overlay-neutral color (50% gray)". Use the Dodge Tool (O) and Burn Tool (O) to create shadow and light. Set the settings for each tool like shown in the image below. Try to darken highlights on left leaves and lighten very dark parts of the image. On the image below red shows the shadows, cyan - where must be light.

008

Step 6

When I finished with the background, I added a lilies image (818382_82358191) in a working document slightly increasing its size and flip it horizontally. Try to find a harmonious arrangement of plants and the prospects for the overall composition. Do not be afraid to add details (as this image). This diversity of backgrounds and create a harmonious composition.

009

Add a layer mask ("Add Layer Mask" button in the layers panel or Layer > Layer Mask > Reveal All) to this image and with black color brushed all cut and unnecessary parts. Try to mix these images on a layer mask by reducing brush "Opacity".

010

Step 7

Now back to the trees and to give them some attention. On the leaves were bright white highlights and should weaken their intensity. Create a new layer by press "Create a new layer" icon or use Cmd/Ctrl + Shift + N, change Blending Mode to "Multiply". With Eyedropper Tool (I) set from leaves shadow foreground color and with soft round brush (Size: 100 - 200px, Opacity: 20%) brushed all highlights on both sides of the image. If you find that the foliage looks a bit smoky, decrease "Fill" of this layer (in my case Fill: 80%).

011

Step 8

After I created the necessary background, I can add the model. This does not mean that we are done with the background. Place into working document image "anett_frozen_ice_queen_by_anettfrozen-d4kdpjw". Use Pen Tool (P) to create a flat path of a model. Make a selection from the path by clicking on the "Make Selection" button on the tool properties panel. Set Feather Radius to 0 and click OK. Add a layer mask ("Add Layer Mask" button or Layer > Layer Mask > Reveal Selection) to remove the background.

012
013

Step 9

To get rid of the background on the lace use "Mask Edge..." (as in Step 3) and brushed lace several times. Checkmark "Smart Radius" and Radius around 1.6px, Shift Edge to -10. After that, you stay need to clean some parts manually in order not to lose the details. Use Brush Tool (B), right-click to get the Context Brush Panel. Select the Hard Round to brush preset, and set the brush Size 50 - 100px and Hardness to 100%. Clean up bird cages and model's crown on a layer mask.

014

Step 10

After cleaning the model, I added a bit of correction to an image to improve the quality of the photo and adjust the color of the image. Use "Camera Raw" filter (Filter > Camera Raw or use Cmd/Ctrl + Shift + A) with there settings: Exposure: +0.15, Contrast: -10, Highlights: -2, Shadows: 0, Whites: -5, Blacks: 0, Clarity: +19.

015

Go to tab "Sharpness" (black & white triangles) and set following values - Luminance: 30, Luminance Detail: 50, Color: 30, Color Detail: 50, Color Smoothness: 50, Amount: 20, Radius: 1.0, Detail: 25 and hit OK to apply changes.

016

Step 11

Let's go back to the background. We will clearly see where our main character, and now you can remove unwanted parts in this image. Create a two new layers ("Create a new layer" icon on a Layer panel or Layer > New > Layer... > or Cmd/Ctrl + Shift + N). For a first layer set Blending Mode to "Darken". Take a Clone Stamp Tool (S), set Sample: Current & Below, use water as the clone source. Change stamp size depending on the details that you want to remove. On the "Darken" layer remove the water lilies near the model (several groups of water lilies in the foreground is better to leave) and on the "Normal" layer remove the texture of bubbles. Arrange the layers as shown below.

017

Step 12

In the next step, I added new water lilies. Open image "water_lily_png_by_mariasemelevich-d8qe44z" and with Lasso Tool (L) select leaves of water lilies. Move it into a working document with Move Tool (V). To keep the image quality I suggest you convert this piece into Smart Object (right-click on layer > Convert to Smart Object or Layer > Smart Objects > Convert to Smart Object). Reduce its size by using Free Transform Tool (Cmd/Ctrl + T or Edit > Free Transform). Everything else is to your taste and wishes. You can arrange the lilies where you want. To make a larger number of lilies duplicate it (Cmd/Ctrl + J or Layer > Duplicate layer or hold Opt/Alt when using Move Tool (V)) and flip it horizontally (Edit > Transform > Flip Horizontal).

018

Step 13

Do the same with flowers of water lilies. In the image below you can see how I placed water lilies. Try not to overdo it and create a harmonious arrangement. The lower right corner of the lilies I do not do, because in that place there will be a plant bush in the foreground. When you're happy with the location. Select all the layers and will integrate them in a single layer by selecting layers and hit Cmd/Ctrl + E or go to Layer > Merge Layers/ Layer > Smart Objects > Convert to Smart Object.

019

Step 14

Background ready and now we add depth of field. You will integrate all layers into one (except model layer) and work with it (Cmd/Ctrl + E, then convert it in Smart Object), or create a merged copy (Cmd/Ctrl + Opt/Alt + Shift + E) and convert it to Smart Object. I used the second method, in case you suddenly need to make a change in the overall composition. Now the depth of field. Go to Filter > Blur > Gaussian Blur and set Radius: 5.5 pixels.

020

Select Smart filter layer mask, Take a Gradient Tool (G) with default black & white gradient, Mode: Linear and gradient on it, roughly from the bottom to the waist of a model.

021

Step 15

Add the main spot of color. It is necessary to focus the viewer on the main character. Add adjustment layer "Gradient Fill" with following gradient #020202 > #3e2d56 > #816e8a > #c4b3c7 > #ecdaef, Mode: Radial, Scale: 200%, Reverse. Set Blending Mode to "Soft Light", Opacity around 72%, Fill around 73%.

022

Create a new layer above gradient layer and set Blending Mode to "Soft Light". Take a Brush Tool (B) with form: soft round, Opacity: 30%, color: # 19294a. Brushed background trees in the left - center side of image.

023

Step 16

It remains only to add effects to the lilies and the background is ready. But it's a little later. First, you need to complete the overall composition. Create a new group by using the "Create a new group" icon at the bottom of the Layer panel and name it "foreground". First, add the "Water plant" image (File > Place.../Place Embedded) in the "foreground" group. The images in the format PNG (without a background) so you just have to change the size and position them where you like. To make a large bush, duplicate the layer (Cmd/Ctrl + J or Layer > Duplicate Layer...), reduce its size, flip horizontal (Cmd/Ctrl + T) and place it under the layer with the main plant.

024

Step 17

Repeat the same with the images "Foliage 1", "Foliage 2", "Foliage 3". First, I added the picture "Foliage 2", flip it horizontally (Edit > Transform > Flip Horizontal) and is located in the upper right corner. Then the next image "Foliage 3" and "Foliage 1". To remove the cut edge of the image, add a layer mask to the right layers and black brush clean edges (only try to make it invisible).

025

Step 18

Next, create a new group ("Create a new group" icon) inside this group and name it "Dragonfly". Open image "Bugs PNG" (Cmd/Ctrl + O or File > Open). Repeat step what you did with water lilies (Step 12) and the position of dragonflies in the right places. Do not be afraid to experiment with their position or placement. You need Rotate, Scale, Flip each dragonflies (use Free Transform Tool (Cmd/Ctrl + T) or Edit > Free Transform/ Transform). The most important thing is not to exceed the size of dragonflies more than the size of the flower lily. And remember, the farther away dragonfly, so the size is getting smaller.

026

Step 19

The composition is completely ready and can add effects and work on realism. At first add effects to water lilies. Go to layer from Step 15 and create a new layer above it (use "Create a new layer" icon or Cmd/Ctrl + Shift + N) and set Blending Mode to "Color Dodge". Take a Brush Tool (B), right-click to get the Context Brush Panel. Select the Soft Round brush preset, and set the brush Size to 100 - 200px, Opacity to 100%, Color: #cc6b7f and click on each flower to create a light effect. Reduce layer opacity to 49%, Fill to 43%.

027

Create one more layer (Mode: Normal, Fill/Opacity: 100%) and with color: #e5d8cd and brush Opacity: 50% create a dense glow over every flower. You just need to click on a flower to be applied once the brush. Create a new layer with Blending Mode "Screen", Opacity: 79%, Fill: 63%. Change brush Opacity to 100% (color remains the same) and draw a dot glow a little higher each flower.

028

Step 20

Now the fun part. I wanted to make a small glowing speck (something like fireflies or magic). You need a brush of soft bokeh. Now we will create it. Go to Brush panel - F5. Set Size: 8px, Spacing: 150%. Go to Shape Dynamics and there set Size Jitter: 100%, Angle Jitter: 35%, Roundness Jitter: 45%. In the next tab, "Scattering" set Scatter: 1000%, Cont 1, and save your brush by clicking on the "Create new brush" icon (I use this brush several times in this artwork).

029

Create a new layer. Take your created brush with Size: until 8px and Opacity: 100%. Draw fireflies over flowers and a little around them. To enhance the effect, you can add layer style "Outer Glow"/"Inner Glow" ("Fx" icon at the bottom of layer panel or go to Layer > Layer Style > Outer Glow/Inner Glow). Settings for both styles are the same.

030
031

Step 21

Let's go back to the model. First, I created a model reflected in the water. To do this, duplicate the layer with a model (Cmd/Ctrl + J or go to Layer > Duplicate Layer...) and convert it to Smart Object (right-click on the layer > Convert to Smart Object). Use Free Transform Tool (Cmd/Ctrl + T or go to Edit > Free Transform). Flip layer vertically (right-click > Flip Vertical). Move up bottom - middle point a little to change perspective. Move the image to connect model and its reflection.

032

Reduce layer Fill to 25%. Go to Filter > Blur > Gaussian Blur... Set Radius around 3.0 pixels and click OK.

034

Go to Filter > Distort > Ripples... Change Amount to 100%, from the drop-down list "Size" select "Medium". On this, I am happy with distorted reflection. Always be attentive to details such as light, shadow, and reflection. These treacherous enemies and very good friends in the photo manipulation. Try to keep these "friends" were always realistic.

035

Step 23

The dress should touch the water and therefore wet. I decided to create a new layer (Cmd/Ctrl +Shift + N or Layer New > Layer...). With soft round brush, Opacity: 50% and color: # brushed lace on the model's dress. Change layer Blending Mode to "Overlay", Fill to 49%.

036

Step 24

And now burning bird! This element I drew myself, but you can also find a brush with birds on the Internet (there is such a lot). If you have trouble, you can find on the Internet the appropriate bird and redraw it. Here are the steps of my hand-drawn bird. What you need: Brush Tool (B) with hard round brush, Size: 6 - 15px Opacity: 50%, Color: #e68d1d (# eaab25 for highlights). For texture brush form: "Spatter 27 pixels", Color: #c97a17. For the tail brush form: soft round brush, Size: 4px Opacity: 50%, Color: #f3d95e. Create a new layer and go on!

037
038

Step 25

Add a glowing style to a bird ("Fx" icon at the bottom of layer panel or go to Layer > Layer Style > Outer Glow/Inner Glow). Use the image below to set the style settings. But it is not enough to create a real golden bird.

039
040

Step 26

Create a new layer below the bird layer. With Brush Tool (B) create a big spot (Soft brush, Size: 500px, Opacity: 100%) of color #9e410d. Set layer Blending Mode to "Screen", Fill to 42%.

041

Step 27

The next bit is tedious but quick. Continue to work with a brush and create a new layer for each effect. So you can control the effect and change it. To quickly change the size, use the left (reduce brush size) and right bracket (increase brush size) on the keyboard. This saves you time. Use the images below to create a glow and sparkle (you'll need a brush that we created in Step 20).

042
043

Step 28

To make the sparks shine, add style "Outer Glow" ("Fx" icon at the bottom of layer panel or go to Layer > Layer Style > Outer Glow) with the settings like on the image below. This adds realism and makes the sparks even more beautiful. Group all layers with model and bird group into one (select layers > /Cmd/Ctrl + G or Layer > Group Layers).

044

Step 29

After creating the birds need to be aligned model to the lighting. This is again a series of different layers, but this time you need to work outside the group "Model", and clip layers to the group. Let's start with a map of light and shadow. Hold Opt/Alt and click on "Create a new layer" icon or go to Layer > New > Layer... Set Blending Mode to "Overlay" and mark "Fill with Overlay-neutral color (50% gray)". Then everything is clear use Dodge Tool/Burn Tool (O) or White/Black brush to create shadow and light. Use my image as an example. On this layer, I painted almost every crease to create a glow effect. Create from this layer a clipping mask (Cmd/Ctrl + Opt/Alt + G or hold Opt/Alt and click between layers).

045

Step 30

As in the case with the bird, use images below to create a color light from the bird on the model. As I mentioned earlier make from all these layers (except hair layer and thereafter) a clipping mask (Cmd/Ctrl + Opt/Alt + G or hold Opt/Alt and click between layers). With this function, you apply effects only to a "Model" group.

046
047

Step 31

All colors are taken from the bird by using the Eyedropper Tool (I). If your version of the bird is different in color and the lighting model should be changed to match the reflection of the light source.

048
049

Step 32

With lighting, we finished and we can proceed to the hair. I traced each strand of hair to make them stand out and emphasize reflection. All manipulations were carried out with the hair on the same layer but different colors. Create a new layer (Cmd/Ctrl + Shift + N), with a Brush Tool (B) (Soft Round brush, Size: 5 - 7px, Opacity: 50% ), apply from mid-tones (#292228 and #352b34) and then add a little shadow (#1f1b1f) and highlight to the lock using the lightest color (#5a4958).

050

Step 33

Let's return to the group "Foreground", select all dragonfly layers, right-click on layers> Convert to Smart Object. Add a style "Inner Glow" and "Outer Glow" ("Fx" icon at the bottom of layer panel or go to Layer > Layer Style > Inner Glow/Outer Glow). In the window that appears set Blend Mode to "Color Dodge", Opacity to 41%, Size to 21px. Go to the tab "Outer Glow" and increase Opacity to 46%, Size to 24px and click OK to apply styles.

051
052

Step 34

Duplicate this dragonfly layer (Cmd/Ctrl + J or go to Layer > Duplicate layer...), again convert it to Smart Object and duplicate it. Go to Filter > Blur > Motion Blur... Apply Angle: 19 degrees, Distance: 22 pixels. This filter will make the effect of flight for dragonflies. Move this layer under the original dragonflies.

053

To make the glow from dragonflies, more and saturated, add to a copy the filter "Gaussian Blur" with Radius: 70 pixels and change layer Blending Mode to "Color Dodge".

054

You can also add a few flying sparks near dragonflies. Take Brush Tool (B) with the brush from Step 20, Size: 10px, color #dcc3ed, and on a new layer draw near dragonflies.

055

Step 35

In this mysterious place has to be the fog. It will emphasize the mystery and drama. To not use a brush we make a realistic fog with the help of Photoshop. Create a new layer (Cmd/Ctrl + Shift + N) with Blending Mode "Screen" ("Fill with Screen - neutral color (Black)"). Reset foreground and background colors to default (D). Go to Filter > Render > Clouds. Now a little decrease layer Opacity to 75% and Fill to 80%.

056

Use Free Transform Tool (Cmd/Ctrl + T or Edit > Free Transform). Right-click and from the drop-down list use two tools "Skew" and "Distort". With "Skew" you can put the layer on a plane of the river and with the help of "Distort" correct perspective. Hold Opt/Alt + Shift keys and move to the center top right point. Move the bottom right point from the center to the push forward layer. With "Distort" use only the upper and lower midpoints. Lower the top mid-point to the horizon, the lowest point, lift to the edge of the working area. Try to match the perspective of the image.

057

Add a layer mask to this layer ("Add a layer mask" icon at the bottom of Layer panel or go to Layer > Layer Mask > Reveal All). Use a black brush on this mask and remove fog layer edge and some fog from foreground plants.

058

Step 36

Repeat the previous step and create another layer of fog. For this layer, a little bit down the value of Opacity to 65%, Fill to 70%.

059

Step 37

Draw little fireflies in the leaves at the top of the image and on the plant. Use white color for drawing. Try not to overdo it and not to occupy the center of the image. Also, you do not need to do a large number of large fireflies.

060

Step 38

To make your fireflies glow, add "Inner Glow" and "Outer Glow" style ("Fx" icon at the bottom of layer panel or go to Layer > Layer Style > Inner Glow/Outer Glow) to a layer with the settings like shown in images below. You can try other colors if you want.

060
061

Step 39

Another layer of fireflies in the rear plane. Use # 5a4958 color and add a 1.0 pixels "Gaussian Blur" (Filter > Blur > Gaussian Blur) to soften the edges. Merge all layers with fireflies and fog in the same group (Cmd/Ctrl + G), and change Blending Mode to "Screen".

062

Step 40

Create a new adjustment layer "Selective Color" over the group "Foreground" (Black & white circle at the bottom of Layer panel or go to Layer > New Adjustment Layer > Selective Color...). Go to color "Greens" and set Cyan -100, Magenta: +96, Yellow: -69, Black: +17. As can be seen from the configuration, I added a bit of warmth in the color green and darken it a little bit.

063

Step 41

In this layer, I created a shadow that then can be applied to adjustment layers and turn the picture into the night. Hold Opt/Alt and click on the "Create a new layer" icon. Set Blending Mode to Overlay, checked "Fill with Overlay-neutral color (50% gray). Next, I use Burn Tool (O) with Exposure: 25%. to draw a shadow. Use the image below to see the location of the shadows. Please note that you need to darken the edges of the image and the background.

064

Step 42

Here we come to the final part of the photo manipulation. In this final part I on the example I will show how to accurately and correctly create one beautiful tint. This type of tinting is very popular now. I understand that you need two-three layers and is ready, but it's not always a good solution. Most of the images lose their color and become faceless. Now I will only add adjustment layers and the first to be a "Selective color" (Layer > New Adjustment Layer > Brightness/Contrast... or "Add adjustment layer" icon on the bottom of Layer panel). I'm interested in only two colors - yellow and blue. I want to become a more gentle green color and the shadows are a little warmer.

065

Step 43

Now slightly increase the brightness of the individual colors. Use adjustment layer "Curves" (Layer > New Adjustment layer > Curves...) and edit the green and blue channels. By raising the green channel, we add a little bit magenta. With the blue channel, we increase the yellow color.

066

Step 44

Now add basic color Use "Solid Color" adjustment layer (Layer > New Adjustment layer > Solid...) with color #495cbf. Set Blending Mode to "Soft Light", Opacity around 30%.

067

Step 45

Add spot of color. We concentrate bright area in the center of the image and darken edges of the image (something like a black vignette). Add adjustment layer "Gradient Fill" and set up following gradient #ffffff > #0f1406 > #0f1406 > #0f1406, Mode: Radial, Angle: 55.3 degrees, Scale: 150%. Set Blending Mode to "Soft Light", Opacity around 50%.

068

Step 46

Next adjustment layer is "Curves" (Layer > New Adjustment layer > Curves...). I reduced dark tones on Red and Blue channels. Use the image below to accurately construct a curves.

069

Step 47

Again "Solid Color" layer with color # 28337a and Blending Mode "Overlay", Opacity: 30%. Add a "Brightness/Contrast" adjustment layer (Layer > New Adjustment Layer > Brightness/Contrast... or click on the icon on a Layer panel). Set Brightness: 3, Contrast: 3.

070

Step 48

Now tinting gradient. This adjustment layer, we add color. Set up following gradient #d3b0ff (Location: 8%) > #2d1899 > #070c25, Mode: Radial, Angle: 67.62 degrees, Scale: 150%. Set Blending Mode to "Soft Light", Opacity around 50%.

071

Step 49

Now a little glow. To gently influence the image of warm light on the bird, I used an adjustment layer "Color Lookup", from the drop-down list, select "LateSunset.3DL" preset. Use 3DLUT file and Set Opacity for this layer 55%, Fill to 35%.

072

Step 50

The next adjustment layer is "Selective Color". This layer will help me to change each color separately. Here and try to change the tone of almost all colors. It helped me to achieve a balance of color. List of settings a little big, so I ask you to take attention to pictures below.

073

Step 51

Now, increase the saturation of the entire image. Add a"Hue/Saturation" adjustment layer. Set Hue: +7, Saturation: +36, Lightness: -16. Set layer Opacity to 52%. Group all colorize layers into one group (Cmd/Ctrl + G) and reduce group Opacity to 85%. Like my example, you can create interesting tinting or change this. All of your choice!

074

Step 52

Now add some blur to create a presence and a nice fairy tale, soft focus. It works very well in the pictures on the theme of a fairy-tale or in the case where the artist needs to create a gentle and soft picture. Create a merged copy of all photo manipulation (Cmd/Ctrl + Opt/Alt + Shift + E), Convert it to Smart Object (right-click on layer > Convert to Smart Object). Go to Filter > Blur > Gaussian Blur. Set up Radius to 15.0 pixels.

075

On a smart filter layer mask, with a soft black brush, remove blur from the center. In the figure below you can see where the remains blur. Use different values of brush Opacity to create a smooth transition and to control the amount of blur for each section of the picture.

076

Step 53

To increase the sharpness of the image. Create a merged copy of image (Cmd/Ctrl + Opt/Alt + Shift + E), Convert it to Smart Object (right-click on layer > Convert to Smart Object). Go to Filter > Other > High Pass. Set Radius to 2.0 pixels and click OK. To get rid of the gray background change Blending Mode to "Linear Light". Using this mode will overlay greatly increase the brightness, so reduce Fill to 50% (do not use Opacity).

077

Final Results

Well, that's all! I hope you enjoyed this tutorial and you could find it useful. I am satisfied with my result. I hope that you are satisfied with your result too and spent time with benefits.

Download the PSD

Lake Fairy.zip | 256 MB

Tutorial by Maria Semelevich

profile
Thank you very much for taking the time to study this tutorial! I hope you benefited it! I wish all luck in your future achievements! I thank the authors of resources for their excellent work and good quality! Thank you very much! If you have questions or need help, please contact me. I look forward to your feedback and creative works! You can contact me by e-mail - [email protected] or Facebook Deviantart Behance. I am open to suggestions and cooperation! With best wishes!


- Maria Semelevich

Loading Preview...
Powered by Creative Market
Loading Preview...
Powered by Creative Market
Loading Preview...
Powered by Creative Market
Create Dot Grid Art in 1 Click
Sponsored

Turn any photo into a dot grid artwork with these Photoshop actions. You'll get great results with dots that change size. They get larger in brighter areas and smaller in darker areas. Free download available.

12 comments on “Create a Night Fairy Tale of a Mysterious Girl in Photoshop”

  1. Great tutorial! I've done almost all manipulation tutorials online and this one is very nice. It used some different techniques I haven't explored. On step 23, what color do we use on the dress? Mine just says "#"

Leave a Reply

Your email address will not be published. Required fields are marked *

cross