

Step 24
Now let’s add our aquatic monster. Open the file “Dragon” and press copy/paste the dragon in our scene. Place the dragon underwater as shown below and lower the opacity of the layer to 34%.
Step 25
Add a layer mask to the dragon layer and hide the lower regions to add more to immersity.
Step 26
Create a new layer and set the blending mode to Overlay. Paint with a round soft brush at 20% Opacity with black and white over the dragon to both darken the already dark areas and lighten the light areas. Clip this layer to the dragon layer (Alt-click between the two layers in the layers palette) to restrict our overlay painting flow outside the dragon.
Step 27
Create a Hue/Saturation Adjustment Layer (Layer > New Adjustment Layer > Hue/Saturation) and clip it to the dragon layer. Drag the Hue slider to 133 and the Saturation slider to 25.
Step 28
Make a new layer and set the blending mode to Color Dodge. Paint with a white round soft brush some specular highlights on the areas indicated below.
Step 29
On a new layer set to Color Dodge paint with a light blue (#377672) over the dragon’s head to boost the luminosity.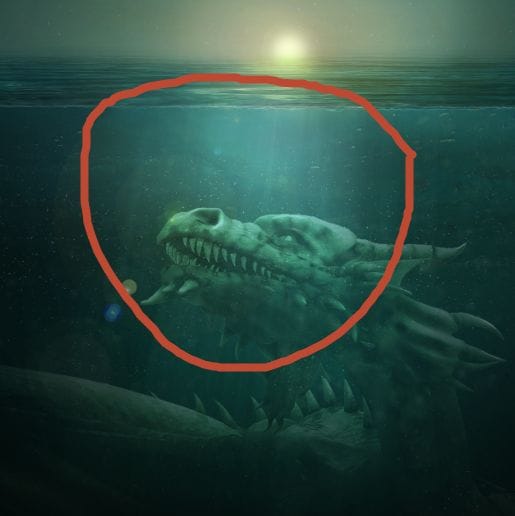
Step 30
Create a new layer and paint with whatever color you like inside the dragon’s eye.
Step 31
Double click this layer to open the blending options window and use the following settings to create a glow and an inner shadow.
Step 32
Create a new layer and paint with black a thin iris inside the eye.
Step 33
Let’s change the color of the eye. Group the iris and the eye layers (select them both Shift-clicking and press Ctrl + G) and change the blending mode of the group to Normal. Create a Hue/Saturation Adjustment Layer and put it inside the eye group. Because the blending mode of the group is set to Normal and not to Pass Through whatever adjustment layers we put inside will only affect the group.
Step 34
Let’s improve the color of the teeth. Create a new layer and change the blending mode to Overlay. Paint with a 30% round soft brush with white over the teeth.
Step 35
Make another layer and set the blending mode to Overlay. With the same white brush paint over the fang-like extremities of the dragon.13 responses to “Create a Troublesome Underwater Scene with a Big Green Monster in Photoshop”
-

Please check, no image. Thanks
-
Uhhm Im tryin’ to figured it out the steps that has no images. Kindly check it? :3 Thaaanks.
-
http://postimg.org/image/vrrpleroz/ I have tried it xd I liked that tut, thanks..
-
It is very good. Easy to follow the steps. Thank you for sharing. Just a shame that the download link does’nt work
-
Wawwww
Nice -
i can’t see some of the images. Can you plz check them again?
Thanks :)
-
Some of the images are not loading. You may want to check the paths
-
Moataz Malinky
-
ITzz Arslan
-
Nice
-
I’m Photoshop beginner :) but I’m gonna try :)
-
u’ll do it :like:
-
i have done :)
-
Leave a Reply