Step 36
Import the bubbles brush and on a new layer paint some bubbles rising from deep below and some rising from the nostrils of the dragon.
Step 37
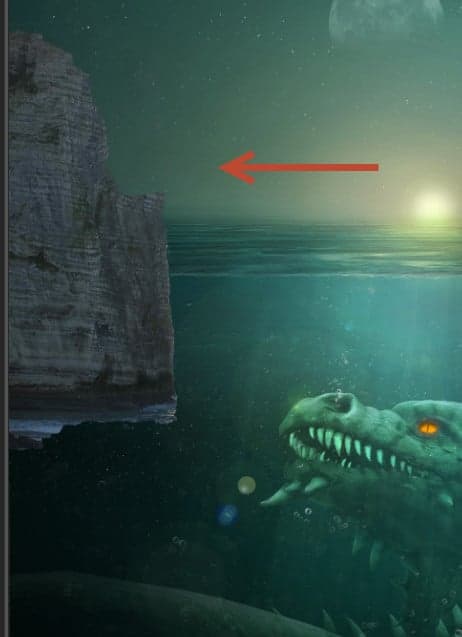
Open the file “Rock” and make a selection of the rocky island. Copy/paste inside our document and place it as shown below.
Step 38
Add a layer mask to the rock layer and hide the bottom region as I did in the image below.
Step 39
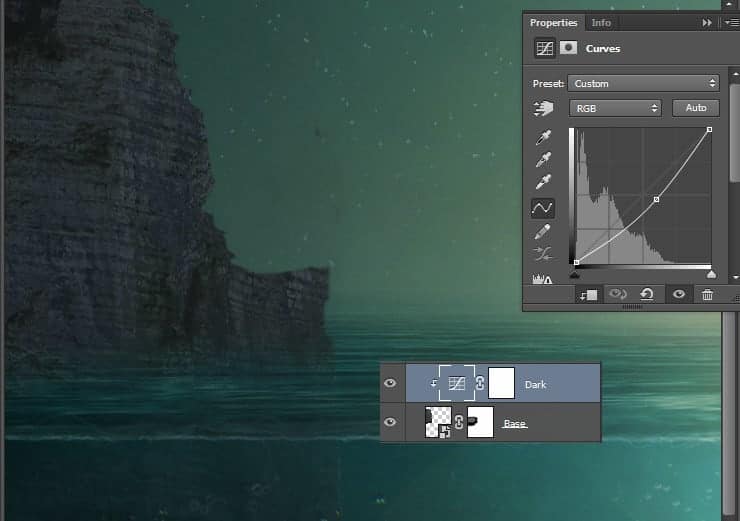
Create a new Curves Adjustment Layer and drag the curve down to darken. Clip this layer to the rock layer.
Step 40
Create a new Hue/Saturation Adjustment Layer and drag the Saturation slider to 25 and the Hue slider to 182. Clip this layer to the rock layer to make the rock blend with our overall hues.
Step 41
Create a new layer and change the blending mode to Overlay. Clip this layer to the rock layer and paint with black over the left side of the rock. Now change the color to white and paint over the right side of the rock. By doing this we will match the rock’s color with the overall lightning.
Step 42
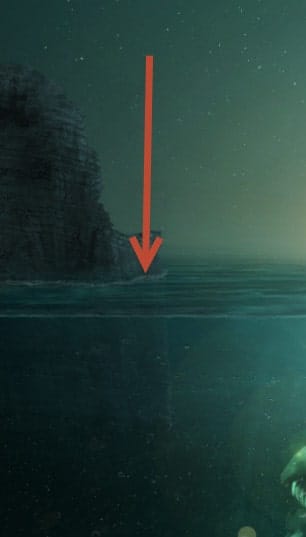
Because the rock is submerged in the water there should be some light waves crushing into the rock. Make a new layer and choose the standard Chalk brush. Lower the opacity to 10% and paint with white some loose lines around the rock where it enters the water.
Step 43
Open the file “Guy”. Use the Pen Tool(P) to create a path around the guy and press Ctrl + Enter to convert that path into a selection. Copy (Ctrl +C) and paste in our document. Don’t forget to convert to a smart object! Place the guy on the rock as indicated below.
Step 44
Create a new layer and place it underneath the guy layer. Paint with a black brush some shadow falling from the guy on the rock.
Step 45
Create a new Curves Adjustment Layer and clip it to the guy layer. Use the settings shown below to darken – our guy was way too bright for our scene.
Step 46
Create another Curves Adjustment Layer and clip it to the guy. Use the settings shown below to increase the contrast and further darken our character.
Step 47
Open the file “Island” and select all. Copy paste the island in our scene and place it as shown below. Use a layer mask to partially hide (by painting with a dark gray in the layer mask) the bottom.13 responses to “Create a Troublesome Underwater Scene with a Big Green Monster in Photoshop”
-
Please check, no image. Thanks
-
Uhhm Im tryin’ to figured it out the steps that has no images. Kindly check it? :3 Thaaanks.
-
http://postimg.org/image/vrrpleroz/ I have tried it xd I liked that tut, thanks..
-
It is very good. Easy to follow the steps. Thank you for sharing. Just a shame that the download link does’nt work
-
Wawwww
Nice -
i can’t see some of the images. Can you plz check them again?
Thanks :)
-
Some of the images are not loading. You may want to check the paths
-
Moataz Malinky
-
ITzz Arslan
-
Nice
-
I’m Photoshop beginner :) but I’m gonna try :)
-
u’ll do it :like:
-
i have done :)
-


Leave a Reply