Step 20
Next, we will add Ray Highlights but first, we need to import brushes. Select a Brush Tool(B) and right-click on the background. Now click on the gear icon and Import Brushes (Select a downloaded brush).

Now we can paint ray. Create a new layer and Foreground color use blue #26c0e1.

Next, add a blur effect. Go to Filter > Blur > Gaussian Blur and set the radius to 10px.


Step 21
Next, place Texture 2 Go to File > Place and select Texture 2. Then place it to our work canvas and position the image with the transform tool (Ctrl / Cmd + T). Hold Alt + Shift and rasterize like the image below. In Photoshop CC only hold Alt to rasterize all sides together and change the blend mode to Multiply.

Now select cyborg layer and hold Ctrl/Cmd then press left click to select. Next, back to texture and create a layer mask.

Step 22
Add Adjustment Layer “Color Balance”

Step 23
Add Adjustment Layer “Hue/Saturation”

Step 24
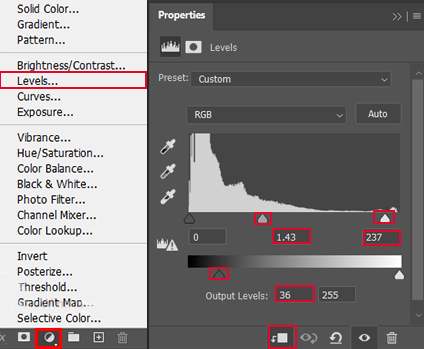
Add Adjustment Layer “Levels”

Step 25
Create a new layer and use a soft round brush tool with foreground color light Blue and paint with a big brush. The flow of the layer set to 10%.


Step 26
Create a new layer and change the blend mode to Color Dodge. Foreground color set to Gray (#505050) and paint the highlight parts with the brush tool.


Step 27
Place Rain Go to File > Place and select Rain, then place it to our work canvas and position the image with the transform tool (Ctrl / Cmd + T). Hold Alt + Shift and rasterize like the image below. In Photoshop CC only hold Alt to rasterize all sides together. Blend mode change to Screen and convert to Smart Object.


Go to Filter > Blur > Motion Blur


Step 28
Add Adjustment Layer “Levels”

Step 29
When we finished all this, now merge all layers into one. Select the last layer and hold CTRL/CMD + SHIFT + ALT + E. Now we have a final layer, right-click on mouse and select Convert to Smart Object. Then go to Filter > Camera RAW Filter. At its most basic, the Photoshop Camera Raw filter allows you to use the functions of the ACR interface at any time within Photoshop.

Step 30
Now in Camera Raw Filter, set the Value: Basic


Leave a Reply