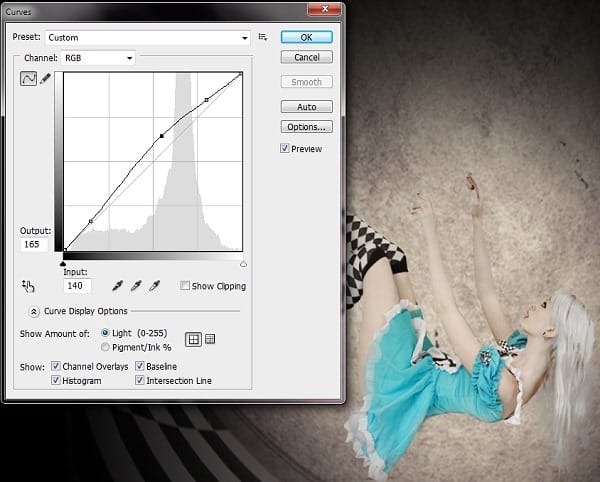
Step 11
With the model copy layer selected, click “Image > Adjustments > Curves.” Click the line and drag three nodes into position as shown here. Curve adjustments allow you to brighten parts of the model such as her skin and dress while maintaining a solid level of black and an even brightness in her hair. Curves avoid too much contrast and blown-out highlights which can be a problem when using similar tools such as Contrast/Brightness or Level Adjustments.

Step 12
Alice’s hair is currently hanging straight down, which won’t work if we want her to appear to be falling. To fix this problem, you can warp her hair to bend upwards, and use some custom hair brushes to restore detail to the strands. Begin by using the Polygonal Lasso Tool to cut out her hair. Copy this new selection.

Create a new layer and hit Shift+Cmd+V (MAC) or Shift+Ctrl+V (PC) to paste the selection into the layer. Add a mask to remove the background. Choose the Move Tool and click the corner node of the hair selection. Click the “Warp” button in the top toolbar and begin dragging the nodes upwards to create a “U” shape.

Step 13
Create a new layer called “hair.” Open the Brush panel and load the hairbrush set by clicking on the Preset Manager button located at the bottom of the panel window. Set the foreground to white and select the hair strand brushes to paint in some detail over the flowing hair on the layer below. Use the Brush panel to rotate the brushes and set an appropriate size. Uncheck the “Spacing” box for a better preview.
Use a normal brush at 2px – 5px to brush in some highlights to reduce the harsh edges left by some of the hair strand brushes.

Step 14
Add a mask to your painted hair layer and use a soft brush at 50% opacity or lower to gently blend the edge of your hair into the crown of the model’s head. Clean up any other rough edges using the mask.

Step 15
Let’s add some dimension to the model by creating some depth of field. Choose the Blur Tool and set the Opacity to 50%. Brush over the left shoe, right leg, bottom of her dress and right arm.
8 responses to “How to Create an “Alice in Wonderland” Inspired Artwork with Photoshop”
-
Love it
-
dank je wel voor deze super tutorial
-
AMAZING but I did it myself and it was 10x better
-
what an awesome tutorial!!
-
c_oOl n_-eX+ d_0 j_Us)+_iN_n b_iE_-Be_r
-
amazing tutorial thanks
-
AWESOME TUTORIAL!~
LOOKS WICKED!~
-
Thanks Vail Joy, its helpful on me!


Leave a Reply