
Step 7
Now we’re going to turn create a bevel from the circle using layer styles. Go to Layer > Layer Style > Blending Options. Set the fill opacity to 0 – this will make everything but your layer styles invisible.

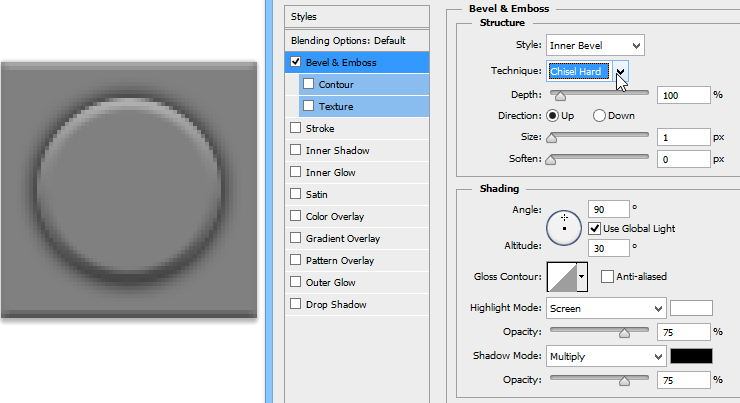
Select and checkmark the Bevel & Emboss layer style. Set the technique to “Chisel Hard” then adjust the size so that you get a bevel thickness like shown in the image below. You can also adjust the shading angle which is 120° by default – I changed mine to 90°.

Next, enable the Drop Shadow layer style. Set the Distance to 0px then adjust the size so that it looks like the image below. Click OK to apply the layer styles when you’re done.

Step 8
We’re done creating the button in the center of the brick. Next, we’ll add a subtle bevel to the outer edge of the brick. To do this, we’re going to apply a layer style to the background layer, but before we can do that, we need to convert the Background layer into a regular layer. You can do this by double-clicking the background layer or right-clicking and choosing “Layer from Background”.

Right-click on the Background layer then choose Blending Options. Enable the Bevel & Emboss option then set the Technique to Chisel Hard and Size to 1-2px (so that it looks similar to the image below). If the bevel looks too strong, you can lower the Highlight/Shadow Opacity setting on the bottom. Click OK to apply the layer styles.

Step 9
Now we need to turn this image into a pattern. Go to Edit > Define Pattern. Name it anything then click OK.

Step 10
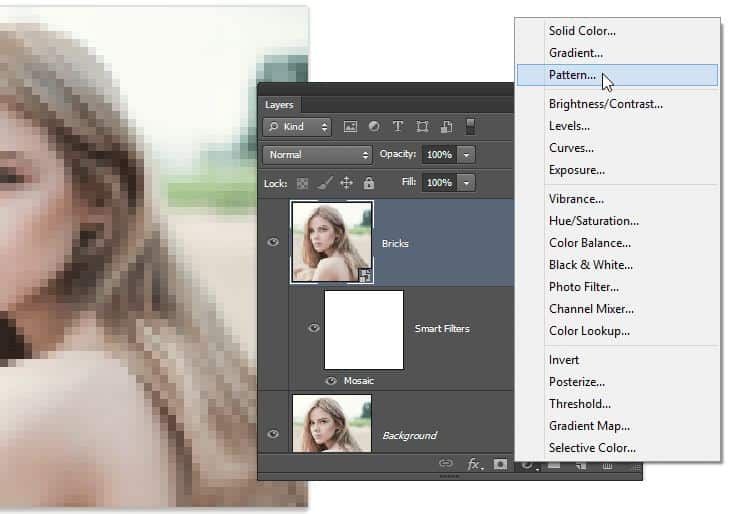
Close the current document without saving and switch back to your main Photoshop document. Create a new Pattern adjustment layer by clicking on the New Adjustment Layer button in your Layers panel then selecting Pattern.

Select the brick pattern then click OK.

Step 11
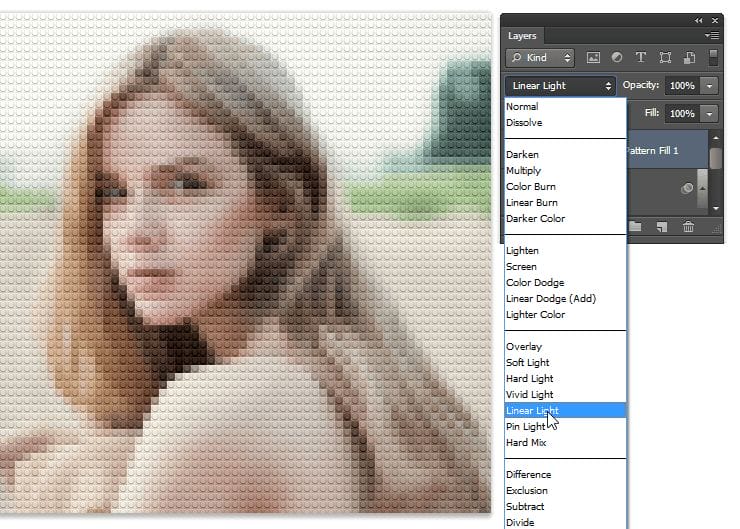
Change the blending mode of your layer to Linear Light. You’ll now have a brick image and this is what your photo will look like if bricks came in every color and shade.

Step 12
Because bricks don’t come in every color and shade, we need to compress it to a more limited color palette. We’ll do this with two layers; one to affect the tone and the other for the color. In your Layers panel, click on the New Adjustment Layer button then select Posterize. Move this layer below your Pattern Fill layer then change the blending mode to Luminosity. The Luminosity blend mode prevents your layer from affecting the colors in your image.
23 responses to “How to Turn Your Photos into Lego with Photoshop”
-
How to dowand the Digital Lego Photoshop
-
my kids loved this a lovely way to get away from the cold breeze. My boys are at football i left them with some apple slices to give them some needed energy! what a mum i am.
-
please fix the dashboard that follows you down the page. its really annoying
-
Thanks for letting us know! It’s been fixed
-
-
How do you download this? Each time I click on one of the links, I just end up endlessly installing software, but never get the PDF or video to this tutorial. Can you provide the link please?
-
For faster results you can try these Lego Photoshop actions:
https://www.photoshoptutorials.ws/downloads/photoshop-actions/free-download-awesome-lego-mosaic-actions/ -
Very cool! I know a couple of kids that would LOVE to see images of themselves made like this. Thanks for sharing!
-
Hi. I’m a beginner in PS. Thank you for this easy-to-follow tutorial ♥
-
thank you much about this nice tut :)
-
Beautiful, creative and acutely enjoy able!
-
Wow, amazing tips. I am going to try in immediately. Thanks a lot.
-
Muchas gracias, me gusta…
-
I love your tutorial, thank you.
I am a beginner, I hope with you I learn something, to the next video -
Thanks for my photoshop world making colourfull.
-
thanks a lot for Photoshop tutorial
-
Good Work.
Pretty girl in the photo is also good :) :) -
well explained! thank you ……..
-
Thank you a lot; you are understandable compared to many other tutorial that make trick that we can not do
-
I love it!
Even though I bases, I could learn stuff, actually.
It is clear and you explained very well, continues long like that, buddy ! -
cool.
I just learned a new trick in Photoshop :)
Continue to publish lessons, thank you Denny Tang -
Thank you for this tutorial, I loved and it is very useful.
Photoshop is so rich tool that we should always learn -
super thank you
-
I’ll test it with my facebook picture :-)
This is useful to blur and give atmosphere to the picture


Leave a Reply