Create a Beautiful River Scenery in Photoshop

Create a Beautiful River Scenery in Photoshop

In this tutorial, we will learn how to create a breathtaking and fantasy-themed, painting-like photo-manipulation. You will learn how to create this scenery by combining images, using Photoshop brushes, then finishing it with a soft photo effect.


Preview of Final Results
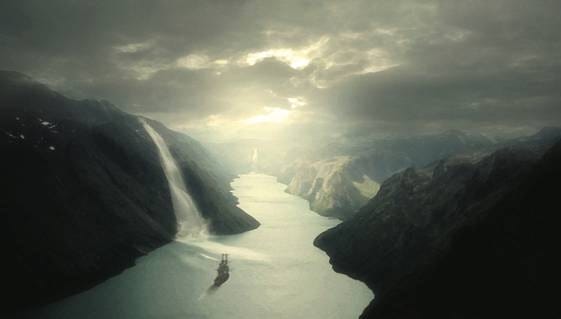

image004

Beautiful River Scenery Photoshop Tutorial


Resources


Step 1: Create a New Image File

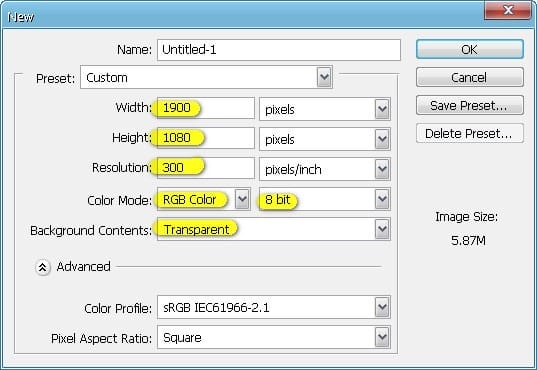
To start, let’s create a new image file, go to the Menu bar and click File > New, and then input the following values on their respective fields:

  • Width: 1900 pixels
  • Height: 1080 pixels
  • Resolution: 300pixels/inch
  • Color Mode: RGB Color; 8 bit
  • Background Contents: Transparent
image005

Step 2: Create the Lake and the Sky

In this step, we will be creating the major element of our picture which is the sea and the sky. To start, let’s open the image “Stock Norwegian Nature 1” by RiddleSolved. Once the image is open, activate the Rectangular Marquee tool by pressing M on your keyboard. See image below:
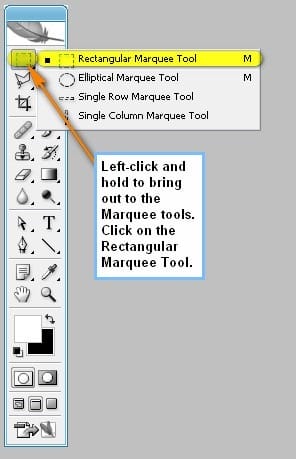
image006

When it is activated, click on an area on the edge of the image and drag a selection area (Rectangular Marquee) on the area shown below:
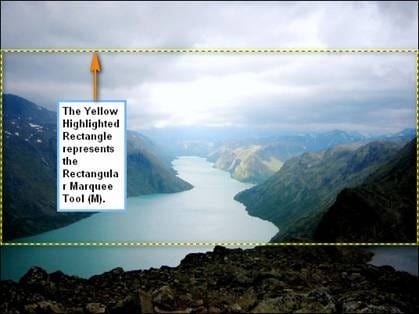
image008

Once you’ve made the selection area, you may now move the image to our canvas. To do that, activate the Move tool by pressing V on your keyboard. Once you’re done, the mouse pointer will change and a small cross will be added to the bottom-right part of the cursor. When you see that change, left-click on the image using the Move tool and then drag the image within the selection area to our canvas.
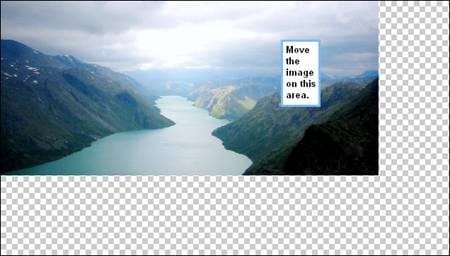
image010

Before we proceed with the next part, we will need to rename this layer to “Lake”. To rename a layer, simply double-click on the words: “layer 2” to prompt a text box to appear. Once that appears, you may now rename the layer.
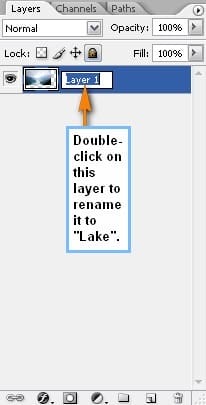
image011

Now we will have to resize that stock image to fit our canvas. To resize or transform the image, activate the Transform tool by pressing Ctrl/Cmd + T on your keyboard. When the Transform tool is activated, you’ll see a box around the image, with squares around it.
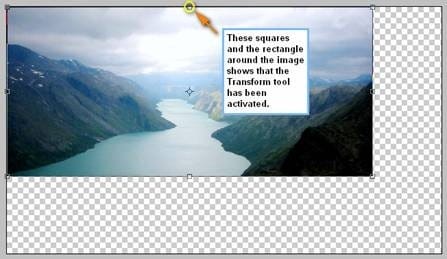
image013

Now to resize, simply move the square shown below to the edge of the canvas to stretch our image.

image015
image017

Now that we’re done with those, it’s time we do a quick fix for this lake. On the Layer Window, click on the Create New Fill/Adjustment layer button. See image below:

image018

After clicking that, a contextual menu would open – click on Gradient Map.

image019

Now when this box opens, do the following as shown on the image below:

image020

After you’ve clicked OK, you will see that the image is now a Black and White image but that’s not how it is supposed to look. We’re going for an image which has high contrast and dramatic lighting of that of a sunset, and in order for us to achieve that, we will need to make it colored. To do that, simply change the Blending mode of the Gradient Map layer to Multiply.

That could be done by clicking on the word Normal on the Layer window for a set of modes to appear. Once it pops up click on Multiply.

image021

The result will be:

image023

Next, let’s lessen the contrast of the lake layer. To do that, click on the Create New Fill/Adjustment layer button again and click on Brightness/Contrast from the contextual menu.

image024

When the box opens, input the following values:

  • Brightness: 0
  • Contrast: -15

The result should be similar to the image below:

image026

Now that we’re done with the Lake, let’s now start adding the sky. To start, let’s open, “stockimage 10” by CSnyder. When you have that stock image opened, activate the Move tool (V) and drag it to our canvas, and make sure you put it above all the layers that we’ve created. Once on the canvas, rename this layer to “sky”. Now let us resize this sky using the Transform tool (Ctrl/Cmd + T), take note that this is a huge image so you might try to fit it first in the canvas. See the image below:

image027
image029

When you’re done, activate the Eraser tool (E), because we would need to erase some parts of this sky to make it blend with our lake. After you’ve activated the Eraser tool (E), input the following values for this tool through the Options window.

  • Brush size: 400px
  • Hardness: 0%
  • Opacity: 100%
  • Flow: 100%
image030

Now we’re ready to erase. Use the Eraser Tool on the areas indicated on the image below:

image032

The result should be similar to this:

image034

To make this sky look seamless, let us reduce its opacity to 70%.

image035

The result:

image037

After that, let us now enhance the light on the sky. To start, let’s create a new layer by pressing Ctrl/Cmd + Shift + N on your keyboard. When this New Layer box opens, type: “Light 1” as its name. Next, activate the Brush tool (B) and input the following values on the Options window:

  • Brush size: 700px
  • Hardness: 0%
  • Opacity: 45%
  • Flow: 100%

Before we paint though, we would need to set the Brush’s color, to do that click on the Foreground Color on the Tools window. See image below:

image038

When that box opens, it would look like this:

image039

Now we’re all set to paint in some light! See image below on how to do it:

image041

The result should be similar to the image shown below:

image043

When you’re done, select all the layers that you’ve created and the press Ctrl/Cmd + G to group the layers. You’d notice that a folder will be created; to see the layers, simply click on the drop-down button. Rename this Group to “Background”.

Note: Renaming a group is similar to renaming a layer.

image044

Step 3: Create the Waterfalls

Now in this step, we will be adding the waterfalls. To do that, we will need to create a new layer first (Ctrl/Cmd + Shift + N) and name this new layer: “Waterfall 1”.

With that done, activate the Brush tool (B) and then open the Brush pack: “Waterfalls” by midnightstouch – before everything else, make sure that you have downloaded these brushes on the Photoshop Brushes directory (Adobe Photoshop > Presets > Brushes).

Now to open it, right click on the canvas while the Brush tool (B) is activated and then click on the drop-down menu to show the advanced Brush’s options. See image below:

image045

Next, we will need to Load the brushes from the directory where we saved it.

image046

Use the following Brush:

image047

Once loaded, use the following settings for the Brush tool (B).

  • Brush size: 100px
  • Hardness: Default
  • Opacity: 100%
  • Flow: 100%
  • Use the following for the Brush’s color:
  • #: ffffff

Apply the Brush on the area shown below:

image049
image051

Next, let’s create another layer (Ctrl/Cmd + Shift + N) but this time name it as “Waterfall 2”. We will still be using the “Waterfalls” brushes by midnightstouch so do not Reset your brushes just yet. Right click on the canvas using the Brush tool (B) and pick the following brush:

image052

Once that Brush is active, use the following settings for the Brush tool (B).

  • Brush size: 700px
  • Hardness: Default
  • Opacity: 100%
  • Flow: 100%
  • #: ffffff

Apply the Brush on the area shown on the image below:

image054

Now to make this waterfall look real, we’re going to remove the unwanted parts. To do that, we’re going to need the Eraser tool (E). Activate this tool and then use the following settings:

  • Brush size: 20px
  • Hardness: 0%
  • Opacity: 15%
  • Flow: 100%

Use the Eraser on the area shown below:

image056
image058

Next we’re going to add some splashes to make it look like real waterfalls. To start, let’s create a new layer (Ctrl/Cmd + Shift + N) and name it “Waterfall2splash”. Once you’re done with that, we’ll need to open the “WaterBrushesSampler” brushes by FrozenStarRo.

Remember: Right click on the canvas using the Brush tool (B) to bring up the Brush tool’s menu. Once open, click on the drop-down button to open the advanced options and once that’s open, click on Load Brushes and then locate “Water BrushesSampler”. Once you’ve loaded the brushes, find and click on this brush:

image059

When you have that specific brush ready, input the following values for the brush tool:

  • Brush size: 150px
  • Hardness: Default
  • Opacity: 50%
  • Flow: 100%
  • #: ffffff

Apply the brush on the area shown below:

image061
image063

Now, let’s create another splash. Create a new layer again but this time, name it: “Waterfall2splash2”. We’re going to use the same brush that we had just used (Brush 662 of WaterBrushesSampler). Use the following settings for the Brush tool (B):

  • Brush size: 150px
  • Hardness: Default
  • Opacity: 50%
  • Flow: 100%
  • #: ffffff

Use the Brush on the region shown below:

image065
image067

Next, we’re going to erase the excess for composition purposes. Activate the Eraser tool (E) and input the following values:

  • Brush size: 80px
  • Hardness: 0%
  • Opacity: 50%
  • Flow: 100%
image069
image071

When you’re done, select all the layers that you’ve created on this step and press Ctrl/Cmd + G to group them. Name this group “Waterfalls”.


Step 4: Add the Ship

In this step, we will add the ship. To start, let’s open “Tall Ship 6” by Alegion Stock. You’d notice that this stock has a transparent background this means that you could simply transfer this image to the canvas. Upon opening, just activate the Move tool (V) and drag that ship to our canvas.

Upon moving, rename this layer to “Ship” and activate the Transform tool (Ctrl/Cmd + T) while this layer is activated and then right click on the ship to show the contextual menu. Once this menu is shown, click on Flip Horizontal. See image below:

image073
image075

Now, we’re going to resize this ship to make it appear like it is on the lake. Activate the Transform tool (Ctrl/Cmd + T) and resize the image as seen below:

image077

When you’re done, we’re going to adjust the Brightness/Contrast of the ship to make it blend with the rest of the images. Click on the “Ship” layer and then go to Image > Adjustments > Brightness/Contrast and input the following values:

  • Brightness: +15
  • Contrast: -10
image078

The result should be similar to the image below:

image080

Now, activate the Eraser tool (E). We’re going to make the ship look like it really is on water by erasing the ship’s hull or its bottom part. Use the following settings for the Eraser tool (E):

  • Brush size: 10px
  • Hardness: 0%
  • Opacity: 100%
  • Flow: 100%

Now in order for us to accurately erase, we would need to zoom in to the image. To do that, go to the Navigator window and set the zoom level to 100%. See image below:

image081

Erase the part of the ship as shown on the image below:

image083
image085

Next, the last thing we would need to do to make this ship blend with the rest of the picture is to lower its Opacity. While the layer “Ship” is selected, reduce its Opacity to 80%.

image086
image087

After the ship, let’s now add its shadows. Create a new layer (Ctrl/Cmd + Shift + N) and then name it “Ship shadow”. When the layer is created, move this layer below the “ship” layer. Next, activate the Brush tool (B) and Reset your brushes. To reset your brushes, do the same thing as you would with the “Load Brushes” option.

image088

After you’ve reset your Brushes, use the following settings:

  • Brush size: 30px
  • Hardness: 0%
  • Opacity: 15%
  • Flow: 100%
  • Navigator Window: 100%

Use the Brush on the area shown on the image below:

image090

The result should be similar to the image below:

image091

When you’re done, group all the layers that you’ve created on this step and name this group: “Ship and its shadow”.


Step 5: Create the Waves from the Ship

We’re going to make the ship look like its moving so we will create waves which come from the ship. To start, let’s create a new layer (Ctrl/Cmd + Shift + N) and name this layer “Waves from Ship 1”. So that it would look realistic, make sure that this layer and all the layers that you’re going to create on this step is below the “Ship’s shadow” layer. Next, activate the Brush tool (B) and load the brush pack: “waves brush” by anaRasha. Once these brushes have been loaded choose the following brush:

image092

Once you’re done with that, set the Brush values to the following:

  • Brush size: 100px
  • Hardness: Default
  • Opacity: 50%
  • Flow: 100%
  • #: ffffff

Be sure to zoom this at 100% for you to accurately brush-in the waves. Use the Brush on the area shown below:

image094
image095

These waves definitely do not look like it came from the ship, so we’ll need to transform/rotate it. Activate the Transform tool (Ctrl/Cmd + T) and right click on the selected layer then click on Rotate.

image096

The result should be similar to this:

image098

Next, let’s create another layer and name it “Waves from Ship 2”. We’re going to use the same brush (brush 461 of the “waves brush” by anaRasha). After that, set the brush to the following:

  • Brush size: 175px
  • Hardness: Default
  • Opacity: 50%
  • Flow: 100%
  • #: ffffff

Apply the brush on the area shown below:

image100

Activate the Transform tool (Ctrl/Cmd + T) and rotate it as shown below:

image101

Now for the next layer, name it “Waves from ship 3” and then activate the Brush tool (B). Once the Brush tool (B) is activated reset the brushes. After resetting it, input the following:

  • Brush size: 40px
  • Hardness: 0%
  • Opacity: 25%
  • Flow: 100%
  • #: ffffff

Make sure that the zoom level is set at 100%. Now we’re ready to paint! Apply the brush on the area shown below:

image103

Now that we’re done, select all the layers that we’ve created and press Ctrl/Cmd + G to group them, name this group as “Waves”.


Step 6: Retouch the Image

In this step, we will need to retouch the image to enhance the beauty of the image. To start, let’s create a Color Balance adjustment layer from the Create New Fill/Adjustment layer button located on the Layer Window.

image104

When the Color Balance box opens, input the following:

  • Color Levels: -20, +5, +20
  • Tone Balance: Midtones
  • Preserve Luminosity: Checked
image105

Next, create another Color Balance adjustment layer, and then input the following:

  • Color Levels: 0, 0, -15
  • Tone Balance: Highlights
  • Preserve Luminosity: Checked
image106

Next, create a Photo Filter adjustment layer.

image107

When the box opens, input the following values:

  • Filter: Warming Filter (81)
  • Density: 25%
  • Preserve Luminosity: Checked
image108

Next, let’s create another Color Balance adjustment layer, when the box opens input the following values:

  • Color Levels: 0, 0, -5
  • Tone Balance: Midtones
  • Preserve Luminosity: Checked

Create another Photo Filter again but this time use the following:

  • Photo Filter
  • Filter: Yellow
  • Density: 25%
  • Preserve Luminosity: Checked

Finally, let’s create the last Color Balance adjustment layer and input the following:

  • Color Balance
  • Color Levels: +10, 0, +5
  • Tone Balance: Midtones
  • Preserve Luminosity: Checked

The image should now be similar to this:

image110

When you’re done, we will now flatten the image or compress all the layers. To flatten the image, right-click any layer to bring up the contextual menu. Once it is open, click on Flatten Image.

image111
image112

Step 7: Make the image look like a Painting

Now, we will give our image a “Painting” effect. Click on the Flattened layer (Background) and then press Ctrl/Cmd + J to duplicate it. After duplicating the layer, the focus of the Layer window or Photoshop itself will be on this duplicated layer, so go to Filter > Filter Gallery > Artistic > Watercolor.

When it opens input the following:

  • Brush Detail: 12
  • Shadow Intensity: 1
  • Texture: 1
image113

The result will be similar to this:

image115

After that, we will need to reduce the Opacity of this layer to give it more detail. Click on the duplicated layer and then reduce the Opacity to 50%.

image116
image118

Step 8: Give the image a soft glow

In this step, we will make the image glow. To do that, first flatten the image. Once flattened, duplicate it again (Ctrl/Cmd + J). Click on the duplicated layer and then go to Filter > Blur > Gaussian Blur. When it opens, input the following:

  • Gaussian Blur: 16.0px
  • Lighten
  • Opacity: 35%
image119

The result will be a blurry image but this is not what we want, to give it a soft glow change the Blending mode to Lighten and change the Opacity to 35%.

image120

The result will be similar to the following:

image122

Finally, when you’re done, right click on this layer and then click on Flatten image.


Download the PSD

Against the Storm.zip | 29 MB


Authors Comment

image124When I was a kid, I was a huge fan of traditional fantasy paintings. To be honest, I never knew how to paint so for those of you out there who want to see their works looking like a fantasy painting, this tutorial is for you. Anyway, thank you for visiting this page and using my tutorial, if you want to see more of my art works, give me a shout at my website.

- Michael Vincent Manalo


Luminar: AI Photo Editing
Sponsored

Luminar AI lets you turn your ideas into reality with powerful, intelligent AI. Download the photo editor and see how you can completely transform your photos in a few clicks.

4 comments on “Create a Beautiful River Scenery in Photoshop”

  1. lovely~
    the river photo on deviant arts, several links are the exact photo here, very popular tutorial, thanks!

cross