Place the selected part into our document, rotate it to the right like this.

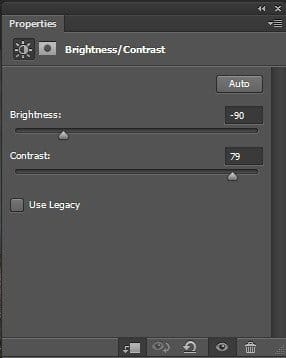
Apply these following adjustment layers to the Hill.
Brightness/Contrast

Hue/Saturation

And we will have the Hill look like this

Step 4 – Adding the Field
Open the Field image and select the field like this.

Place the selected part into the document

Apply Layer Mask to the Field image.

Continue adding some adjustment layers to the Field.
Curves – Hue/Saturation – Brightness/Contrast


And we’re done with the basic background image for this piece.

Step 5 – Extracting the Dead Forest
We will learn how to extract this Forest from the image which you can’t simply use Quick Selection or Magic Wand tool to get the forest part, instead we will use Color Range to solve this puzzle. Open the Dead Forest image and hit Ctrl + A to select the whole image, then go to Select -> Color Range…

Here comes a little tricky part. Adjust the Fuzziness meter to the point where you can begin seeing the forest part as black color, the other as white and grey color. Hold Shift and left click on the white and grey part until they all turn into white like the image below.

After you can see the forest part clearly in black, click OK. Photoshop will automatically select the white part after that. Right click on the image and choose Select Inverse to switch to the forest part.

Hit Ctrl + J and bam! You have the forest extracted clean and nice.

Step 6 – Place The Forest
Having our forest extracted, place it into our document, behind the Hill. Layer Mask some part of the forest like below.

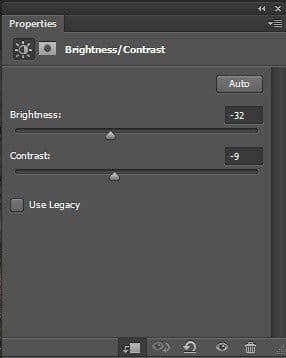
Apply following adjustment layers to the forest.
Brightness/Contrast – Hue/Saturation – Exposure


And this is what we have

Step 7 – More Dead Forest!
Duplicate the Forest and place it to the left, erase some part of it like this

We’re done with the forest, lets move on!

Step 8 – The Witch House
Place the Witch House image like below, place it under the Hill layer.

Go to the House layer’s Blending Option and do a little change to Inner Shadow.

And some adjustment layers, of course!
Levels – Brightness/Contrast – Hue/Saturation


The Witch House has been greatly blended with the whole image.

Step 9 – Create Light From The House
We will add some nice touch for the house by creating glowing light from the house’s windows. Create a new layer, grab the Pen Tool and start draw the window-shape on the house’s window.
21 responses to “Create a Halloween Photo Manipulation in Photoshop”
-
There are about 3 links that don’t seem to work for me. I can’t seem to know why for example the house. Even the link that Henk posted doesn’t work for me. Very confused and worried as I have to finish a project.
-
Thanks for sharing such informative post its help me to know deeply Photoshop work step by step.those are very useful for me! :)
-
These are beautiful designs! Typography can be so powerful.
-
Best tutorial, great skills!!! Tanx
-
Lovely ANTAKA. Thnkz fr your Tutorial. It really Impressive.
-
mais comment entre sur le prgrame :'(
-
Great tutorial!! However I need some help on Step 18. I am not familiar with using the Perspective tool and I can’t get it to conform to the landscape. Can you give us some tips on how to do this?
Thank You
-
Thank you so much Antaka.
-
I have reahed the stage of lighting the windows in the witch house, I make a new layer and use the pen tool to draw around the window but I cant replicate the yellow light that is supposed to be emmited. I follow the instrutction to the letter and have tried many times. I also dont have the red colour with the brush tool when applying masks. Please help :(
-
Hi Jules,
After you’ve finished drawing with pen, just right click on the draw path and choose Fill Path, you should be able to fill with drawing path with the color in the tutorial provided.
Also, the red color in the layer mask is just a sample for better visual view, its actually the black color you use when masking.
Let me know if there’s anything more you want to know, contact me via my email : [email protected].
Best,
Antaka
-
-
can i have a download link to the full completed photo shop of this project i need to show my class
-
LOL I think I know what class you’re talking about.
-
-
awesome photo manipulation
-
thank you for sharing!!
-
Where’s the link to the witch house?
-
Hi Steve,
Sorry for the mistake, here’s the link to the Witch House stock :
http://atknebula.deviantart.com/art/HOUSE-07-03-328360230
Thanks for pointing out!
-
Post updated. Thanks for the link!
-
Found the house.
For all who is searching for the house:
http://www.deviantart.com/art/HOUSE-07-03-328360230
Hey this is a cool tutorial whitch I am trying to do aswell.
But where can I find this witch house?
Thanks
It seems like you forgot to include the Witch House in the tutorial resources.
Thanks for all the great tutorials!
perfect~~


Leave a Reply