Learn how to create a photo manipulation based on the HBO series, “Game of Thrones”. This Photoshop tutorial will give you in-depth instructions on compositing, adding snow, and lighting/blending techniques.
Preview of Final Results

Tutorial Resources
- Model– faestock
- Mountains– Burnt
- Sky– salsolastock
- Ball– rivendell-photostock
- Colors– needanewname
- Snow Brush– carocha
Step 1 – Open a new file
![image007[6] image007[6]](https://cdn.photoshoptutorials.ws/wp-content/uploads/2013/10/image0076-1.jpg?strip=all&lossy=1&webp=82&avif=82&resize=589%2C394&ssl=1)
Open Photoshop and ant the top of the screen select the option File – New. The size has to be Width: 2249 and Height: 2000
Step 2 – Model
Place the model in the new file and resize it if is necessary. I resize it here pressing Ctrl+ T and holding shift change the size. Is important that you hold Shift because in that way the image will not distort.

Step 3 – Selection
You can select the model with pen toolor polygonal lasso tool.

Step 4 – Layer Mask
Now add a layer mask to hide the model’s background, you will have something like this. You will find the layer mask button at the botton of the layer’s menu.
![image010[6] image010[6]](https://cdn.photoshoptutorials.ws/wp-content/uploads/2013/10/image0106-1.jpg?strip=all&lossy=1&webp=82&avif=82&w=1920&ssl=1)
Step 5 – Duplicate
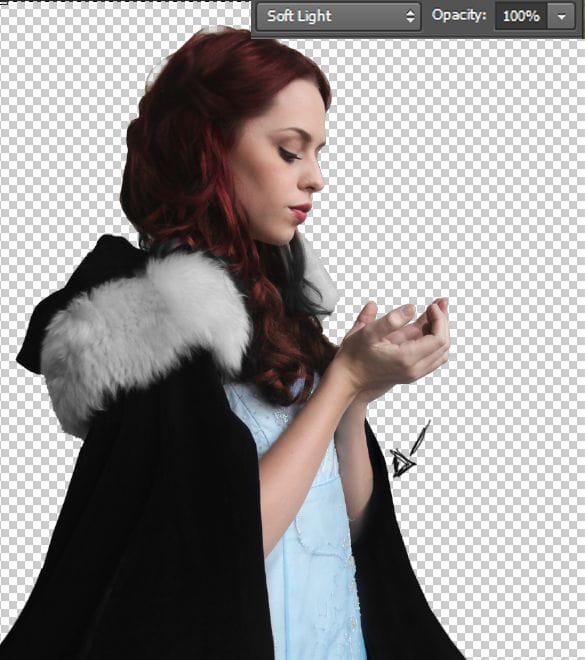
Duplicate the model’s layer and change the layer mode to Soft light to add more contrast to the model. Change the opacity to 60% and the fill to 85%.
![image011[6] image011[6]](https://cdn.photoshoptutorials.ws/wp-content/uploads/2013/10/image0116-1.jpg?strip=all&lossy=1&webp=82&avif=82&w=1920&ssl=1)
Step 6 – Skin
Select only the model’s skin with lasso tool like you did before.

Now change the saturation of the skin to get a pale tone. Press Ctrl + U and in the option saturation reduce it to -25 like this:
![image015[6] image015[6]](https://cdn.photoshoptutorials.ws/wp-content/uploads/2013/10/image0156.jpg?strip=all&lossy=1&webp=82&avif=82&resize=534%2C376&ssl=1)
The result is this one:
![image016[6] image016[6]](https://cdn.photoshoptutorials.ws/wp-content/uploads/2013/10/image0166-1.jpg?strip=all&lossy=1&webp=82&avif=82&w=1920&ssl=1)
Step 7 – Coat
Now you have to desaturate the coat. To do this is the same process as the skin, go to the model original layer and using lasso tool select only the coat, then press Ctrl+J to duplicate the layer.
![image017[6] image017[6]](https://cdn.photoshoptutorials.ws/wp-content/uploads/2013/10/image0176-1.jpg?strip=all&lossy=1&webp=82&avif=82&w=1920&ssl=1)
Step 8 – Coat Saturation
Press Ctrl+U to se the color menu and reduce the saturation completely. Press ok to save the changes.

Step 9 – Coat details
Duplicate the coat layer Ctrl+J. To give the coat movement press ctrl+T and choose the option warp to modify the coat. Don’t worry if it doen’t look perfect you can hide undesired parts passing a black brush over the layer mask.
![image019[6] image019[6]](https://cdn.photoshoptutorials.ws/wp-content/uploads/2013/10/image0196-1.jpg?strip=all&lossy=1&webp=82&avif=82&w=1920&ssl=1)
Step 10 – Darker
To make the coat darker you have to duplicate the coats layer and change the mode to soft light to have something like this:

Step 11 – Background
Tip: Before you continue with the model is important to add the background. You may asked yourself why? Well if you have the background you will know where the light is coming, remember that lighting is something that will make your art realistic.
22 responses to “Create a Surreal Game of Thrones Photo Manipulation”
-
How to download material (Pic etc) for making the photo
-
Thanks for the great tutorial! You’re very good at this!
-
Can you do a tutorial for the winter is here poster?
-
Actually the link for the ‘mountain’ is at http://burtn.deviantart.com/art/Mountain-Trail-259366061
-
You have done a great work here….thats are amazing………..
-
These are beautiful designs! Typography can be so powerful.
-
Me hubiese gustado el tutorial en YouTube, es q soy principiante..
-
Awesome tutorial
-
Great. I was looking for tutorial like this :) Amazing. Thanks.
-
I tried placing the second background and it went through me.
-
Andrea como siempre espectacular con tu creatividad y su realización, me encantas….Tu amigo José
-
You are amazing, your work is truly a work of art!!!
-
Another amazing tutorial. Thank you so so much for sharing and spreading the power of knowledge.
-
nice.. very good
-
very nice, thank you…but can you fix the second image in step 36?
-
Very Useful.
thanks -
wow this is epic ..
-
can you please tell me why i can not load your Tutorial Resources.I like this totorial so much
-
nice tut, thank you
-
I’m glad you like it!
-
-
You misspelled Burt N
-
Amezin…
Art….
Plez…. Keep touching with me
@lonelymax@


Leave a Reply