
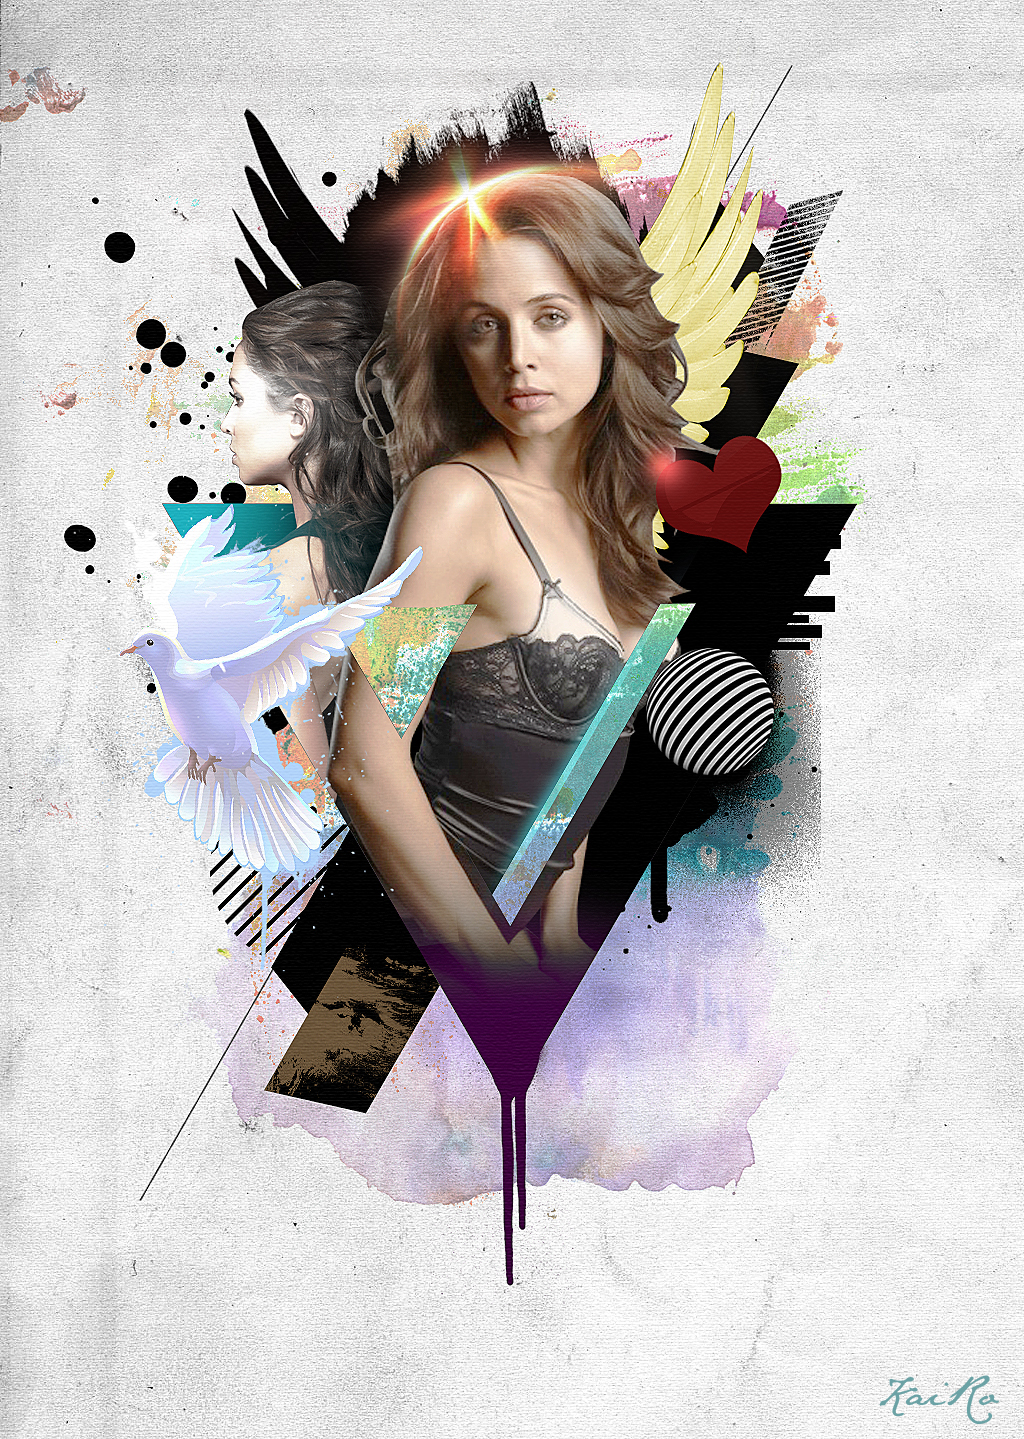
")
Step 72
Select the Scissors Tool and cut out the overlapping parts. Locate spot and click to cut it out. Then select the cut part and hit Delete.
")
Step 73
Do the same with remaining pieces.
")
")
")
Step 74
Fill the remaining gaps.
")
Step 75
Select the outline shape and copy it (Ctrl + C). Press Ctrl + F (Paste Front). Select the Gradient Mesh Tool and click inside the cloud shape. This will add mesh lines.
")
Step 76
Select the mesh points using the Mesh Tool and select a color from the color palette. After adding color send the shape backward ( Ctrl + Shift + [ )
")
Step 77
Select all the shapes and copy them. Head back to Photoshop and paste it as a vector smart object.
")
Step 78
Add dripping paint (drips and spray paint, 33.png)
")
Place it beneath the triangle shape layer.
")
Step 79
Apply color overlay.
")
Step 80
Switch back to Illustrator for one last time. Create the pattern in the following image. Use the Rectangle Tool to create the shape.
")
Step 81
Select all the boxes and skew them using the Transform palette. (Window > Transform)
")
Step 82
Copy and paste the shape in the main file.
")
Step 83
Rotate the pattern by -60 degrees.
")
Step 84
Place it beneath the base shapes. Resize it.
")
Step 85
Add layer mask to the pattern. Set the foreground color to black. Load the grunge brushes set into the brushes palette. Select a grunge brush and place it over the pattern, and click to apply the brush. Make sure you apply the brush in the Layer Mask.
")
Step 86
Open the Auto shapes palette. And choose the pattern below. Draw the pattern.
")
Step 87
Make a circular selection above the pattern. Use the selection to add Layer Mask.
")
Step 88
Here I applied a brush stroke using a grunge brush (Download link provided in resources).
")
Step 89
Place this layer Just above the shape layer. Press Ctrl + Alt + G to clip it to the shape layer.
")
Step 90
Add some nice highlights using a round soft brush. Then set the blending mode to Screen.
")
Step 100
Let’s create a light streak using the Brush Tool. Create a new layer. Click on the edge of the canvas.
")
Press Ctrl + T and stretch it vertically.
")
Step 101
Lock the transparent pixels of the layer. Pick a nice foreground color and press Alt + Backspace to fill the color.
29 responses to “Create This Stylistic Mixed-Media Artwork in Photoshop”
-

Very nice tutorial. I kind of cheated and screen captured some of the things to save time, but it came out good. Thanks
-
hello
its realy amezing tutorial ill try this -
step 28?? where is the button “Thumbnail”?
-
Looks so festive……Excellent post. Thanks for sharing……….
-
i was totally confused at steps 12&13.can you plz explain how did you obtained those steps?
-
i’m totally confused at steps 12&13.can u plz explain how did you obtained that?
-
Downed, thanks a lot for your sharing
-
thanks guys i’ve learn a lot
-
Thanks so much for sharing! Really liked this!
-
GOOD TUTORIAL!!
-
Incredible tutorial! I’ve been using Photoshop for years, and I still learned a ton of stuff going through this.
Thanks!
-
sooooo fun lol
-
The shoofly stock images are no longer available. *sadness
:( -
awesome creation…… i learn it
-
Thanks, Very nice tutorial.
Here is my version – http://i.imgbox.com/acdvYlY6.jpg -
nice soumaya keep trying …
-
I not doing it no more because if I follow these steps I will like mess up or something so I am not doing it so BYE :)
-
-
This is my copy :))
https://www.box.com/s/tpkaboqgp5za2j8b7kt5-
good work :)
-
-
Thank you, i fixed it by myself :)
-
Actually I am facing problem with step 28 :(
-
Thank you, i fixed by myself
-
i have problem on that step too. how to fill the selection? i cant unhide it. please tell me what did you do?
-
-
Awesome tutorial!!! Thanks
-
This is great!
-
heheheheheheheheh thnx vazomama
-
OMG this is awesomeeeee! She is HAWT TOO I wanna
-
I think it,s the easy way to learn.thank you.
-
Thanks for sharing this :)
Leave a Reply