
In this tutorial you will learn to create a beautiful composition stock images and custom build shapes in Illustrator. It demonstrates effective usage of Photoshop’s shape layers, smart objects, and masks. By the end of the tutorial you will know more about these techniques. Parts of this tutorial require Adobe Illustrator.
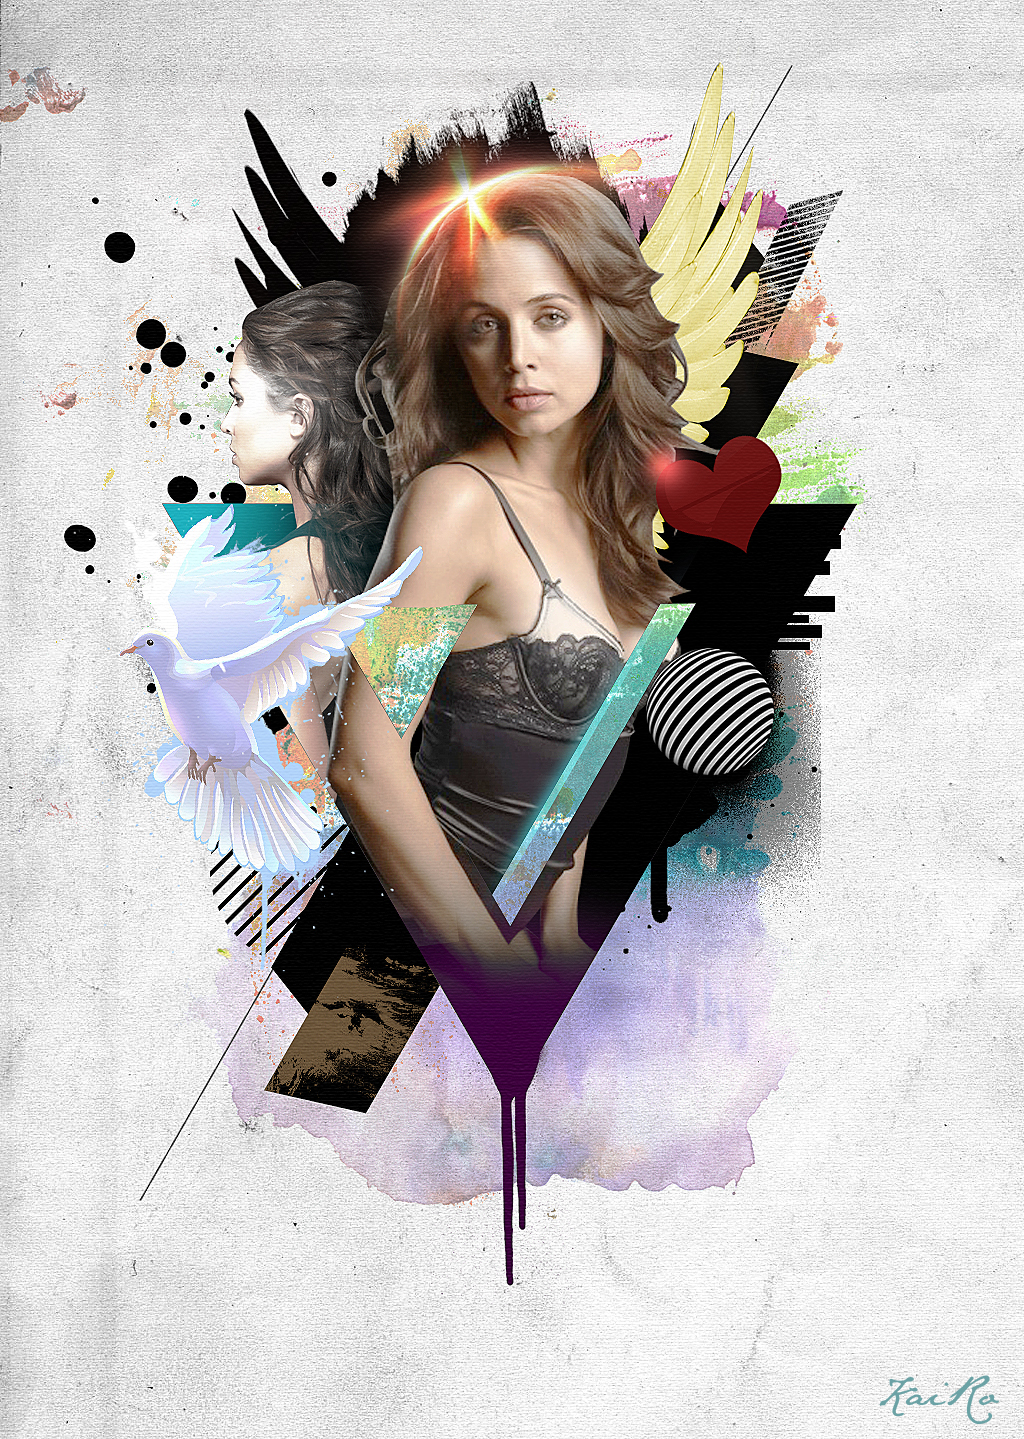
Preview of Final Results

Tutorial Resources
- Paper Texture– Bashcorpo
- Main Model– xxslavaxx stock
- Model 2– xxslavaxx stock
- Halftone Pattern– Vecteezy
- Water Color Texture– Mediamilitia
- Drips and Spray Paint– Qbrushes
- Patterned Spheres– Media Militia
- Hot air Balloons– Media Militia
- Brush Stroke– Mediamilitia
- Grunge Brushes– Qbrushes
Wing Stock– Shoofly-Stock(Alternative)Planet– SXC(Alternative)
Step 1
We need a blank canvas to start working. Create a new file something similar to the one here. Whenever you are not sure about the dimensions just start with something and later you can always increase or decrease the canvas size.
")
Step 2
Here we will create some basic shapes around which we will build our design. Select the Polygon Tool from the from the tool bar. We can edit the number of sides of the polygon. Since we need to draw a triangle, set the sides count to 3. Same time select the shape layers option and draw. This will create a new layer with an editable vector path. We can use the path for several different things.
")
We have the triangle here which is a shape layer. It has a vector path associated with it. We can use to perform path operations like adding, subtracting, excluding and so on. So here you can see how to use the path of the shape layer to cut a hole in the shape. First copy and paste the path. Then scale it down and position it. Once the path is in desired position and select Subtract From Shape Area option.
")
Step 3
Here I am going to add more elements that will define the outline. Use the Rectangle Tool to create the shape.
")
Step 4
Press Ctrl + T to enter transform mode. Right click on the shape and choose Skew. Click and move the pointer across shape.
")
Step 5
After you skewed the shape, duplicate it by simply pressing Ctrl + J. That will create a copy of the shape. Select the shape and press Ctrl + T. Choose Flip Horizontal from the menu.
")
Step 6
Now position the slanted shapes over the triangle. Press Ctrl + T and rotate the shape by -60 degrees. Use the Info palette (F8) to view the coordinates.
")
Step 7
Rotate and reposition the other shape as well. Place both the shapes underneath the triangle layer.
29 responses to “Create This Stylistic Mixed-Media Artwork in Photoshop”
-

Very nice tutorial. I kind of cheated and screen captured some of the things to save time, but it came out good. Thanks
-
hello
its realy amezing tutorial ill try this -
step 28?? where is the button “Thumbnail”?
-
Looks so festive……Excellent post. Thanks for sharing……….
-
i was totally confused at steps 12&13.can you plz explain how did you obtained those steps?
-
i’m totally confused at steps 12&13.can u plz explain how did you obtained that?
-
Downed, thanks a lot for your sharing
-
thanks guys i’ve learn a lot
-
Thanks so much for sharing! Really liked this!
-
GOOD TUTORIAL!!
-
Incredible tutorial! I’ve been using Photoshop for years, and I still learned a ton of stuff going through this.
Thanks!
-
sooooo fun lol
-
The shoofly stock images are no longer available. *sadness
:( -
awesome creation…… i learn it
-
Thanks, Very nice tutorial.
Here is my version – http://i.imgbox.com/acdvYlY6.jpg -
nice soumaya keep trying …
-
I not doing it no more because if I follow these steps I will like mess up or something so I am not doing it so BYE :)
-
-
This is my copy :))
https://www.box.com/s/tpkaboqgp5za2j8b7kt5-
good work :)
-
-
Thank you, i fixed it by myself :)
-
Actually I am facing problem with step 28 :(
-
Thank you, i fixed by myself
-
i have problem on that step too. how to fill the selection? i cant unhide it. please tell me what did you do?
-
-
Awesome tutorial!!! Thanks
-
This is great!
-
heheheheheheheheh thnx vazomama
-
OMG this is awesomeeeee! She is HAWT TOO I wanna
-
I think it,s the easy way to learn.thank you.
-
Thanks for sharing this :)
Leave a Reply to rahulCancel reply