
")
Step 102
Rotate it by -60 degrees.
")
Step 103
Place it above all layers. Change the blend mode to Screen.
")
Step 104
Now open up the planet stock image. Drag it into the main file. Press Ctrl + T. And enter the values in the Options bar. What we are trying to achieve is to use the glow of the planet and combine it with the model below.
")
Step 105
Adjust lighting using the Curves command.
")
Step 106
Slightly reduce the saturation.
")
Step 107
And now hide all those hard edges of the image using Layer Mask.
")
Step 108
Change the blend mode to Screen.
")
Step 109
If still there are any hard edges just hide the using a soft round brush by painting inside the mask.
")
Step 110
Add a new Curves adjustment layer at the very top in the layers palette. Adjust the mid tone values slightly.
")
Step 111
And finally sharpen up the image. But we can’t apply sharpness filter to all layers at once. We will use the Apply Image command to achieve this. First create a new layer above all layers in the layers palette. Go to Image > Apply Image. Make sure the “Merged” option is selected in the dialog box. Press OK. This creates merged copy of the composition in our new layer.
")
Step 112
Now we can apply unsharp mask filter to this layer. Go to Filter > Sharpen > Unsharp Mask. Enter the value and press OK. And there is the final image.
")
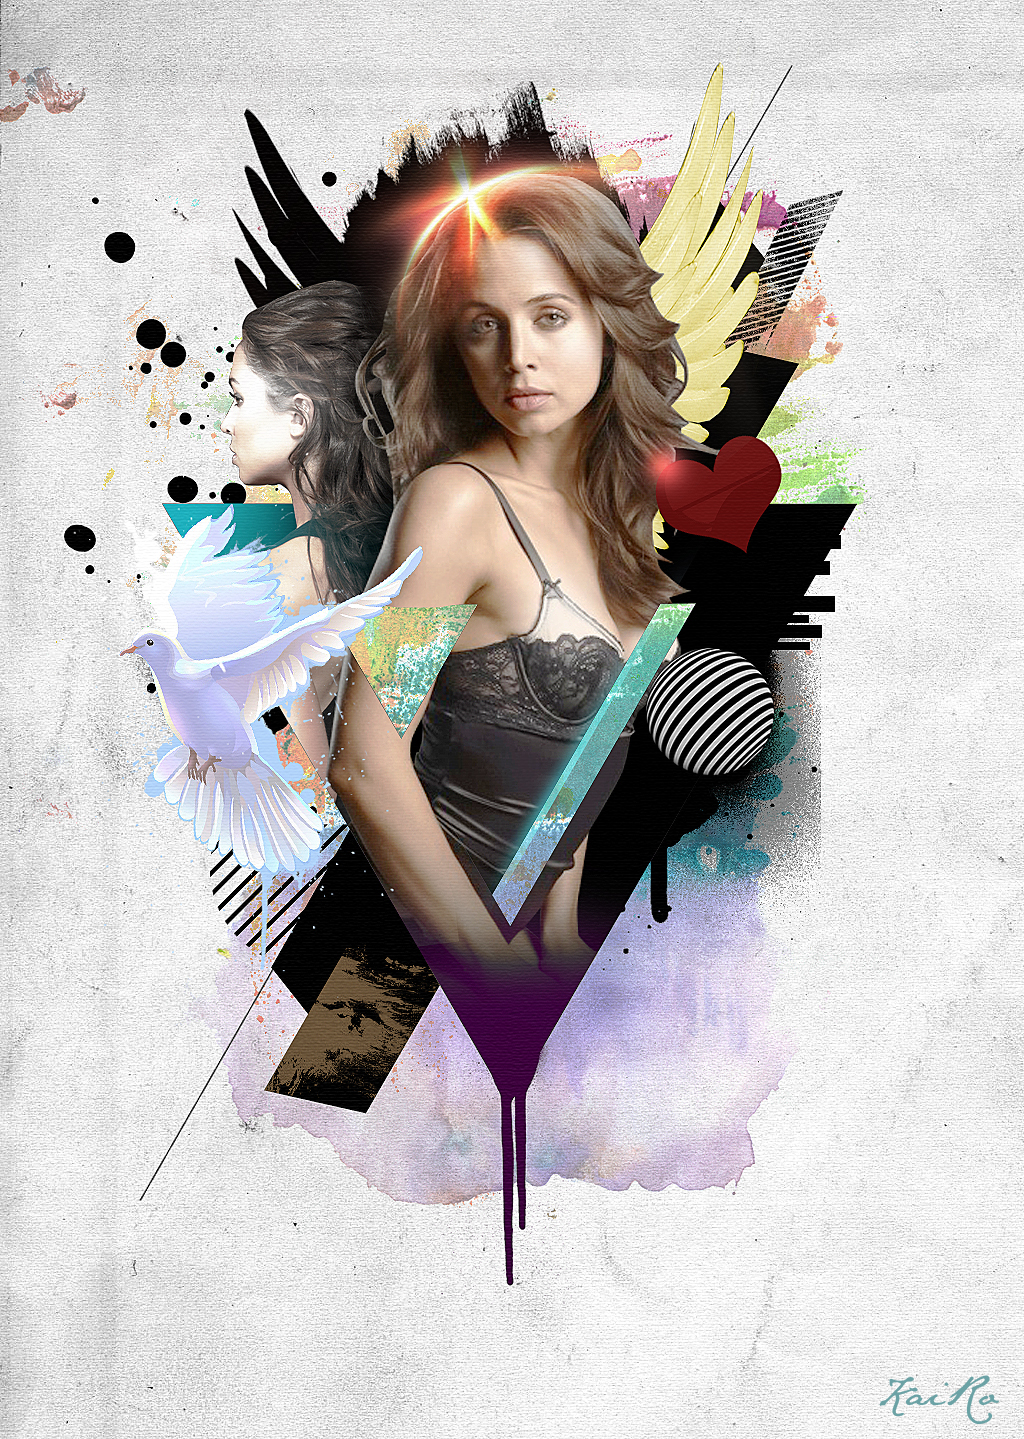
Preview of Final Results
![final-results[1]](https://cdn.photoshoptutorials.ws/images/stories/0728745b59bc_1365E/final-results1.png?strip=all&webp=82&avif=82&w=1920 "final-results[1]")
Tutorial by Niranth M

I am a Graphic / Web Designer and a wannabe VFX artist. Hope you learned something and had fun reading this tutorial. Thank you for following this tutorial.
– niranth
29 responses to “Create This Stylistic Mixed-Media Artwork in Photoshop”
-

Very nice tutorial. I kind of cheated and screen captured some of the things to save time, but it came out good. Thanks
-
hello
its realy amezing tutorial ill try this -
step 28?? where is the button “Thumbnail”?
-
Looks so festive……Excellent post. Thanks for sharing……….
-
i was totally confused at steps 12&13.can you plz explain how did you obtained those steps?
-
i’m totally confused at steps 12&13.can u plz explain how did you obtained that?
-
Downed, thanks a lot for your sharing
-
thanks guys i’ve learn a lot
-
Thanks so much for sharing! Really liked this!
-
GOOD TUTORIAL!!
-
Incredible tutorial! I’ve been using Photoshop for years, and I still learned a ton of stuff going through this.
Thanks!
-
sooooo fun lol
-
The shoofly stock images are no longer available. *sadness
:( -
awesome creation…… i learn it
-
Thanks, Very nice tutorial.
Here is my version – http://i.imgbox.com/acdvYlY6.jpg -
nice soumaya keep trying …
-
I not doing it no more because if I follow these steps I will like mess up or something so I am not doing it so BYE :)
-
-
This is my copy :))
https://www.box.com/s/tpkaboqgp5za2j8b7kt5-
good work :)
-
-
Thank you, i fixed it by myself :)
-
Actually I am facing problem with step 28 :(
-
Thank you, i fixed by myself
-
i have problem on that step too. how to fill the selection? i cant unhide it. please tell me what did you do?
-
-
Awesome tutorial!!! Thanks
-
This is great!
-
heheheheheheheheh thnx vazomama
-
OMG this is awesomeeeee! She is HAWT TOO I wanna
-
I think it,s the easy way to learn.thank you.
-
Thanks for sharing this :)
Leave a Reply