Make your artwork look like they're from an alternate universe. These Cyberpunk presets work with Photoshop (via the Camera Raw filter) and Lightroom. Download all 788 presets for 90% off.
Create a mysterious floating box in the middle of a desolate land. This though-provoking image can be created using a variety of texture photos and a few Photoshop brushes – and we’ll show you how. You’ll learn techniques such as creating a 3D cube from textures, working with shadows, and lighting/color techniques.
Preview of Final Results
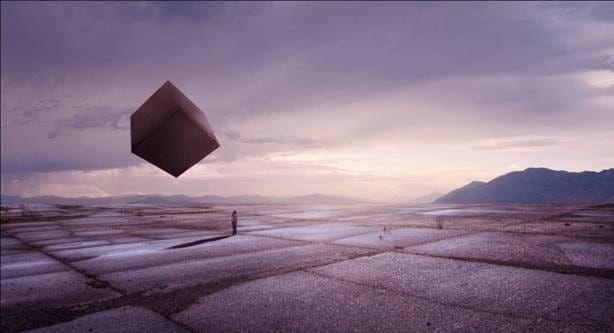
Download the PSD
Mysterious Floating Box.zip | 31.65 MB
Download from Website
How to Create a Mysterious Floating Box in a Desolate Land
Tutorial Resources
- Stormy view of Valley - night-fate-stock
- MBI Beton - Jascha400d
- Basic white cube 1 - svilen001
- Concrete Wall 3 - mdpratt
- 394 Look up - WolfcatStock
Step 1: Create a New Photoshop Image File
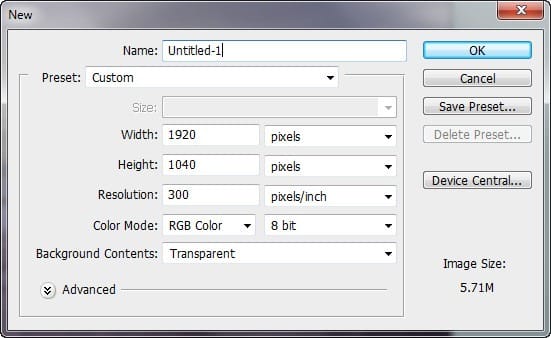
Let's start by creating a new image file, go to the Menu bar and click File > New, and then input the following values on their respective fields:
- Width: 1920 pixels
- Height: 1040 pixels
- Resolution: 300pixels/inch
- Color Mode: RGB Color; 8bit
- Background Contents: Transparent
Step 2: Create the Background - Sky
In this step, we will be creating the sky of our image. To start, open "Stormy view of Valley" by night-fate-stock. Once the stock image is open, activate the Rectangular Marquee tool (by pressing M on your keyboard) and create a selection area around the sky. See images below:


When you're done, activate the Move tool (V) and left-click on the selected region and drag it to the canvas. Take note that this sky is from a huge stock image and so when you move it to the canvas it will occupy a lot of space.
Move and position the selected area as shown on the image below:
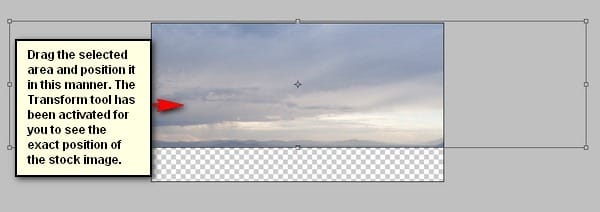
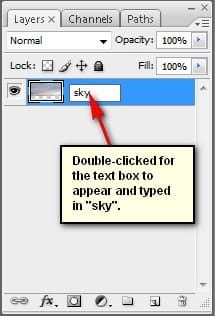
Now that it is in position, rename this layer now to "sky".
To rename a layer, simply double-click on the words: "layer 1" (you can find that on the layer window) to prompt a text box to appear. Once that appears, you may now rename the layer. See image below:
Next, activate the Transform tool (Ctrl/Cmd + T) and resize the image as shown on the image below:
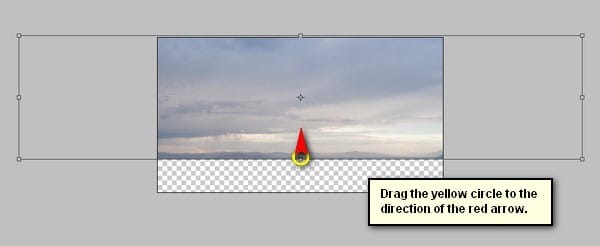

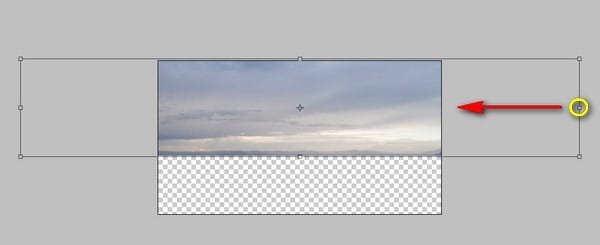
The result of that should be similar to this:
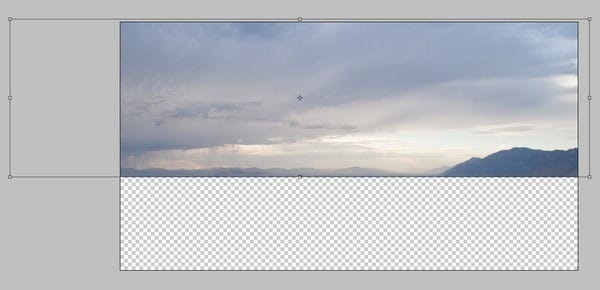
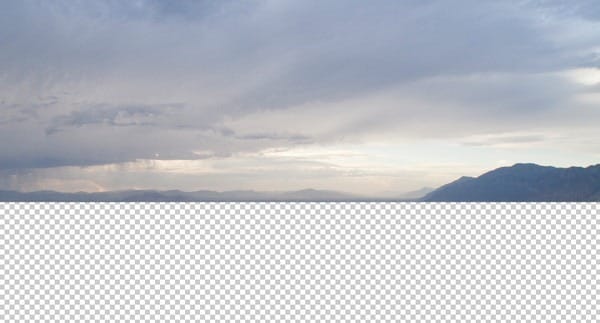
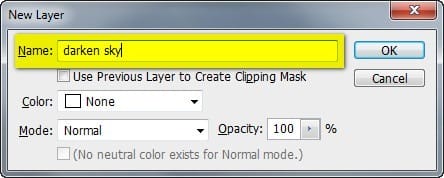
Next, let's darken the sky; to do that, make sure that the "sky" layer is selected and then create a new layer (Ctrl/Cmd + Shift + N). This process makes sure that the new layer will be created above the active layer. Now when then new layer box is open, input "darken sky" on the name box. See image below:

Now that the new layer has been created, activate the Brush tool (B) but before we start, make sure that the active Brushes are the default brushes. The default Photoshop brushes are shown on the image below, if that's not what you see, then follow the instructions below:

Right click the canvas while a layer is selected and while the Brush tool (B) is activated and then click on the button highlighted below:

Then click on "Reset Brushes" from the contextual menu.

Now, that that is done input the following settings for our Brush tool (B):
- Brush size: 1000px
- Hardness: 0%
- Opacity: 15%
- Flow: 100%
- #: 00011b

Note, the #: 00011b symbolizes the brush's color. To change your brush color to that color, simply follow the steps shown below:

Once the Color Picker box opens, input the following:

Now, your brush has a dark blue color, let's start painting!

The result:

Step 3: Create the Background - Ground
Now, we will complete the background by adding land. To start, open "MBI Beton" by Jascha400d. Once open, activate the Rectangular Marquee Tool (M) and create a selection area as shown on the image below:

Once you have created the selection area, activate the Move tool (V) and drag it to our canvas. Position it as shown on the images below:


Rename this layer now to "ground". Next, activate the Transform tool (Ctrl/Cmd + Shift + T) and resize it as shown on the image below:

The result of that should be similar to this:


Now, we will need to blend the ground with the light from the sky. To do that, create a new layer (Ctrl/Cmd + Shift + N) and type "lighten" on the name box.
Next, right click on the newly created layer and click on "Create Clipping Mask" so that the paint we will be applying will only be applied to the "lighten" layer.

Activate the Brush tool (B) and then input the following:
- Brush size: 300px
- Hardness: 0%
- Opacity: 15%
- Flow: 100%
- #: ffffff

Now, let's paint:

The result:

Next, we will add more light to the horizon to make it look more dramatic. To start, create a new layer (Ctrl/Cmd + Shift + N) and input "horizon fix 1" on the name box.
Activate the Brush tool (B) and then input the following:
- Brush size: 500px
- Hardness: 0%
- Opacity: 15%
- Flow: 100%
- #: fffdc5

Now, let's paint:

The result of that should be like this:

Next, create a new layer (Ctrl/Cmd + Shift + N) and name this layer "horizon fix 2". Activate the Brush tool (B) and input the following:
- Brush size: 1000px
- Hardness: 0%
- Opacity: 15%
- Flow: 100%
- #: fffff3

Now, let's start enhancing the horizon for the second time:

The result:

Next, let's darken the "ground" to make the light look more dramatic. Create a new layer (Ctrl/Cmd + Shift + N) and name this layer to "darken ground".
Activate the Brush tool (B) and input the following:
- Brush size: 600px
- Hardness: 0%
- Opacity: 25%
- Flow: 100%
- #: 000000

Now, let's paint:

The result of that should be similar to this:

When you're done, select all the layers that we've created and press Ctrl/Cmd + G to group them. Once grouped, rename it to "Background".

Step 4: Create the Mysterious Box
Now, we will be creating the eerie floating box. To start, let's open "Basic white cube 1" by svilen001. We would need to take the box out from this stock image and to do that, we would need the Polygonal Lasso Tool (L).

Once this tool is activated, create a selection area around the box:

Next, activate the Move tool (V) and drag this box to our canvas. Rename this layer to "box". Make sure to put this above the "Background" group.

Position it as show below:

Next, activate the Transform tool (Ctrl/Cmd + T) and resize the box as shown on the images below:


The result:

Step 5: Create the Texture for the Mysterious Box
In this step, we will make the floating box look more realistic. The step above will now serve as our guide in transforming the textures that we would be applying to the box.
To start, open the texture "Concrete Wall 3" by mdpratt. Now, we won't be using the whole texture, instead we will be cutting parts of the texture and applying it on each sides of the box. Activate the Rectangular Marquee tool (M) and create a selection area around the region shown on the image below:

Once you've done that, activate the Move tool (V) and drag it to our canvas. Move it and position it as shown below:

Next, rename this to "side 1".
Now, it is time we distort this layer. To distort it, activate the Transform tool (Ctrl/Cmd + T) and right click on the canvas to show the contextual menu. Once the menu is up, click on "Distort".

Follow the instructions on distorting "side 1" as shown on the images below:


The result of that should be similar to this:

Next, we would need to darken this layer to make it blend with the sunset; to start, create a new layer (Ctrl/Cmd + Shift + N) and name it "darken side 1". Right click on this layer and then choose "Create Clipping Mask" to focus the paint only on this layer.
Once you've done those, activate the Brush tool (B) and input the following settings:
- Brush size: 150px
- Hardness: 0%
- Opacity: 15%
- Flow: 100%
- #: 0f0600

Note: We will be using a very dark brown brush instead of a black one so that the colors of its shadow would still match the color themes of the image.
Now, let's darken the texture:

The result should be similar to this:

Now, we will create the texture for the upper right side of the box. Activate the Rectangular Marquee tool (M) and open the "Concrete Wall 3" stock image again. Create a selection area around the region shown below:

Activate the Move tool (V) and drag the selected area to our canvas. Rename this layer now to "side 2" and put it above "darken side 1".
Position this layer as shown below:

Next, activate the Transform tool (Ctrl/Cmd + T), right click on the canvas and choose "Distort" from the menu and distort the image as shown on the images below:


The result:

Now, we will darken "side 2", so create a new layer (Ctrl/Cmd + Shift + N) and input "darken side 2" on the name box. Once created, create a clipping mask for this layer.
Activate the Brush tool (B) and input the following:
- Brush size: 150px
- Hardness: 0%
- Opacity: 15%
- Flow: 100%
- #: 0f0600
Let's paint!

The result of that should be similar to this:

Next, we will put the texture for the top left side. . Activate the Rectangular Marquee tool (M) and open the "Concrete Wall 3" stock image again. Create a selection area around the region shown below:

Now, activate the Move tool (V) and drag this to our canvas. Rename the layer now to "side 3". Position it as shown below:

Activate the Transform tool (Ctrl/Cmd + T) and choose "Rotate 90 CCW" from the contextual menu.

The result:

Now, distort "side 3" as shown on the images below:


The result should be similar to this:

Now, let's darken this to make it blend with the light of the image; create a new layer (Ctrl/Cmd + Shift + N) and name it "darken side 3" and then create a clipping mask for this layer.
Activate the Brush tool (B) and then input the following settings:
- Brush size: 150px
- Hardness: 0%
- Opacity: 15%
- Flow: 100%
- #: 0f0600
Now, let's paint:

The result of that should be similar to this:

Note: For easier distorting, you may remove the visibility of the box itself. This will give you an easier time in distorting but there will be no guide. The layer visibility can be triggered through the following:

Now, select all the layers we've made from Step 4 and group them (Ctrl/Cmd + G) and name the group to "Box".
Step 6: Add the Wanderer
In this step, we will be adding the woman who is staring and captivated by the box. To start, open "394 Look up" by WolfcatStock. We would need to create a selection area around this woman and for that we will need the Magnetic Lasso Tool.

Once activated, just drag it around the woman to create the selection area.

Activate the Move tool (V) and drag this image to the canvas. Once on the canvas, rename this layer to "woman". Position it as shown on the image below:

Now, we would need to reduce the size of this woman so activate the Transform tool (Ctrl/Cmd + T) and resize it as shown on the image below:

Next, activate the Transform tool (Ctrl/Cmd + T) once again and then right click on the canvas and then choose "Flip Horizontal" from the contextual menu.

The result of that:

Now, let us activate the Move tool (V) and drag the image to its new position which is a little under the floating box. See image below:

Next, let's fix the brightness/contrast of our woman. To do that, first select the woman and then go to Image > Adjustments > Brightness/Contrast:
Once it has opened, input the following:
- Brightness: 22
- Contrast: -12
- Use Legacy: Check

The result:

Next, let's adjust the lightness of the image; to do that, select the "woman" layer and then go to Image > Adjustments > Hue/Saturation.
Once open, input the following:
- Edit: Master
- Hue: 0
- Saturation: 0
- Lightness: -30

The result:

Now, to make her blend more seamlessly with the rest of the images, we would need the Eraser tool (E).

Once the Eraser tool (E) is activated input the following:
- Brush size: 200px
- Opacity: 100%
- Flow: 100%
- Zoom level: 400%

To change the zoom level, simply go to the Navigator window and change the zoom level to 400%

Now, use the Eraser tool (E):

The result:

Step 7: Add the Wanderer's Shadow
In this step, we will be adding the shadow of the wanderer. To do that, simply select the "woman" layer and duplicate it by pressing Ctrl/Cmd + J. Once duplicated, activate the Transform tool (Ctrl/Cmd + T) and right click on the canvas; click on "Flip Vertical".
The result:

Activate the Move tool (V) and drag it down to make it look like the woman's reflection:

Now, activate the Transform tool (Ctrl/Cmd + T), right click on the canvas and then press Distort. Next, distort it as shown on the images below:


The result should be similar to this:

Now, we will turn it into a real shadow; first, go to Image > Adjustments > Brightness/Contrast and input the following:
- Brightness: -100
- Contrast: -100
- Use Legacy: Check

The result:

Next, we will blur this shadow to make it look real. To do that, make sure that the duplicated layer is selected and then go to Filter > Blur > Gaussian Blur. Now, when it is open, input the following:
- Radius: 1.0 pixels

The result of that:

Now, we'll reduce the duplicated layer's opacity. To do that, just go to the Layer window and change the Opacity from 100% to 70%.

Next, select all the layers from Step 6 and group them (Ctrl/Cmd + G) and name the group to "Woman".
Step 8: Enhance the Overall Look of the Image
Now, let's enhance the look and feel of the image. To start, let's create a Solid Color adjustment layer from the "Create New Fill/Adjustment layer button" from the Layer window.

Once the contextual menu opens, click on Solid Color:

Clicking on the Solid Color option will open the Color Picker box. Now, input the following on the #: space.
- #: 00022c

Click OK and then change the Blending mode and Opacity of this solid color to the following:
Note: To change the Blending mode, simply click on the Solid Color and then go to the Layer window and find the "Normal" option. Click on that and it will open a contextual menu, once its open, click on Exclusion as shown on the image below:

- Blending mode: Exclusion
- Opacity: 50%

Make sure that you put this layer above the "woman" group. Next, let's create a Color Balance adjustment layer from the "Create New Fill/Adjustment layer button".

Once it is open, input the following:
- Color Levels: +17, -12, -10
- Tone Balance: Midtones
- Preserve Luminosity: Check

Next, let's create a Levels adjustment layer still from the "Create New Fill/Adjustment layer button".

Once the Levels box opens, input the following:
- Channel: Red
- Input Levels: 15, 1.00, 255
- Output Levels: 0, 255
- Channel: Blue
- Input Levels: 15, 1.00, 255
- Output Levels: 0, 255


Next, let's create a Photo Filter adjustment layer still from the "Create New Fill/Adjustment layer button".

Once it opens, input the following:
- Filter: Violet
- Density: 25%
- Preserve Luminosity: Check

Next, let's create a Brightness/Contrast adjustment layer still from the "Create New Fill/Adjustment layer button".

Once it opens, input the following:
- Brightness: -10
- Contrast: 10
- Use Legacy: Uncheck

Next, let's create another Color Balance adjustment layer and once it opens, input the following:
- Color Levels: 0, -15, 0
- Tone Balance: Midtones
- Preserve Luminosity: Check
Now, let's create a Gradient Map adjustment layer from the "Create New Fill/Adjustment layer button".

Now, when the Gradient Map box opens, do the following as shown on the images below:

You'll notice that your image is now Black and White, so let's change the Blending mode and Opacity to the following:
- Blending mode: Luminosity
- Opacity: 60%

The result should be similar to this:

Final Results

Download the PSD
Mysterious Floating Box.zip | 31.65 MB
Download from Website
- Michael Vincent Manalo