How to Create a Surreal Deer Photo Manipulation with Adobe Photoshop

How to Create a Surreal Deer Photo Manipulation with Adobe Photoshop

In this tutorial, I'll show you how to create a surreal scene featuring a deer carrying an underwater scene inside the horns.  First, we'll import the forest and add shadow and light to it. After that, we'll add the deer and retouch him using adjustment layers, masking, and brushes. Later, we'll import the underwater part and sea, add the boat and birds. We'll use several adjustment layers to enhance the final effect.

Preview of the Final Result

Tutorial Resources

Step 1

Create a new 1830x1311 px document in Photoshop and fill it with white. Open the forest image and drag it into the white canvas using the Move Tool (V). Convert this layer to a Smart Object.

Step 2

Hit Ctl+Shift+N to make a new layer and activate the Clone Tool (S).  Use this tool to remove the bench near the tree on the background.

Step 3

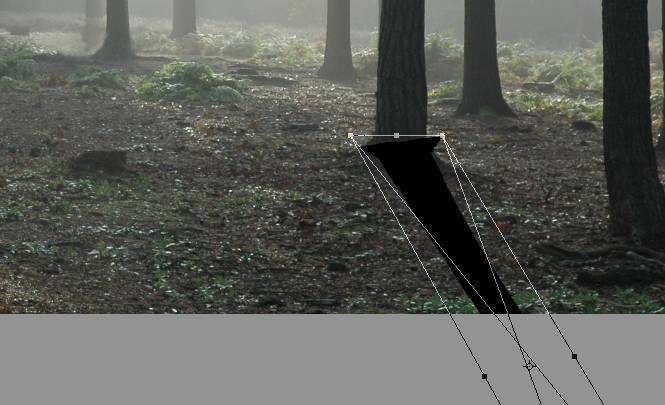
We'll make  shadows for the trees. Make a new layer and use the Polygonal Lasso Tool (L) to select the tree on the midground (don't need to be so precise). Fill it with the color #0f0604 and flip it vertically (Edit > Transform > Flip Vertically). Convert this layer to a Smart Object and move it below this tree. Use the Free Transform Tool (Ctrl+T) to distort the shadow to fit the light on the middle of the background.

Step 4

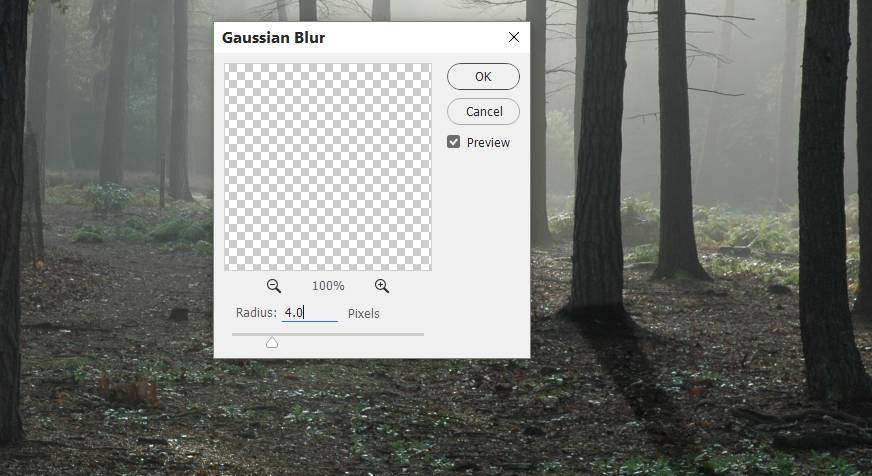
Lower the opacity of this layer to 40%. Go to Filter > Blur > Gaussian Blur and set the radius to 4 px:
Step 5

Click the second icon at the bottom of the Layers panel to add a mask to this layer. Activate the Brush Tool (B) and select a soft round one with black color.  Use this brush to erase the bottom part of the shadow covering the tree.

Step 6

Use the same method to add shadows for other trees. I've changed the shadows' opacity to fit the distance from the trees to the light on the background. Add a mask to each of these layers to remove the unwanted details on the bottom of the shadows.

Step 7

Go to Layer > New Adjustment Layer > Gradient Map and pick the colors #0d0501 and #0a437b to turn the scene into a night one.

Step 8

Make a Curves adjustment layer and decrease the lightness. On this layer mask, use a soft black brush to erase the middle section, leaving the dark effect visible on the bottom left and right only.

Step 9

Create a Levels adjustment layer to bring more light to the top middle as we aim to make the main light there. On this layer mask, paint on the rest so it won't be affected by this adjustment layer. 

Step 10

Add a Color Fill layer and pick the color #085b83. Lower the opacity of this layer to 60% and on this layer, use a soft black brush to erase most of the canvas, leaving the mist visible on the top middle only.

Step 11

Create a new layer on top of the layers and use a soft brush with the color #89c2e2 to paint in the middle. Change this layer mode to Soft Light 100%.

Step 12

Open the moon image and cut out the moon from the dark background. Place the moon on the top middle of the main canvas and change this layer mode to Screen 100%.

Step 13

Double click this layer, choose Inner Glow. Set the color of glow to #99c7d2.

Step 14

Make a new layer and use a soft brush with the color #bdd3e0 to paint around the moon. Change this layer mode to Overlay 100% and add a mask to this layer. Use a soft black brush to reduce the light effect  around the top middle. 

Step 15

Add a new layer and use the same brush to paint on the middle of the ground to add some light there. Alter this layer mode to Soft Light 100%.

Step 16

Isolate the deer and place him in the middle of the ground. Convert this layer to a Smart Object.

Add a mask to this layer and use a small hard black brush to hide some unwanted details around the deer's contour.

Step 17

Go to Edit > Puppet Warp and use the pins to change the pose of the deer, especially the horns to make them higher. 

Step 18

Make a new layer above the deer layer and set it as Clipping Mask. Change this layer mode to Overlay 100% and fill with 50% gray:

Activate the Dodge and Burn Tool (O) with Midtones Range, Exposure about 10-15% to refine some details on the deer. You can see how I did it with Normal mode and the result with Overlay mode.

Step 19

Create a new layer (set as Clipping Mask) and use the Clone Tool with the opacity about 50% to reduce the visibility of a part on the deer's back.

Step 20

Create a new layer and use a small brush with the color #623726 to paint some small furs to fill in the dark part on the bottom of the deer's body.

Step 21

Make a new layer and use a soft brush with the same color and the opacity about 22% to paint more fur on the lower part of the deer's body to reduce the contrast there.

Step 22

Make a Color Balance adjustment layer and alter the Midtones values:

Step 23

Add a Curves adjustment layer  and reduce the lightness. On this layer mask, use a soft black brush to erase the contour of the deer to reveal the light there.

Step 24

Create another Curves adjustment layer to reduce the contrast on the deer. On this layer mask, paint on the deer's contour to keep the light there.

Make a Photo Filter adjustment layer and pick the color #0196ec to make the deer's color fit the background.

Step 25

Add a new layer and use a small brush with the color #94e0e3 to paint bright furs on the front of the deer. 

Step 26

Create a new layer and use a soft brush with the color #96d5c6 to increase the light on the deer. Change this layer mode to Overlay 100%.

Step 27

Add a new layer below the deer's one and make shadow for the deer as done with the trees. I've lowered the shadow's layer to 40%.

Step 28

Place the underwater image onto the horns and change this layer mode to Hard Light 100%

Add a mask to this layer and use a hard black brush to erase the part outside the horns.

Step 29

Make a Color Balance adjustment layer and change the Midtones settings:

Step 30

Create a Curves adjustment layer to darken the left of the underwater part. Paint on the rest to keep its contrast.

Add another Curves adjustment layer to brighten the middle of the underwater part. The selected areas show where to paint on the layer mask.

Step 31

Open the sea image and use the Rectangular Marquee Tool (M) to select a part in the middle of the sea to add to the top of the horns. Use Ctrl+T to make this part thinner and add a mask to this layer. Use a hard black brush to remove the part outside the horns.

Step 32

Create a Color Balance adjustment layer to change the color of the sea's surface.

Step 33

Add a Curves adjustment layer to bring more light to the sea part. On this layer mask, use a soft black brush with  the opacity about 5-10% to reduce the light on the details which are too bright.

Step 34

Make a new layer and use a small brush with the color #b0dfec to paint some light details along the sea's contour.

Step 35

Open the boat image and use the Move Tool to drag it onto the right of the sea's surface. Use Ctrl+T to change the form of the boat a bit to fit the perspective of the sea.

Step 36

Make a Hue/Saturation adjustment layer and alter the Master values:

Create a Color Balance adjustment layer and change the Midtones settings:

Step 37

Make a Curves adjustment layer to bring more light to the middle of the boats and some details which are a bit darker than the rest. The selected areas show where to paint on the layer mask.

Create a Selective Color adjustment layer to give the boat some blue to fit the background.

Step 38

Make a new layer, change the mode to Overlay 100% and fill with 50% gray.  Use the Dodge and Burn Tool to refine the light and shadow on the boat a bit.

Step 39

Isolate the birds and place them above the left of the sea's surface.

Step 40

Make a Curves adjustment layer to bring more light and haze to the birds. 

Add a Color Balance adjustment layer to give some blue/cyan to the birds.

Step 41

Create a new layer  on top of the layers and use a soft black brush with the color #d1d9dd to paint some light for the tree on the right of the deer. Change this layer mode to Overlay 100%.

Step 42

Make a Photo Filter adjustment layer and pick the color #c8eaff.

Make a Color Balance adjustment layer and change the Midtones settings:

Step 43

Make a Curves adjustment layer to brighten both sides of the scene a bit. On this layer mask, use a soft black brush to paint on the middle to keep its lightness.

Create a Vibrance adjustment layer to enhance the color of the whole scene. Use a soft black brush to reduce the red's saturation on the trees, deer and shade areas.

Step 44

Make a new layer and hold Ctrl while clicking the deer layer to load its selection. Use a soft brush with the color #ae4c4c to paint on the legs, the bottom of the deer to give them some red. Change this layer mode to Soft Light 40%.

Final Result

Download the PSD

Surreal Deer Tutorial.zip

Luminar: AI Photo Editing
Sponsored

Luminar AI lets you turn your ideas into reality with powerful, intelligent AI. Download the photo editor and see how you can completely transform your photos in a few clicks.

4 comments on “How to Create a Surreal Deer Photo Manipulation with Adobe Photoshop”

  1. I don't understand step 23 and 24 about the Curve layer, it darken the whole picture. I try to clipping mask step 23 but I don't know how to do step 24, it make the whole picture dark with curve

    1. If it makes the whole image darker, it means it's not being clipped to a layer. The curve adjustment layer should be positioned above the deer. You can download the PSD to check the layer positions.

Leave a Reply

Your email address will not be published. Required fields are marked *

cross