


Go to Filter > Blur > Gaussian Blur and set radius to 3px.

Step 8
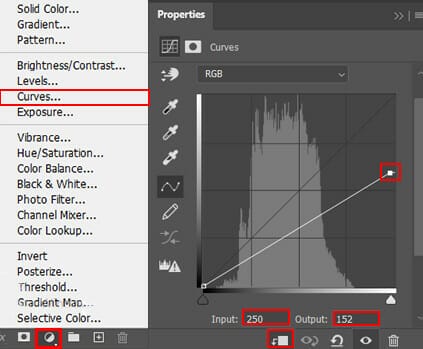
Add Adjustment Layer “Curves”

Step 9
Add Adjustment Layer “Color Balance”

Step 10
Add Adjustment Layer “Curves” and press Ctrl/Cmd + I to invert. Then use Brush Tool(B) Soft Round with foreground color white and paint the left side of buildings (Light)


Step 11
Add Adjustment Layer “Curves” and press Ctrl/Cmd + I to invert. Then use Brush Tool(B) Soft Round with foreground color white and paint the right side of buildings (Dark).


Step 12
Next, we add Clouds but first we need to import brushes. Select a Brush Tool(B) and right click on background. Now click on the gear icon and Import Brushes (Select a downloaded brush).

Step 13
Now we can paint Clouds. Create a new layer and Foreground color use White.


Step 14
Add Adjustment Layer “Curves” and press Ctrl/Cmd + I to invert. Then use Brush Tool(B) Soft Round with foreground color white and paint the left side.

Step 15
Add Adjustment Layer “Curves”

Step 16
Now place last image, Go to File > Place and select Model. Then place it to our work canvas and position the image with the transform tool (Ctrl / Cmd + T). Hold Alt + Shift and rasterize like the image below. In Photoshop CC only hold Alt to rasterize all sides together.


Then use a Pen Tool(P) and start selecting. When we finish the selection press right-click on mouse and “Make Selection” then create layer mask. The simplest path you can draw with the standard Pen tool is a straight line, made by clicking the Pen tool to create two anchor points. By continuing to click, you create a path made of straight line segments connected by corner points.


Step 17
Add Adjustment Layer “Curves”

Step 18
Add Adjustment Layer “Hue/Saturation”

Step 19
Add Adjustment Layer “Color Balance”

Step 20
Add Adjustment Layer “Curves” and press Ctrl/Cmd + I to invert. Then use Brush Tool(B) Soft Round with foreground color white and paint on hair.


Step 21
Add Adjustment Layer “Hue/Saturation” and press Ctrl/Cmd + I to invert. Then use Brush Tool(B) Soft Round with foreground color white and paint on edges.


Step 22
When we finished all this, now merge all layers to one. Select the last layer and hold CTRL/CMD + SHIFT + ALT + E. Now we have a final layer, right click on mouse and select Convert to Smart Object. Then go to Filter > Camera RAW Filter. At its most basic, the Photoshop Camera Raw filter allows you to use the functions of the ACR interface at any time within Photoshop.
2 responses to “View to Apocalypse Photoshop Tutorial”
-

Very good 👍
-
Nice! Thank you!
Leave a Reply