
Make your photos look breathtaking. In this Photoshop Elements tutorial, you will learn how to use a combination of tools to digitally add a realistic ray of light to your photos.
Ray of Light Photoshop Elements Tutorial
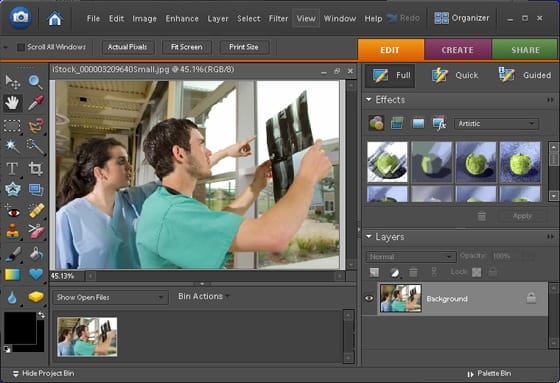
Step 1: Open an image
Open a photo into Photoshop Elements. The photo should have a light source such as an overexposed sky, highlights in clouds, etc..
{articlead}
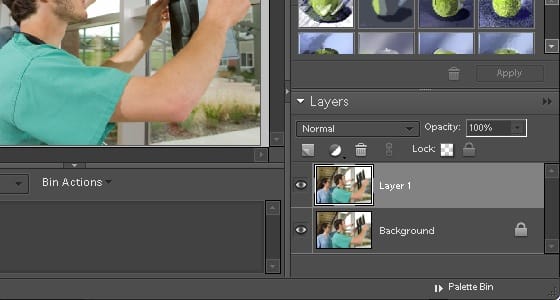
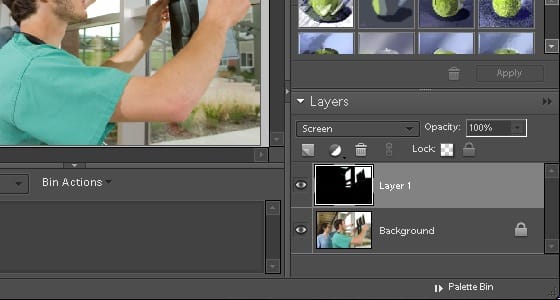
Step 2: Duplicate the background layer
Select the Background layer in the Layers palette then press Ctrl+J to duplicate the layer.
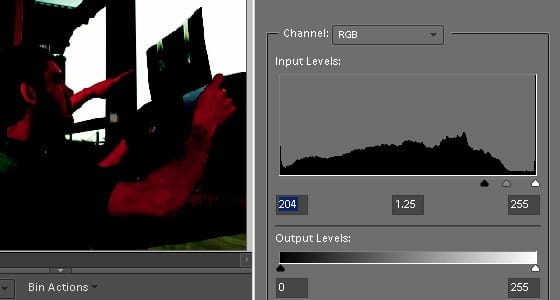
Step 3: Use the Levels tool to increase contrast
With the top layer selected, choose Enhance > Adjust Lighting > Levels. Drag the black input slider towards the left until most of the image is black except for any light source. For example, in the image below, the contrast was increase only until the window turned all white. We could have applied more contrast, but the translucent bones in the medical image would start to turn black.
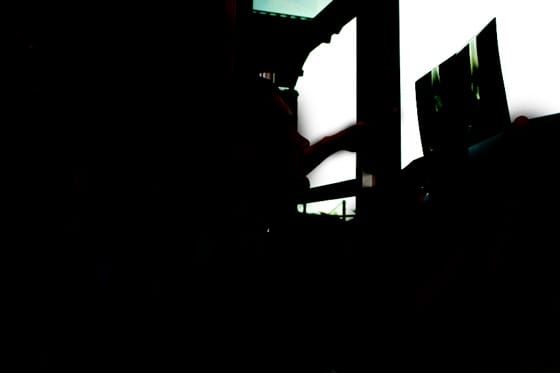
Step 4: Paint out areas that are not bright
Select the brush tool and set your foreground color to black. Paint over areas that are not bright. With the image used in this tutorial, everything except the windows and the bones in the medical image were painted black.
Step 5: Change the blend mode to Screen.
In the layers palette, select the top layer and change the blend mode to Screen. This will make the layer blend so that only the highlights (white areas) are visible.
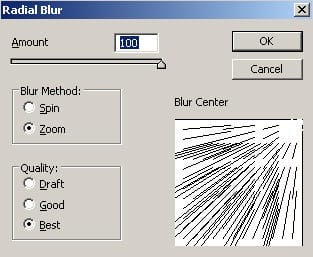
Step 6: Apply Radial Blur
With the top layer selected, choose Filter > Blur > Radial Blur. Copy the settings from the image below. In the Blur Center settings, move the target to where you want the light to blast from. For example, I positioned the blur center to the top right corner so that the light blast out from the top right to the bottom left.
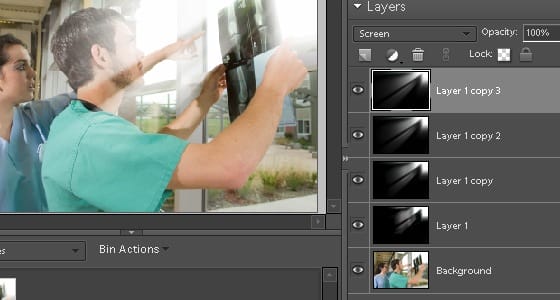
Step 7: Duplicate the layer and repeat the Radial Blur filter
Right now, the ray of light in your image will look very faint. In this step, we’ll repeat a process of duplicating the layer and repeating the Radial Blur filter to extend and brighten the ray of light. Press Ctrl+J (duplicate layer) then Ctrl+F (repeat previous filter; Radial Blur) three times or until you get results that you like. You should end up with several layers and a more visible ray of light.
Step 8: Merge the layers
Select the top layer then press Ctrl+E several times until there are only two layers left.
2 responses to “Ray of Light”
-

Your technique made a vast difference in my book cover. I needed some visual impact and I added a strong light source using your technique. Now the image has come to life. Thank you!
-
Re your technique – vs your graphic. I assume you allowed the contrasts to stay the way they are, for the ‘visual,’ aspect of a newbie, to see. But in terms of the light source, the ‘ray tracing,’ the shadow on the woman behind, It does not look realistic, and the color variations, on the woman are strange,
If there is dust in the air, the rays might look as clean of edges as yours do. But the pic is very clear, and LIGHT IS INVISIBLE, UNTIL IT COMES IN CONTACT WITH AN OBJECT TO REFLECT OFF OF. In this case, it would be dust in the air..
There is a very nice and FREE little Photoshop plugin, called ‘Luce.’ At first, I did not get it, but I found ways to create some wonderful images. I did not use it as simple pre-set tool, but made layers, and reversed some of the EFx. Check it out. Here is another method, you might like.
Go on top of whatever image you need the ray, go to the ‘Shape’ tools, and use a rectangle, or whatever. Make sure the ‘COLOR’ of the RAY you need, is already in the color palette. If you need the light to expand, such as a SPOTLIGHT on a STAGE,, create the rectangle between the two objects; i.e. the light source, and its destination.. Make it smaller than the finished area. Go to the ‘DIRECT SELECTION TOOL, and grab the corners, and pull the shape to what shape your ray is to be. If you need additional tools to pull, or push the shape, go to the ‘Add Anchor Point tool, and put in the ‘dots’ where you need. When the shape is good, go to the ‘Gaussian’ Blur Filter, and watch a wonderful transformation. AFTER that, you can go to (immediate go, or the menu won’t be there as you need) Edit menu, ‘Fade Gaussian’ Blur, and you”ll get lost in the possibilities. “Also, you can go it it’s layer, control it’s opacity, and also use the ‘move tool, to make it a different scale, or size etc..
Leave a Reply to JoeyJoelCancel reply