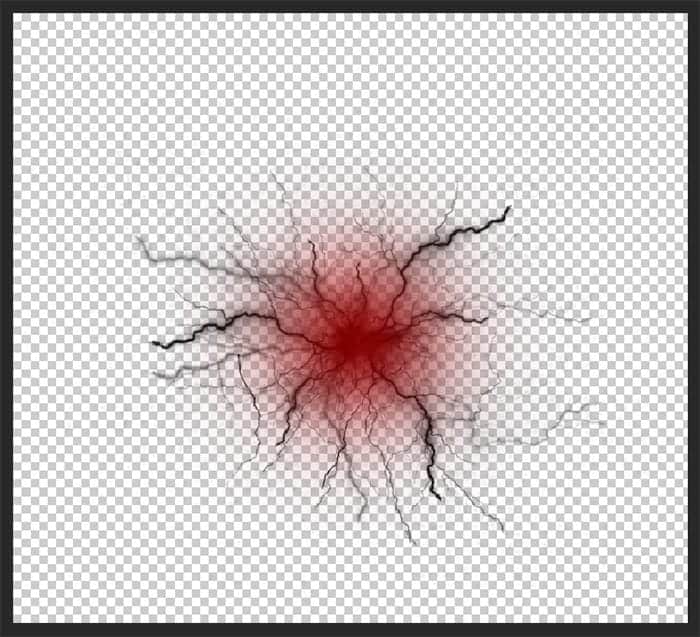

Take a soft brush (Size: 250px, Opacity: 50%, Hardness: 0%) and draw a point in place where center of all the lightning’s.

Step 22
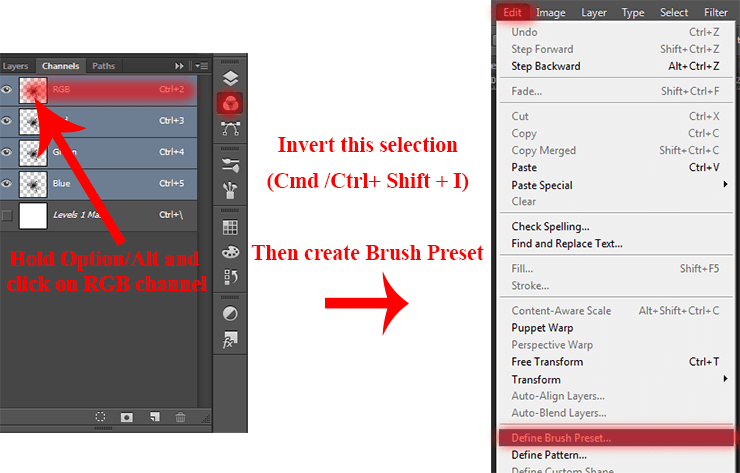
Now create a brush – spray. It gives the sparks effect of lightning’s. For the base, I take brush “Airbrush Soft Low Density Grainy” in the standard Photoshop brushes. Follow the images and create a brush. Do not forget to save the resulting brush! If you have another brush with a similar effect, you can use it, or add in this brush something else. This is just an example of creating.

Once you create it, set Size: 10px, Opacity: 10%, Hardness: 0% and draw it to lightning near the center and on the edges of lightning as shown. Draw black only.

Step 23
Go to Channels panel. Hold Option/Alt and click on RGB channel to select all. Invert this selection to select the entire brush (Cmd /Ctrl+ Shift + I). Now save it as Brush Preset (Edit > Define Brush Preset…). That’s it! Now on the Brushes panel you receive this brush.

Step 24
Draw, created brush, small explosions from lightning in spheres. Select your brush and on a new layer (this layer must be the uppermost), draw where lightning touch the ground with the spheres. Change the Size and Angle of the brush (Opacity 100%) to make it look realistic. The closer to the viewer, the more I did the size of the brush.

Step 25
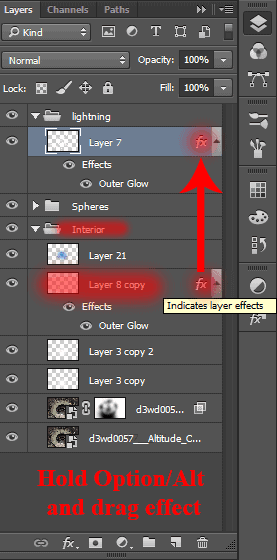
Merge all layers with lightning in one layer (select layers and use Cmd /Ctrl+ E or Layer > Merge Layers…). Now duplicate the glow effect with little lightning in the group “Interior” (Hold Option/Alt and drag effect).


Step 26
Duplicate this layer twice (Cmd /Ctrl+ J) and change the Blending mode of both layers on “Subtract”. These layers must be below the layer with lightning. Set the Opacity for each layer as shown in Figure.

Layer with Opacity: 15% need to Flip Horizontal (Edit> Transform> Flip Horizontal) that texture not look to the same type.

Step 27
Select both layers. Use the Free Transform tool (Cmd/Ctrl + T or Edit > Free Transform) to resize the layers larger than the size a working area. So we will create a larger texture in the picture. Similar to blood vessels of the eye or energy flows.
13 responses to “Omega – Create this Abstract Composite Using Only Three Resources”
-
where is the material??
-
where is the material?
-
amazing ideas and creativity
-
Absolutely beautiful works.. This is what called “Creativity”.
-
i really love this website!
-
thank you Maria Semelevich
-
Vry nyc
-
Thank you veru much! I am very pleased! :) I hope it will be helpful to you!
-
-
like
-
Thank you veru much! I am very pleased! :) I hope it will be helpful to you!
-
-
amazing…
-
Thank you veru much! I am very pleased! :) I hope it will be helpful to you!
-
wonderful!
-


Leave a Reply