Step 10
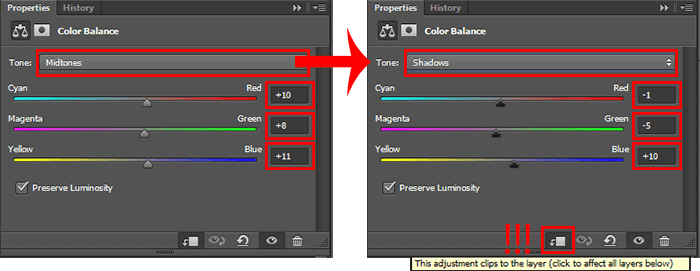
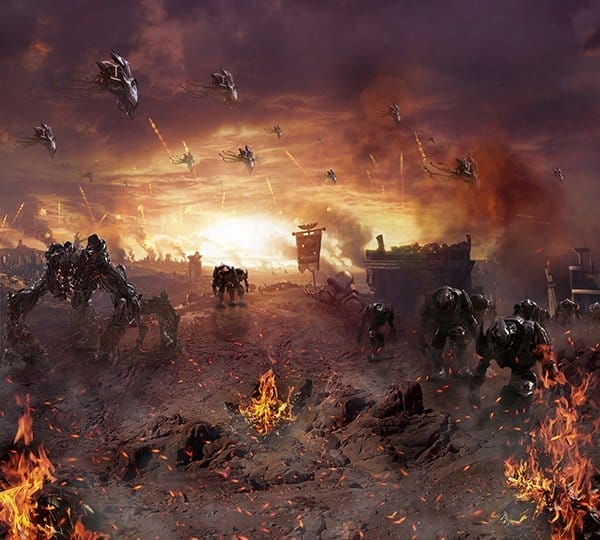
Here’s a result I got. You should have about the same. It is very important to achieve the right shade to the picture became united, and all the rest can then be added.


Step 11
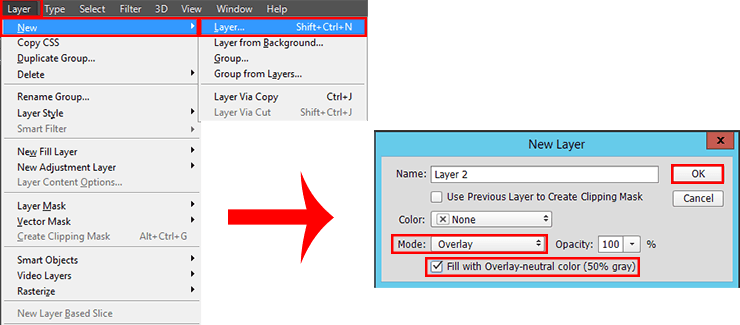
I decided to add lighting to the ground. Use Cmd/Ctrl + Shift + N to create new layer with neutral color. Set Mode: Overlay, check box on “Fill with Overlay-neutral color (50% gray)”. Neutral color – the color that doesn’t change the image in that blending mode (Overlay). So, it will help to make the desired effect without causing damage to the image.

Step 12
Use the Burn Tool (O) for create shadow and Dodge Tool (O) to create a light and shadow. Set the settings to each tool like shown in the image below.

Draw light and shadow, based on sunset light from the main picture. Do not do a contrasting shade too, otherwise texture will be strongly emphasized. Blue shows where to draw the shade, and red – the light. On Layer panel set Opacity: 77%.

Step 13
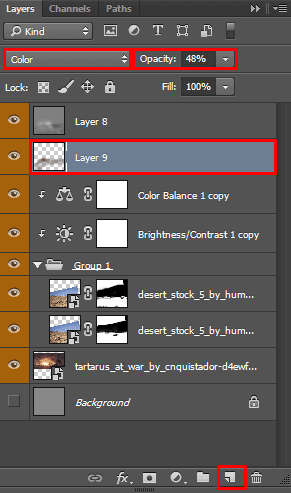
I painted places where should be the color of a sunset, to hide some place and associate the foreground with the main image. I create a new layer above adjustment layers, set Blending Mode “Color” and Opacity: 48%, then used Brush Tool (B) (Size: 250px, Opacity: 45%, Hardness: 0%) and Eyedropper Tool (I) (or hold Opt/Alt when use Brush Tool) I took the colors of the sky and the ground of the main image and painted over desert texture, but only on the seam line.


Step 14
When the ground is ready, I started to manipulate with sky. It was important to find the appropriate resource of sky to made realistic artwork and I could mix it with the main image. Go to File > Place (Place Embedded) and select image “Sunset_s4__Stock_Image_by_LemnosExplorer”. Increase the sky, so it was a bit more working area and place it in line with the skyline of the main image. To accurately do this simply associate the sea and the mountains in main image, so that they were roughly on the same line. (you can change the opacity to make it easier to work).

Step 15
Move the layer with the sky under the main image. To blend the sky add a layer mask to the main image. I will remove part of sky from main image to prevailed realistic pictures, not an artificial landscape. Take a Brush Tool (B) (Size: 450px, Opacity: 20-65%, Hardness: 0%) and carefully on layer mask remove the upper part of the image to get a smooth transition. Then try to leave and will integrate the cloud, which harmonize with the sky. The main thing is a smooth transition. Remove or leave but completely some yellow clouds and use the opacity to make the transition shades.
10 responses to “How to Create an Epic Scene of Alien Invasion in Photoshop”
-
boring :)
-
lol
-
hiii
-
-
Can we get the PSD thanks!
-
Great tutorial!
-
wowww amazing artwork kindly upload PSD file i am your big fan.
-
U should try it ??
U can download the app easily.. portable app -
????
-
gooddd
-
Very good!! Thank you for sharing


Leave a Reply