
Luminar AI lets you turn your ideas into reality with powerful, intelligent AI. Download the photo editor and see how you can completely transform your photos in a few clicks.
Step 7
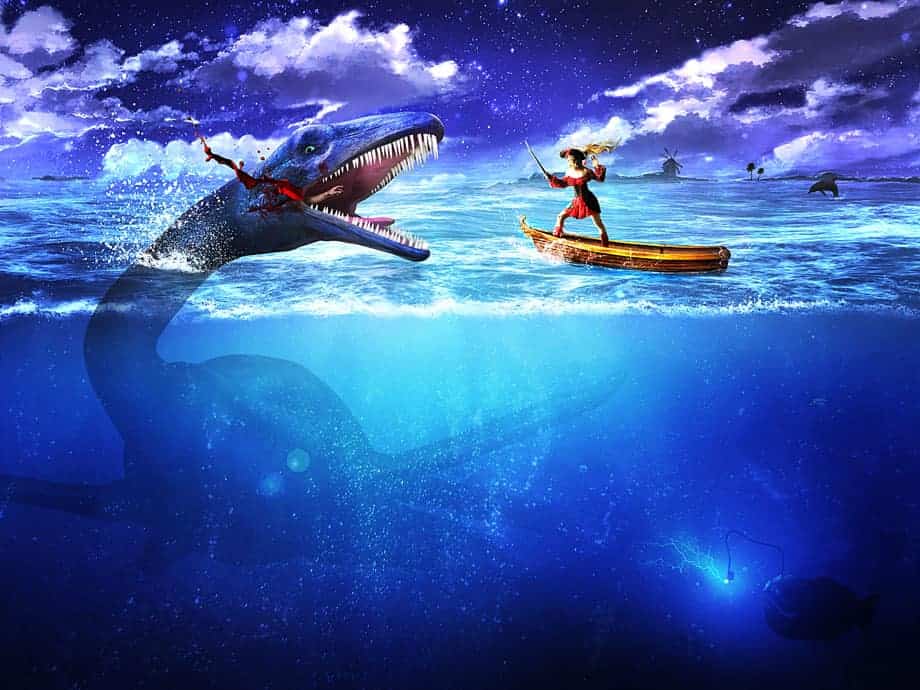
Open the image “Sea”. Make a selection of the sea surface with the Rectangular Marquee Tool and copy/paste into our scene. Add a layer mask and use the standard soft round brush to paint with black in the layer mask the horizon and the lower hard edge of the sea surface. Don’t forget about converting it to a smart object too.

Step 8
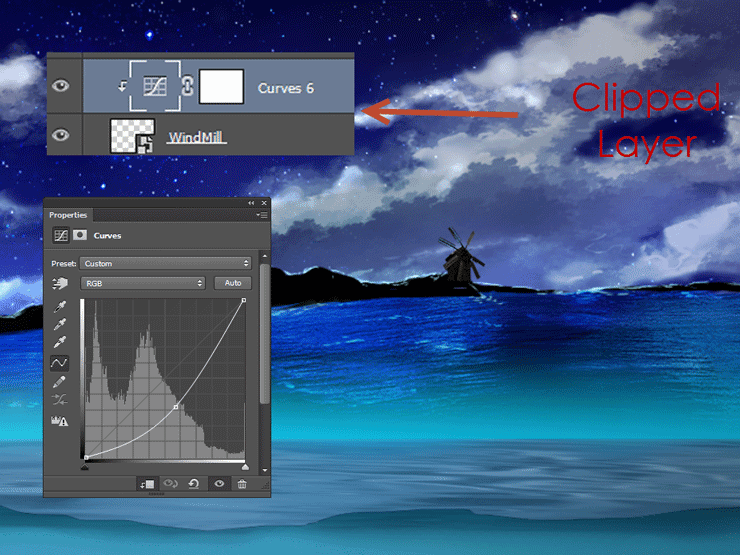
Create a Curves Adjustment Layer like shown below and clip it to the water surface layer. Drag the blue curve up and red curve down to color the water surface blue.
Often when importing objects they will look out of place because they have a different hue than the rest of the scene. When this happens you should color correct the imported object to fit with the rest of the scene by using a Curves Adjustment Layer or a Hue/Saturation Adjustment layer. There are no fixed recipes for this – the knowledge comes from lots of experience.
In our case the water surface has a warm hue (yellow/red) while our scene has a more cold one (blue/cyan). By dragging the red curve down in the Curves Adjustment Layer I lowered the amount of red. Dragging the blue and green curve up increased the amount of blue/magenta thus making the surface blend nicely with the rest of the scene.

Step 9
Create a new layer (Ctrl + Shift + Alt + N) and use one of the imported splash brushes to create some waves where the water surface meets the underwater. Use the Eraser Tool (E) to erase unwanted splash. Apply a subtle Color Overlay effect to blend it better with the water.
You can apply Shadows, Color Overlay and lots of other effects by double clicking a layer and opening the Blending Options screen. When working with smart objects double clicking will open the smart object in another window so don’t that – instead right click the smart object and from the drop down menu choose Blending Options.

Step 10
Create a new layer and with the standard chalk brush at 40% opacity paint a piece of distand land as shown below and place this layer below the water surface layer. Here’s how your layer palette should look like.
12 comments on “Create an Epic Pirate Sea Battle in Photoshop”
This is so awesome! Detailed tutorial, thank you!
Great! How to view this article..
Nice
oh! nice tutorial, thanks for the shared.
thx!
I've spent 3 days for this tut-techniques and I think (hope-) ) I've done something very good)
Omar EL-Midany wa7da b wa7da :P
اللهم صل عالنبي :D
تحوس انه نجم :v
The blood is too fake. It has a milky material and too much blood for merely a human.
wow nice work but the thing is that am new to this how can i get your article. i serious need to learn this, hope to hear from
An