Step 27
Then again Set the opacity and flow to 30 to 40% and paint on the stone like shown in the image below:.

Step 28
To match the color of the stone I applied a Hue/Saturation, set the hue to +16, saturation -66 and lightness to -49.Create clipping mask for this layer.

Step 29
Here is the result:.

Step 30
Place again the dark forest image but this time place it like shown below so, it can cover entire the canvas.

Step 31
Apply layer mask to this layer and set brush setting as we applied in step 25 & 26. Paint it as shown in the image

Step 32
Next I applied a Hue/Saturation adjustment layer with same setting applied in step 28.As you can see we blended the stones properly to our image.Create clipping mask for this layer also.

Step 33
I created the light rays. To do this grab the soft brush, hardness to 0% and opacity and flow to 30%. Choose the color #dfdf15 and paint as shown in the image.

Step 34
Then change the blend mode to soft light and opacity to 40%. Here is the result

Step 35
Now we have done with background, model and stones.It’s time for final adjustments. First applied the curves adjustment layer set it as shown below and reduce the opacity to 21%.

Step 36
Click on the layer mask and select the soft round brush then paint a dot on the layer mask shown in the image in the below.

Step 37
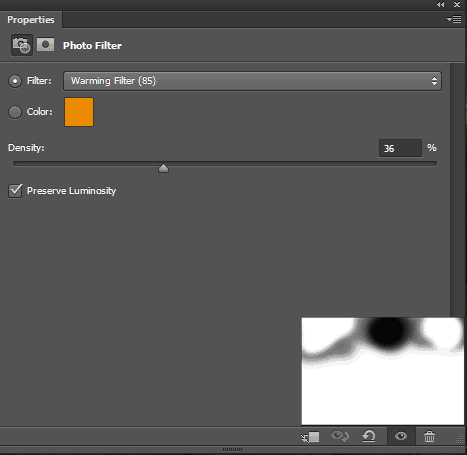
Let give the image a soft warming look by adding a photo filter adjustment,select the warming filter(85) and set the blend mode color, opacity to 51% and select the layer mask of photo filter adjustment layer choose a soft round brush with 100% opacity as well as flow and paint a dot on layer mask .

Here is the result.

Step 38
I added a gradient map adjustment layer to darken the bottom part of the image and highlight a bit in middle.Choose color #000000 for shadows and for highlight choose #9c5b07. Then change the blend mode to soft light and opacity to 20%.Grab the brush tool with 30% opacity & flow and paint on the layer of this adjustment layer as shown in the image.

Result after applying Gradient Map.

Step 39
Next I added a channel mixer adjustment layer. This layer is milestone of this manipulation because it converts our manipulation totally in a moon night scene. So add the channel mixer adjustment layer. Then select red channel and set blue to +2. Then select blue channel set the red to -11 and green to +44.
10 responses to “Create a Fantasy Moonlight Emotional Manipulation In Photoshop”
-
Thanks i enjoyed creating this on Photoshop.
-
Thank you!
-
This tutorial is perfect for making book covers. I’ll have to try it out! Thanks!
-
Nice
-
Thank you
-
nice work thanks.
-
awesome tone!thank you :D
-
wow! your working process is so nice……thanks for sharing………………
-
Bad link Foggy Night.zip
-
really very nice…..i am also using photoshop and it is very usefull to me ..


Leave a Reply