Turn any photo into a dot grid artwork with these Photoshop actions. You'll get great results with dots that change size. They get larger in brighter areas and smaller in darker areas. Free download available.
Preview of Final Results

Tutorial Resources
- Frozen Lake(background) - Arctic-stock
- Statue - SXC
- City - SXC
- Foggy Background - Darkdevil16
- Boat - SXC
- Frozen Lake 1 - Shinigami-stock
- Frozen Lake 2 - Shinigami-stock
- Iceberg 1 - Equinestockimages
- Iceberg 2 - Equinestockimages
- Iceberg 3 - Equinestockimages
- Iceberg Background - Equinestockimages
- Tree Snow Texture - Fenne-stock
- Snow 1 - Equinestockimages
- Snow 2 - Arctic-stock
- Snow 3 - Resurgere
- Snow 4 - Resurgere
- Icicles - Wonderdyke-Stock
- Mountain Cloud - Kuschelirmel-stock
Step 1
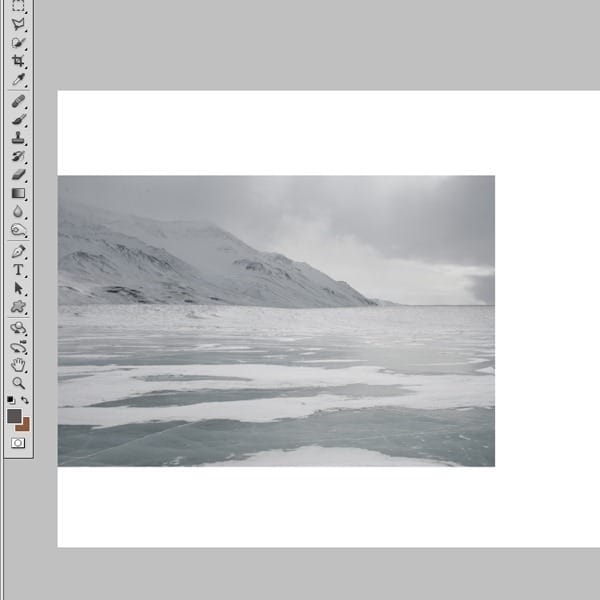
This tutorial is a bit long because we need to make all the images have the same color and contrast, but despite all that it is an easy tutorial and these techniques can be applied every time you want to create a winter photo manipulation. So, the first step is to create a new document and then drag in the frozen lake photo.
Step 2
Next, drag in the sky picture and place it in the upper left corner.
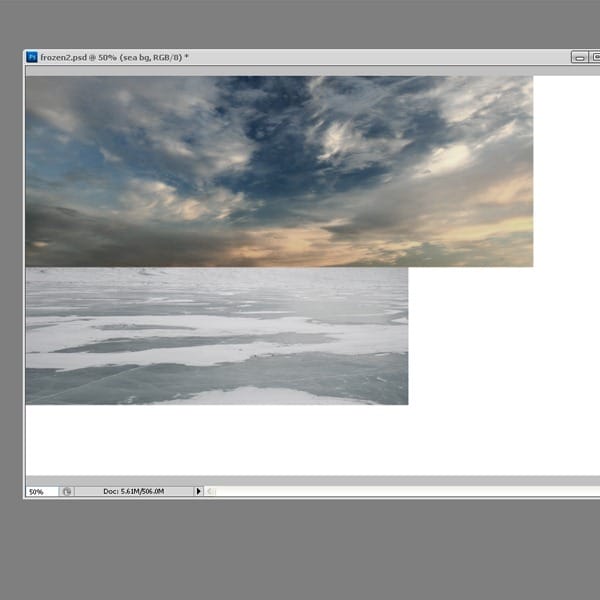
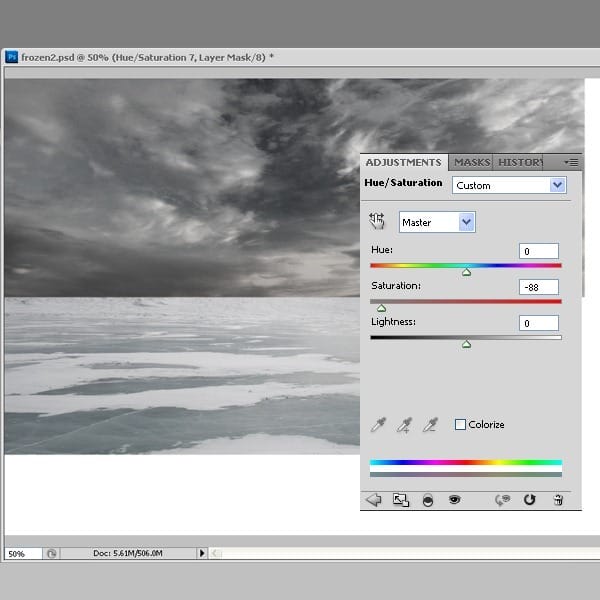
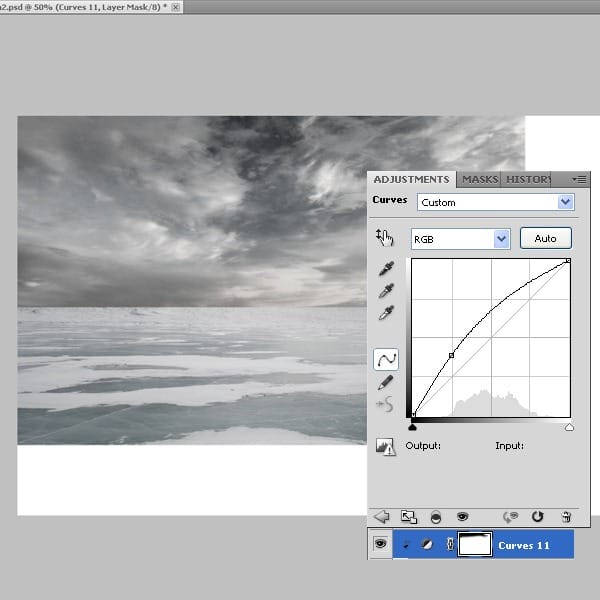
Now, as you can see the two pictures look like they don't belong with each other because they don't have the same colors, so we need to fix that. All the layers we will use for this process need to be clipped to the picture's layer, so they won't effect the other layers. Go to the Adjustment Layers-Hue/Saturation and desaturate the picture. Use the settings from the image below.
Next go to Adjustment Layers, select Curves and bring some light into the picture. Erase the upper part on the mask so it will remain a bit dark.
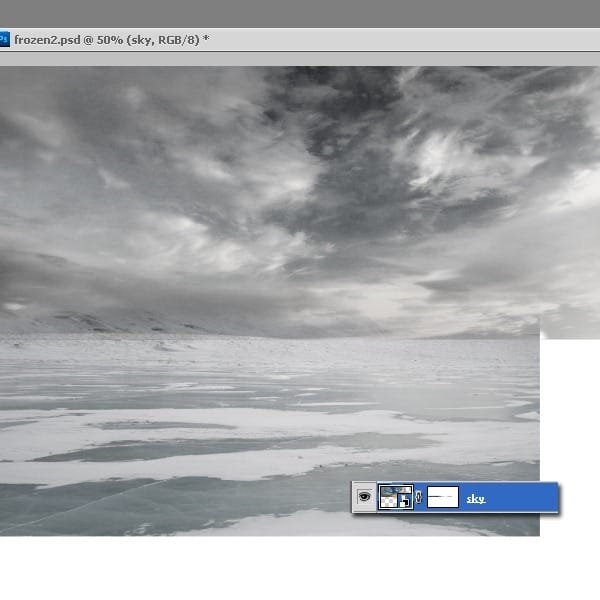
Now that the colors match we need to blend the images together. Create a mask on the sky's layer and with a brush erase the lower edge.
Step 3
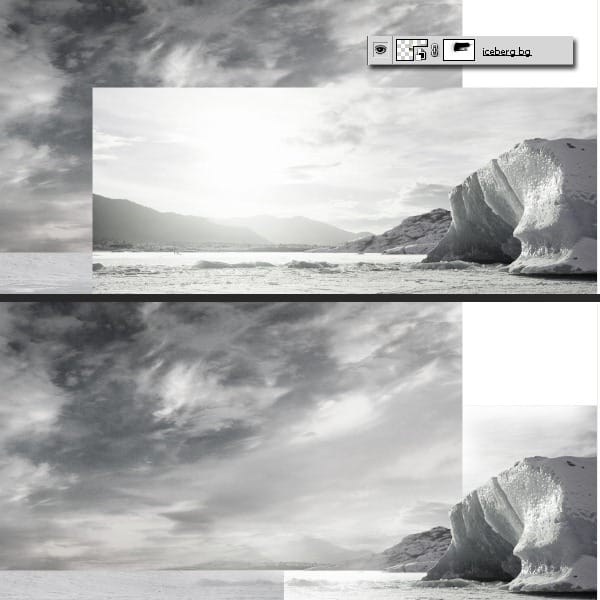
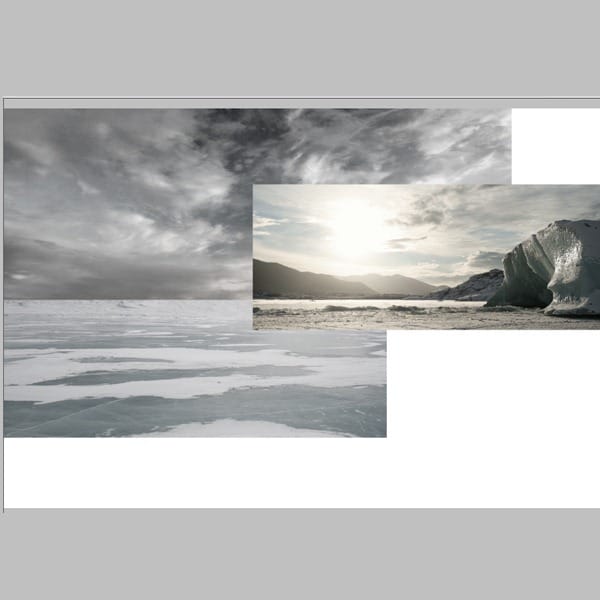
Open the Iceberg photo and place it like you see in the image. From this photo we will use only the mountains from the back.
As we did for the picture above, we will create a clipping mask and change the colors and contrast of the picture. Below are some screenshots of the adjustment layers that we will use, including all the presets. 1) Adjustment Layers-Hue/Saturation 2) Adjustment Layers-Curves
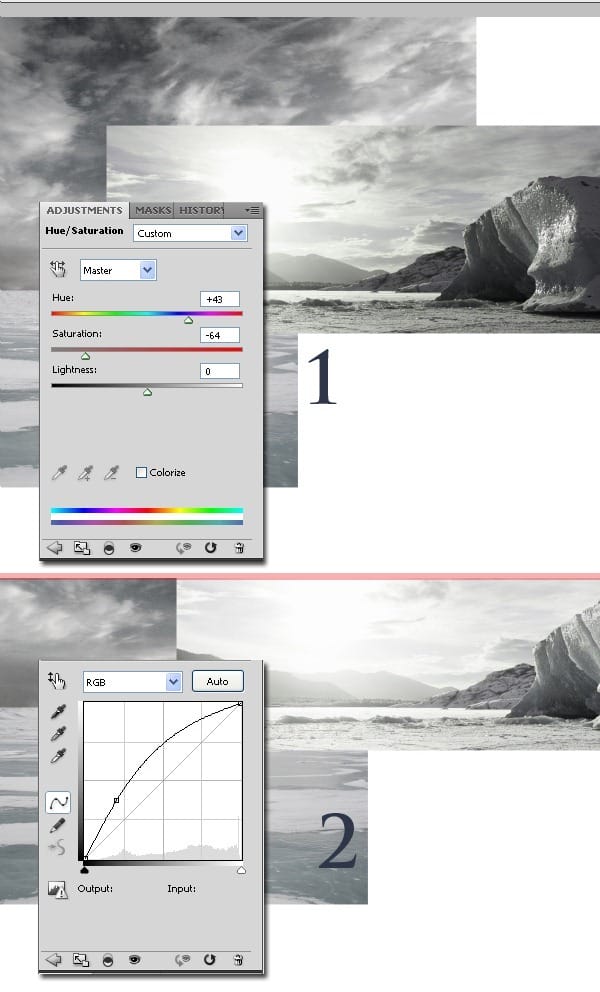
Blend in the image by erasing the edges on the layer's mask, with a brush.

Step 4
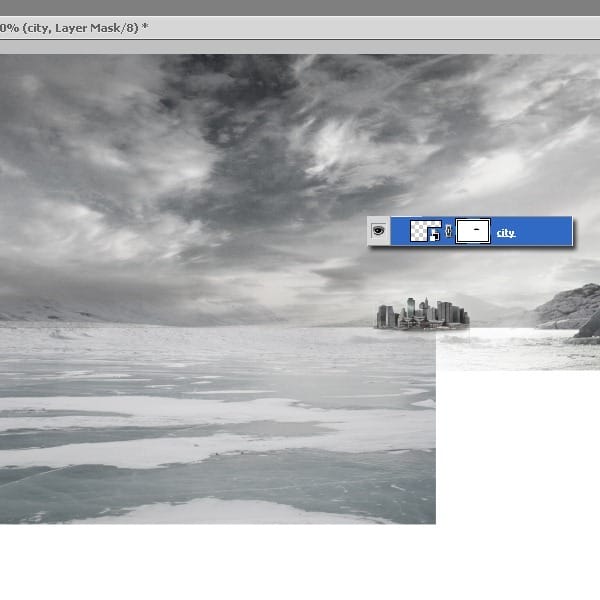
Open the city photo, resize it so it fits in the background. The image needs to be small so it will look far away. Create a mask and erase everything but the city. You can also cut it out with the pen tool.
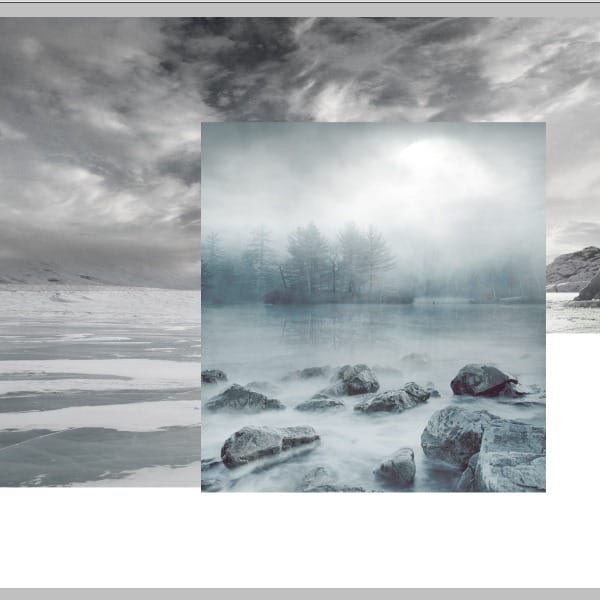
Now we need to make the city look frozen and a little foggy. So open the foggy image and place it above the city. 1) Clip it to the city's layer. 2) Switch the Blending Mode to Soft Light.

Next, add some frozen light, by creating a clipping mask with Curves.

Step 5
Open the frozen lake photo and place it in the lower left corner. Now let's add some light so the photo will blend in. Use Curves as a clipping mask. Delete the edges on the layer's mask.


Step 6
Open the other frozen lake photo and place it near the first one.

Next, we will do the same as we did for the pictures above, and this procedure is going to repeat itself for almost all the picture used in this tutorial, only the adjustment layers and the presets will be different, so use Levels and Curves as a clipping mask for the lake picture. After you complete this create a mask and erase the edges.


Step 7
Adjustment Layers-Color Balance. Use the settings below. In this step we will add a bit of cyan to the whole picture.

Step 8
In the next steps we will create the big iceberg in the background. This is made from 3 pictures of the same ice, but shoot from different angles. So open the first picture and place it like I did in the picture below.

We will repeat the same technique that we applied for the pictures above, so go to the Adjustment Layers-Curves to add some light to the picture. Next go to the Adjustment Layers-Hue/Saturation. Use both layers as a clipping mask. After you adjusted the colors delete everything but the ice, we don't need the background.

Step 9
Duplicate the iceberg's layer, with all the clipping masks, to preserve the colors, and flip it vertically. Now you see it looks symmetrical and it doesn't look natural because it's repeating itself, so we need to cut out with a pen tool some parts that are just too much.


Open the iceberg photography again, place it in the upper right corner and erase the parts that we don't need. Use Curves and Hue/Saturation with the presets made for the photo used above.


Step 10
In this step we will adjust the sky, because it looks too cloudy and we need a more calm sky to fit our work, so create a new layer and with the clone stamp tool (opacity 30%-40%) clone some parts of the sky that are lighter. I use the brush tool also, with smooth edges to fix some parts.

Step 11
Adjustment Layers-Color Balance. Use the settings below.

Step 12
Now we will continue to create the piece of ice in the background. Open the second picture of the ice and place it like I did, so it will fit the other part. Now we need to make the right color adjustments so it will blend in. Make the presets like you see in the images below. All these layers need to be clipped to the ice's layer. When you have the right tones, add a mask to the first layer leave only the small ice.

Adjustment Layers-Curves.

Adjustment Layers-Hue/Saturation.

Adjustment Layers-Levels.

Use the image below as a reference for how this should look like.

Step 13
This is the last part of the iceberg. So open the picture and place it at the end of the big chunk of ice. Use Curves to add some light to this picture. Erase the pictures background as you did for the other two before.


Step 14
Now let's put some snow in the picture, so open the first photography. Place it in lower right corner.

Use some Adjustment Layers, to fix the color differences, such as Color Balance, Curves, Hue/Saturation. Use the presets from the images below. Erase the edges so it will blend in.


Step 15
We will use a lot of snow pictures, because we will take only a small part from each. Open the next snow picture. Place it on top of the other one. Adjust the colors as we did for the other snow picture. You can find the presets in the images below. Next erase the edges.


Step 16
Cut out the statue (I used the pen tool). Place it on top of all the other layers. Add a mask and cover the lower part so it will look like the statue is sinking in the frozen water. Use the ice line to place the statue, see how it's matching the statue.


We need to adjust the colors of the statue, so use : Hue/Saturation, Curves and Color Balance. Use this Adjustment Layers as a clipping mask.


Step 17
In this step we will add the small boat. We are adding this because like this, the statue will look bigger by comparison. Place the boat on top of the snow in the right corner and cut it out.


Adjustment Layers-Hue/Saturation

Adjustment Layers-Curves

Adjustment Layers-Levels

Adjustment Layers-Gradient Map

Step 18
Now we will add some snow to the city and adjust some minor details with the clone stamp tool. Use the brush tool to add some snow. This is not so important because it's so small and it will be a bit blurry in the end but all the small details count.


This is how it should look at this point.

Step 19
In this step we will add some more snow around the Liberty Statue. Open this picture and place it in the back of the statue. Cover the edges. Switch the blending mode to screen.


Step 20
Open the same picture again, but now place it a bit to the right. Switch the blending mode to screen.


Use the Adjustment Layers shown below: Curves, Gradient Map (opacity about 25%) and Levels. Use this adjustment as a clipping mask.

Step 21
In this step we are still adding snow, so open the next picture and place it under the statue. Cover on the mask the unneeded parts.


Step 22
Now let's add some shadow to the statue. On a new layer, using the brush tool, create a shape like in the picture below and decrease it's opacity to 29%.


Step 23
At this point we have a good image but we need to focus on the small detail so I will add some snow at the statue's base. This is an easy procedure, just select the clone stamp tool and copy the snow from the right part. This must be done on a new layer under the one with the statue's shadow. Because of this the new created snow is going to be a bit dark. Use the Adjustment layers to correct that. You will find the presets below. (Hue/Saturation and Color Balance)


Now let's blend the snow: create a new layer on top of all and select the brush too. Paint on the snow with the colors you pick from the actual snow, by using the eyedropper tool. You can also use the clone stamp tool.

Step 24
We will now add some icicles. Get the Icicles stock file and start cutting out independent icicles. Using the pen tool cut a couple of icicles.

Step 25
Position the icicle on the hand and put that layer on Multiply and set the opacity to 50%

Duplicate the icicle layer (CTRL+J) and set the blending mode for the duplicated layer to Screen at 100% opacity.

Step 26
Group this two layers created at step 25 and duplicate the group a couple of times. Use Ctrl+T and make various transformations to the icicle until you have different size and shape icicles.

Arrange the icicles like in the image below.

Step 27
Duplicate some icicles and arrange them in a spiky formation to replace the fire.

Step 28
1) Cut another icicle from the Icicles stock photo and arrange it on the spike of the statue. 2) Set the blending mode to Screen. 3) Duplicate the this layer and leave the blending mode to Screen.

Group the two layers created above and duplicate this group. Transform this new group (CTRL+T) to make the icicle shorter and rotate it to fit exactly above the last spike on the right.

We will make this icicle look brighter. 1) Cut a group of icicles from our Icicles stock photo and position the icicle above the third spike from the right. 2) Set this layer to Overlay. 3) Duplicate this layer and set it on Screen.

1) Group the two layers (CTRL+G) created above and duplicate the group. Flip this icicle horizontally and make it smaller using transform. Position it on top of the fifth spike from the right. 2) On a new layer make a white line using a sharp edge brush and another softer one near it like in the image below. This will add extra light on the right side of the icicle. 3) Position this extra light layer near the edge of the spike.

1) Cut another icicle group from our Icicles stock photo and position this on top of the middle spike. 2) Set it on Screen. 3) Duplicate the layer and set it on Overlay. 4) Duplicate again and set it on Screen. 5) I made a strong white margin for this icicle as well, using a very thin sharp edge brush. 6) I positioned the white line on the edge of the spike.

For the sixth spike duplicate any other icicle you created above. This is how it should look so far.

Step 29
We will now create a glow around the spikes to make it seem like cold vapors are emanating from them. 1) Get the Mountain Cloud stock file 2) Double click this layer to open the Layer Style panel and modify the Blend If section like shown in the image below to mask out the darker pixels.

1) Set the blending mode to Screen. 2) Mask the image until you're only left with the edge of the clouds showing.

1) This is how the head looks without the cold vapors that give the ice a glow. 2) This is how it looks after I used the edge of the cloud to give it a glow. You can flip it, rotate it, drop the opacity, arrange them around the spikes like shown in the image below.

I also used de cloud edges around the ice spikes from the torch.

Step 30
1) Get the Icicles stock photo and cut the top part out. 2) Rotate it to have the same angle orientation like the hand of the statue.

1) Position the ice on the hand. 2) Duplicate the ice layer and use it to mask the entire hand.

Step 31
1) This is how the hand should look so far. 2) Add more icicles on the arm (you create them just like the ones you did for the hand).

Step 32
Add a gradient map using to colors shown below:

Step 33
We will create a texture that will give our work some dynamics to make it look like the freezing wind is blowing and leaving its mark on the environment. 1) Make a new Layer and fill it with this color - 2e3649. Make sure your foreground color is white and the background color is 2e3649. 2. Go to Filter/Render/Fiber… and in the Fiber panel enter the values below. You can use the Randomize function until you get something similar.

Rotate this texture in an angle similar to the one shown in the image below.

Set the Blending Mode to Soft Light.

Duplicate the layer created above to make sure it covers the whole image. On the masks of this files use a lower opacity normal brush (50%) and just mask away the places you think the texture shows too much.

Step 34
Go to the Adjustment Layers-Curves. Apply this adjustment to the entire layer.

Step 35
Go to the Adjustment Layers-Curves again but apply this only on a few parts that need to be darken. Use the image below as reference.

Step 36
We will create a brush to add snow particles. Go to Window and select Brush. In the Brush Panel use the settings below:


Step 37
Use the brush created in the previous step and add some particles with lowered opacity to the icicles like in the image below.

Step 38
Go to the Adjustment Layers-Curves. Use the settings below.

Step 39
Go to the Adjustment Layers-Curves. Use the settings below.

Step 40
Go to the Adjustment Layers-Gradient map. We need this to change, just a bit the colors, to make them colder. Set the opacity to 33%.

Step 41
Go to the Adjustment Layers-Curves again, but this time apply it on the upper left corner, just to make it a bit darker.

Step 42
In this step we will make the city in the back look out of focus, to give the whole picture more depth, so go to Filters-Blur-Gaussian Blur (4-5%). Use this filter only on the city.

Step 43
On the top layer press CTRL+ALT+SHIFT+E to stamp the visible layers. Next go to Filters-Other-High Pass. Set the Layer's Blending Mode to Hard Light and the opacity to 90%.

Step 44
Go to the Adjustment Layers-Photo Filter.

Step 45
Adjustment Layers-Hue/Saturation. Make the presets like you see in the image below.

Step 46
At this point our work is almost complete, we just need to add the text. Write the text with a simple font using white color and duplicate the layer. On the duplicated layer go to Filter-Blur-Motion blur and use the biggest distance. If you think this is too much you can use a smaller distance also.

Final Results
![final-results[1]](https://cdn.photoshoptutorials.ws/wp-content/uploads/2012/06/Frozen-Landscape-1024x680.jpg?strip=all&lossy=1&quality=70&webp=70&avif=70&ssl=1)
Download the PSD
Earth Goddess Photoshop Tutorial
Resources
- Frozen Lake(background) - Arctic-stock
- Statue - SXC
- City - SXC
- Foggy Background - Darkdevil16
- Boat - SXC
- Frozen Lake 1 - Shinigami-stock
- Frozen Lake 2 - Shinigami-stock
- Iceberg 1 - Equinestockimages
- Iceberg 2 - Equinestockimages
- Iceberg 3 - Equinestockimages
- Iceberg Background - Equinestockimages
- Tree Snow Texture - Fenne-stock
- Snow 1 - Equinestockimages
- Snow 2 - Arctic-stock
- Snow 3 - Resurgere
- Snow 4 - Resurgere
- Icicles - Wonderdyke-Stock
- Mountain Cloud - Kuschelirmel-stock
Step 1
This tutorial is a bit long because we need to make all the images have the same color and contrast, but despite all that it is an easy tutorial and these techniques can be applied every time you want to create a winter photo manipulation. So, the first step is to create a new document and then drag in the frozen lake photo.

Step 2
Next, drag in the sky picture and place it in the upper left corner.

Now, as you can see the two pictures look like they don't belong with each other because they don't have the same colors, so we need to fix that. All the layers we will use for this process need to be clipped to the picture's layer, so they won't effect the other layers. Go to the Adjustment Layers-Hue/Saturation and desaturate the picture. Use the settings from the image below.

Next go to Adjustment Layers, select Curves and bring some light into the picture. Erase the upper part on the mask so it will remain a bit dark.

Now that the colors match we need to blend the images together. Create a mask on the sky's layer and with a brush erase the lower edge.

Step 3
Open the Iceberg photo and place it like you see in the image. From this photo we will use only the mountains from the back.

As we did for the picture above, we will create a clipping mask and change the colors and contrast of the picture. Below are some screenshots of the adjustment layers that we will use, including all the presets. 1) Adjustment Layers-Hue/Saturation 2) Adjustment Layers-Curves

Blend in the image by erasing the edges on the layer's mask, with a brush.

Step 4
Open the city photo, resize it so it fits in the background. The image needs to be small so it will look far away. Create a mask and erase everything but the city. You can also cut it out with the pen tool.

Now we need to make the city look frozen and a little foggy. So open the foggy image and place it above the city. 1) Clip it to the city's layer. 2) Switch the Blending Mode to Soft Light.
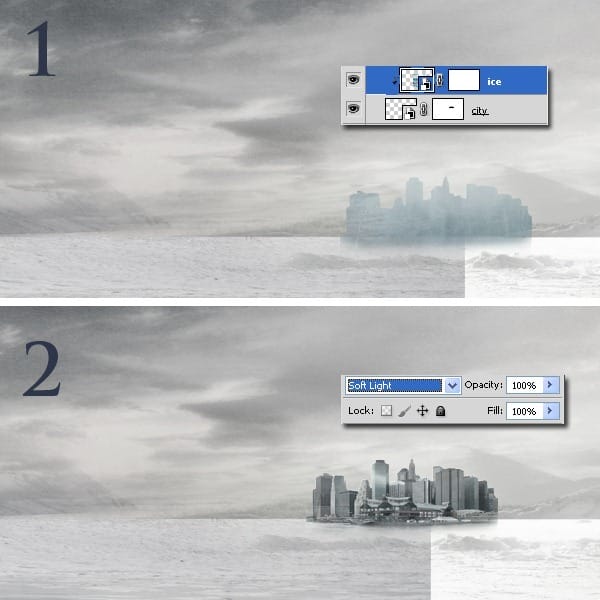

Next, add some frozen light, by creating a clipping mask with Curves.

Step 5
Open the frozen lake photo and place it in the lower left corner. Now let's add some light so the photo will blend in. Use Curves as a clipping mask. Delete the edges on the layer's mask.


Step 6
Open the other frozen lake photo and place it near the first one.

Next, we will do the same as we did for the pictures above, and this procedure is going to repeat itself for almost all the picture used in this tutorial, only the adjustment layers and the presets will be different, so use Levels and Curves as a clipping mask for the lake picture. After you complete this create a mask and erase the edges.


Step 7
Adjustment Layers-Color Balance. Use the settings below. In this step we will add a bit of cyan to the whole picture.

Step 8
In the next steps we will create the big iceberg in the background. This is made from 3 pictures of the same ice, but shoot from different angles. So open the first picture and place it like I did in the picture below.

We will repeat the same technique that we applied for the pictures above, so go to the Adjustment Layers-Curves to add some light to the picture. Next go to the Adjustment Layers-Hue/Saturation. Use both layers as a clipping mask. After you adjusted the colors delete everything but the ice, we don't need the background.

Step 9
Duplicate the iceberg's layer, with all the clipping masks, to preserve the colors, and flip it vertically. Now you see it looks symmetrical and it doesn't look natural because it's repeating itself, so we need to cut out with a pen tool some parts that are just too much.


Open the iceberg photography again, place it in the upper right corner and erase the parts that we don't need. Use Curves and Hue/Saturation with the presets made for the photo used above.


Step 10
In this step we will adjust the sky, because it looks too cloudy and we need a more calm sky to fit our work, so create a new layer and with the clone stamp tool (opacity 30%-40%) clone some parts of the sky that are lighter. I use the brush tool also, with smooth edges to fix some parts.

Step 11
Adjustment Layers-Color Balance. Use the settings below.

Step 12
Now we will continue to create the piece of ice in the background. Open the second picture of the ice and place it like I did, so it will fit the other part. Now we need to make the right color adjustments so it will blend in. Make the presets like you see in the images below. All these layers need to be clipped to the ice's layer. When you have the right tones, add a mask to the first layer leave only the small ice.

Adjustment Layers-Curves.

Adjustment Layers-Hue/Saturation.

Adjustment Layers-Levels.

Use the image below as a reference for how this should look like.

Step 13
This is the last part of the iceberg. So open the picture and place it at the end of the big chunk of ice. Use Curves to add some light to this picture. Erase the pictures background as you did for the other two before.


Step 14
Now let's put some snow in the picture, so open the first photography. Place it in lower right corner.

Use some Adjustment Layers, to fix the color differences, such as Color Balance, Curves, Hue/Saturation. Use the presets from the images below. Erase the edges so it will blend in.


Step 15
We will use a lot of snow pictures, because we will take only a small part from each. Open the next snow picture. Place it on top of the other one. Adjust the colors as we did for the other snow picture. You can find the presets in the images below. Next erase the edges.


Step 16
Cut out the statue (I used the pen tool). Place it on top of all the other layers. Add a mask and cover the lower part so it will look like the statue is sinking in the frozen water. Use the ice line to place the statue, see how it's matching the statue.


We need to adjust the colors of the statue, so use : Hue/Saturation, Curves and Color Balance. Use this Adjustment Layers as a clipping mask.


Step 17
In this step we will add the small boat. We are adding this because like this, the statue will look bigger by comparison. Place the boat on top of the snow in the right corner and cut it out.


Adjustment Layers-Hue/Saturation

Adjustment Layers-Curves

Adjustment Layers-Levels

Adjustment Layers-Gradient Map

Step 18
Now we will add some snow to the city and adjust some minor details with the clone stamp tool. Use the brush tool to add some snow. This is not so important because it's so small and it will be a bit blurry in the end but all the small details count.


This is how it should look at this point.

Step 19
In this step we will add some more snow around the Liberty Statue. Open this picture and place it in the back of the statue. Cover the edges. Switch the blending mode to screen.


Step 20
Open the same picture again, but now place it a bit to the right. Switch the blending mode to screen.


Use the Adjustment Layers shown below: Curves, Gradient Map (opacity about 25%) and Levels. Use this adjustment as a clipping mask.

Step 21
In this step we are still adding snow, so open the next picture and place it under the statue. Cover on the mask the unneeded parts.


Step 22
Now let's add some shadow to the statue. On a new layer, using the brush tool, create a shape like in the picture below and decrease it's opacity to 29%.


Step 23
At this point we have a good image but we need to focus on the small detail so I will add some snow at the statue's base. This is an easy procedure, just select the clone stamp tool and copy the snow from the right part. This must be done on a new layer under the one with the statue's shadow. Because of this the new created snow is going to be a bit dark. Use the Adjustment layers to correct that. You will find the presets below. (Hue/Saturation and Color Balance)


Now let's blend the snow: create a new layer on top of all and select the brush too. Paint on the snow with the colors you pick from the actual snow, by using the eyedropper tool. You can also use the clone stamp tool.

Step 24
We will now add some icicles. Get the Icicles stock file and start cutting out independent icicles. Using the pen tool cut a couple of icicles.

Step 25
Position the icicle on the hand and put that layer on Multiply and set the opacity to 50%

Duplicate the icicle layer (CTRL+J) and set the blending mode for the duplicated layer to Screen at 100% opacity.

Step 26
Group this two layers created at step 25 and duplicate the group a couple of times. Use Ctrl+T and make various transformations to the icicle until you have different size and shape icicles.

Arrange the icicles like in the image below.

Step 27
Duplicate some icicles and arrange them in a spiky formation to replace the fire.

Step 28
1) Cut another icicle from the Icicles stock photo and arrange it on the spike of the statue. 2) Set the blending mode to Screen. 3) Duplicate the this layer and leave the blending mode to Screen.

Group the two layers created above and duplicate this group. Transform this new group (CTRL+T) to make the icicle shorter and rotate it to fit exactly above the last spike on the right.

We will make this icicle look brighter. 1) Cut a group of icicles from our Icicles stock photo and position the icicle above the third spike from the right. 2) Set this layer to Overlay. 3) Duplicate this layer and set it on Screen.

1) Group the two layers (CTRL+G) created above and duplicate the group. Flip this icicle horizontally and make it smaller using transform. Position it on top of the fifth spike from the right. 2) On a new layer make a white line using a sharp edge brush and another softer one near it like in the image below. This will add extra light on the right side of the icicle. 3) Position this extra light layer near the edge of the spike.

1) Cut another icicle group from our Icicles stock photo and position this on top of the middle spike. 2) Set it on Screen. 3) Duplicate the layer and set it on Overlay. 4) Duplicate again and set it on Screen. 5) I made a strong white margin for this icicle as well, using a very thin sharp edge brush. 6) I positioned the white line on the edge of the spike.

For the sixth spike duplicate any other icicle you created above. This is how it should look so far.

Step 29
We will now create a glow around the spikes to make it seem like cold vapors are emanating from them. 1) Get the Mountain Cloud stock file 2) Double click this layer to open the Layer Style panel and modify the Blend If section like shown in the image below to mask out the darker pixels.

1) Set the blending mode to Screen. 2) Mask the image until you're only left with the edge of the clouds showing.

1) This is how the head looks without the cold vapors that give the ice a glow. 2) This is how it looks after I used the edge of the cloud to give it a glow. You can flip it, rotate it, drop the opacity, arrange them around the spikes like shown in the image below.

I also used de cloud edges around the ice spikes from the torch.

Step 30
1) Get the Icicles stock photo and cut the top part out. 2) Rotate it to have the same angle orientation like the hand of the statue.

1) Position the ice on the hand. 2) Duplicate the ice layer and use it to mask the entire hand.

Step 31
1) This is how the hand should look so far. 2) Add more icicles on the arm (you create them just like the ones you did for the hand).

Step 32
Add a gradient map using to colors shown below:

Step 33
We will create a texture that will give our work some dynamics to make it look like the freezing wind is blowing and leaving its mark on the environment. 1) Make a new Layer and fill it with this color - 2e3649. Make sure your foreground color is white and the background color is 2e3649. 2. Go to Filter/Render/Fiber… and in the Fiber panel enter the values below. You can use the Randomize function until you get something similar.

Rotate this texture in an angle similar to the one shown in the image below.

Set the Blending Mode to Soft Light.

Duplicate the layer created above to make sure it covers the whole image. On the masks of this files use a lower opacity normal brush (50%) and just mask away the places you think the texture shows too much.

Step 34
Go to the Adjustment Layers-Curves. Apply this adjustment to the entire layer.

Step 35
Go to the Adjustment Layers-Curves again but apply this only on a few parts that need to be darken. Use the image below as reference.

Step 36
We will create a brush to add snow particles. Go to Window and select Brush. In the Brush Panel use the settings below:


Step 37
Use the brush created in the previous step and add some particles with lowered opacity to the icicles like in the image below.

Step 38
Go to the Adjustment Layers-Curves. Use the settings below.

Step 39
Go to the Adjustment Layers-Curves. Use the settings below.

Step 40
Go to the Adjustment Layers-Gradient map. We need this to change, just a bit the colors, to make them colder. Set the opacity to 33%.

Step 41
Go to the Adjustment Layers-Curves again, but this time apply it on the upper left corner, just to make it a bit darker.

Step 42
In this step we will make the city in the back look out of focus, to give the whole picture more depth, so go to Filters-Blur-Gaussian Blur (4-5%). Use this filter only on the city.

Step 43
On the top layer press CTRL+ALT+SHIFT+E to stamp the visible layers. Next go to Filters-Other-High Pass. Set the Layer's Blending Mode to Hard Light and the opacity to 90%.

Step 44
Go to the Adjustment Layers-Photo Filter.

Step 45
Adjustment Layers-Hue/Saturation. Make the presets like you see in the image below.

Step 46
At this point our work is almost complete, we just need to add the text. Write the text with a simple font using white color and duplicate the layer. On the duplicated layer go to Filter-Blur-Motion blur and use the biggest distance. If you think this is too much you can use a smaller distance also.

Final Results
![final-results[1]](https://cdn.photoshoptutorials.ws/wp-content/uploads/2012/06/Frozen-Landscape-1024x680.jpg?strip=all&lossy=1&quality=70&webp=70&avif=70&ssl=1)
4 comments on “Create a Frozen Scene Inspired by "The Day After Tomorrow"”
Beautiful, creative and acutely enjoy able!
was keen to do this tutorial but some of the stock files are missing :(
FANTASTIC!!! :)
Wheres the Sky stock image??