Rename the mountains layer to “Mountains”(really original huh).

And here is the result of adding the mountains to our scene:

Step 7: Few adjustments
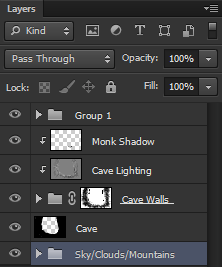
Before we continue, let’s do some adjustments to our workspace. First, select the monk layer and the two layers above it and make a new group with them.

Then open the Sky/Clouds group and drag the Mountains layer inside it. Make sure that it is the top layer inside the group.

Now rename this group to Sky/Clouds/Mountains so we don’t get lost later.

There’s a weird spot close to our cave where the clouds are really white, let’s fix that now. Double click the Cloud 2 layer to make changes to that smart object.

Now select the Clone Stamp Tool (Shortcut S) and follow the instructions on the image below:
· To clone parts of an image hold Alt/Opt and left click in the area you want to use
· To paste the areas you cloned into new areas simply let go of Alt/Opt and left click in the new area


Here is the result:

And here is what our image should be looking like without that weird bright cloud in the corner:

Last but not least, rename the group we created in the beginning of this step to Monk.

Step 8: Adding the planet
Go to File -> Place and select the planet stock.

Now select the Eliptical Marquee Tool (Shortcut M) and create a perfect circle in the planet that it’s on the front. To create a perfect circle simply hold Shift while creating the ellipse.


Then create a new layer mask in this layer to hide everything else but the planet.

Hit Ctrl/Cmd+T (or Edit->Free Transform) to resize and replace the planet in our image.

Now double click the planet layer (double click somewhere around the name of the layer). Add a Inner Glow style to this layer, with the following settings:


Here is the result in our planet:

And this is how your layers panel should be looking like:

Step 9: Adding some ropes
In this step we’re going to add the ropes that will surround our planet in the shape of a 3D cube. Before we start adding the ropes, we need to add the shape of a 3D cube so we can work around it.
Open the 3D cube psd file in photoshop, and select the “spine highlights” group. With this group selected, hit Ctrl/Cmd+Alt/Opt+Shift+E to create a new layer in the file with all the previous layers merged. This is what your layers panel should be looking like:
29 responses to “Create a Surreal Photo Manipulation of a Monk in the Caves”
-
Good job Awesome work
-
u’re wron
-
-
Beautifully done.
-
Love this TUT! it took me a couple of hours but well worth the end result. Great job!
-
Please re uploaded PSD file because when i click on download showing 404 error, this is best work for me i want check how did you do this
-
Thanks a lot, I learn a lot form this tutorrials
-
Wow. Thank you for sharing this experience with us………..and for the challenge.
-
Thanks for this great tutorial. One of the best I found so far. But I do have a question, since one step doesn’t work out like it should. I have finished the cave and put the layers in a Group Folder as the tutorial says. The next step would be the cave lighting layer. But when I try to create it, Photoshop won’t let me add a clipping mask. For some reason it won’t do that above a group folder. To help myself I merged all cave layers into one, that way it works, but of course I can’t change any details now, which is a bit annoying. I would be glad if you or someone else could tell me what I’ve been doing wrong. I use Photoshop CS4.
-
Hey man. Thank you so much for this awesome tutorial; thanks for being so specifici with everything. Here is what I did following your instructions, hope you like it:
Regards from Mexico.
-
Excellent tutorial! I can’t believe I did it! Thank you for such perfect instructions! I learned a lot!
-
nice
-
Very nice examples. Thanks.
-
i love u jerry
muawwwwww!!!!!!!!!!!!!!!!!!!!!!!!!!!!!!!!!!!!!!!!!!!!!!!
tzup@x!!!!!!!!!!!!!!!!!!!!!!!!!!!!!!!!!!!!!!!!!!!!!!!!! -
Oh great! Thank you.
-
Great tutorial =)
Thanks a lot !Here’s my try : http://gohusdesign.com/surreal.html (in the bottom of the page)
-
Thanks Man, Good tutorial it really help with some techniques i already knew and did know :P Thanks!
-
Great tutorial. I loved it, and my end result turned out really well. I learned a tonne about layer masks so thank you :D
-
This worked ! Could do it as a beginner. Neat description. Great tutorials.Thank you!
-
A bit cheating with the cube but it works. Proper way is to create a cube with isometric transforms.
-
<3 <3 <3
I love your tuts!! -
AWESOME
-
Thank you for your tutoring.I am very appreciate your time.
Wish you and your family have wonderful weekend.
-
Awesome tutorial…keep them coming..Thanks
-
Terrific tutorials, as ALWAYS!
And trust me, a lot of users see your tutorials, even if they don’t leave feedback.
Thanks, as always!
-
I always learn something from the great Photoshop Tutorials here.
-
On the part where you pick random parts from the island, you should have placed the layer inside the main PSD & use layer masks. Duplicate layer, paint in layer mask, repeat.
-
Better vextor mask to cut out than layer mask to fading edge
-
-
One of the best tutorials- very detailed. Thanks a lot.
-
Awesome work!!!!


Leave a Reply