
This is the result:

Add a Selective Color adjustment layer so we can adjust all the colors of our image at once. On the properties panel, use the following settings in each of the Colors:


The result should be something like this:

Let’s create a new layer with all of our previous layers merged. To do that, hit Ctrl/Cmd+Alt/Opt+Shift+E. Set the blending mode of this layer to Screen, and reduce the opacity to 15%.

Now with this layer selected, go to Filter->Blur->Gaussian Blur and select a Radius of 80px.


The result should be this dreamy effect:

Duplicate the layer we just created by dragging it to the Create New Layer button or by pressing Ctrl/Cmd+J. Set the blending mode of this new layer to Soft Light and set the opacity to 25%.

Here’s the result:

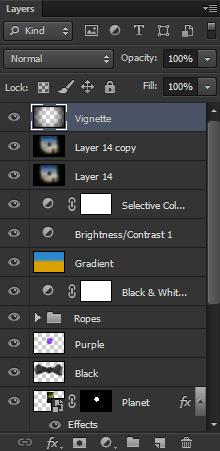
Now create a new layer by pressing the Create New Layer button (or Ctrl/Cmd+Shift+N) and name it Vignette. Place it above all the other layers.

Press D to make sure that black is your foreground color, and then hit Alt/Opt+Del to fill your whole screen with black.

Get the Eraser Tool (Shortcut E), set the size to 2000px, and start erasing the center of our image to create a nice vignette effect to it.


Here’s how your layers should be looking like:

Create a new layer again (Ctrl/Cmd+Shift+N), name it Lens Flare, set the blending mode to Screen and make sure that it is on the top of the layer stack.

Now go to Filter -> Render -> Lens Flare and try to create something like shown on the image below. Remember to select Movie Prime and set the Brightness to 100%.


This should be the result:

Now add a layer mask to that image and hide some of the Lens Flare using the Brush Tool (Shortcut B) with black.


This is the result:

Now for the textures, go to File -> Place and chose Texture 1. Set the blending mode to Overlay and the Opacity to 25%.


This is the result we get:

And for the second and final texture, go again to File -> Place and chose Texture 2. Rotate it (just like when using the Free Transform Tool) and resize it to fit our whole canvas.
29 responses to “Create a Surreal Photo Manipulation of a Monk in the Caves”
-
Good job Awesome work
-
u’re wron
-
-
Beautifully done.
-
Love this TUT! it took me a couple of hours but well worth the end result. Great job!
-
Please re uploaded PSD file because when i click on download showing 404 error, this is best work for me i want check how did you do this
-
Thanks a lot, I learn a lot form this tutorrials
-
Wow. Thank you for sharing this experience with us………..and for the challenge.
-
Thanks for this great tutorial. One of the best I found so far. But I do have a question, since one step doesn’t work out like it should. I have finished the cave and put the layers in a Group Folder as the tutorial says. The next step would be the cave lighting layer. But when I try to create it, Photoshop won’t let me add a clipping mask. For some reason it won’t do that above a group folder. To help myself I merged all cave layers into one, that way it works, but of course I can’t change any details now, which is a bit annoying. I would be glad if you or someone else could tell me what I’ve been doing wrong. I use Photoshop CS4.
-
Hey man. Thank you so much for this awesome tutorial; thanks for being so specifici with everything. Here is what I did following your instructions, hope you like it:
Regards from Mexico.
-
Excellent tutorial! I can’t believe I did it! Thank you for such perfect instructions! I learned a lot!
-
nice
-
Very nice examples. Thanks.
-
i love u jerry
muawwwwww!!!!!!!!!!!!!!!!!!!!!!!!!!!!!!!!!!!!!!!!!!!!!!!
tzup@x!!!!!!!!!!!!!!!!!!!!!!!!!!!!!!!!!!!!!!!!!!!!!!!!! -
Oh great! Thank you.
-
Great tutorial =)
Thanks a lot !Here’s my try : http://gohusdesign.com/surreal.html (in the bottom of the page)
-
Thanks Man, Good tutorial it really help with some techniques i already knew and did know :P Thanks!
-
Great tutorial. I loved it, and my end result turned out really well. I learned a tonne about layer masks so thank you :D
-
This worked ! Could do it as a beginner. Neat description. Great tutorials.Thank you!
-
A bit cheating with the cube but it works. Proper way is to create a cube with isometric transforms.
-
<3 <3 <3
I love your tuts!! -
AWESOME
-
Thank you for your tutoring.I am very appreciate your time.
Wish you and your family have wonderful weekend.
-
Awesome tutorial…keep them coming..Thanks
-
Terrific tutorials, as ALWAYS!
And trust me, a lot of users see your tutorials, even if they don’t leave feedback.
Thanks, as always!
-
I always learn something from the great Photoshop Tutorials here.
-
On the part where you pick random parts from the island, you should have placed the layer inside the main PSD & use layer masks. Duplicate layer, paint in layer mask, repeat.
-
Better vextor mask to cut out than layer mask to fading edge
-
-
One of the best tutorials- very detailed. Thanks a lot.
-
Awesome work!!!!


Leave a Reply